GDC SX-3000 User Manual Download Page 41

- 41 -  

2. SMS 

February 14, 2013 


SX-3000 Standalone 

Integrated Media Block™ User Manual 


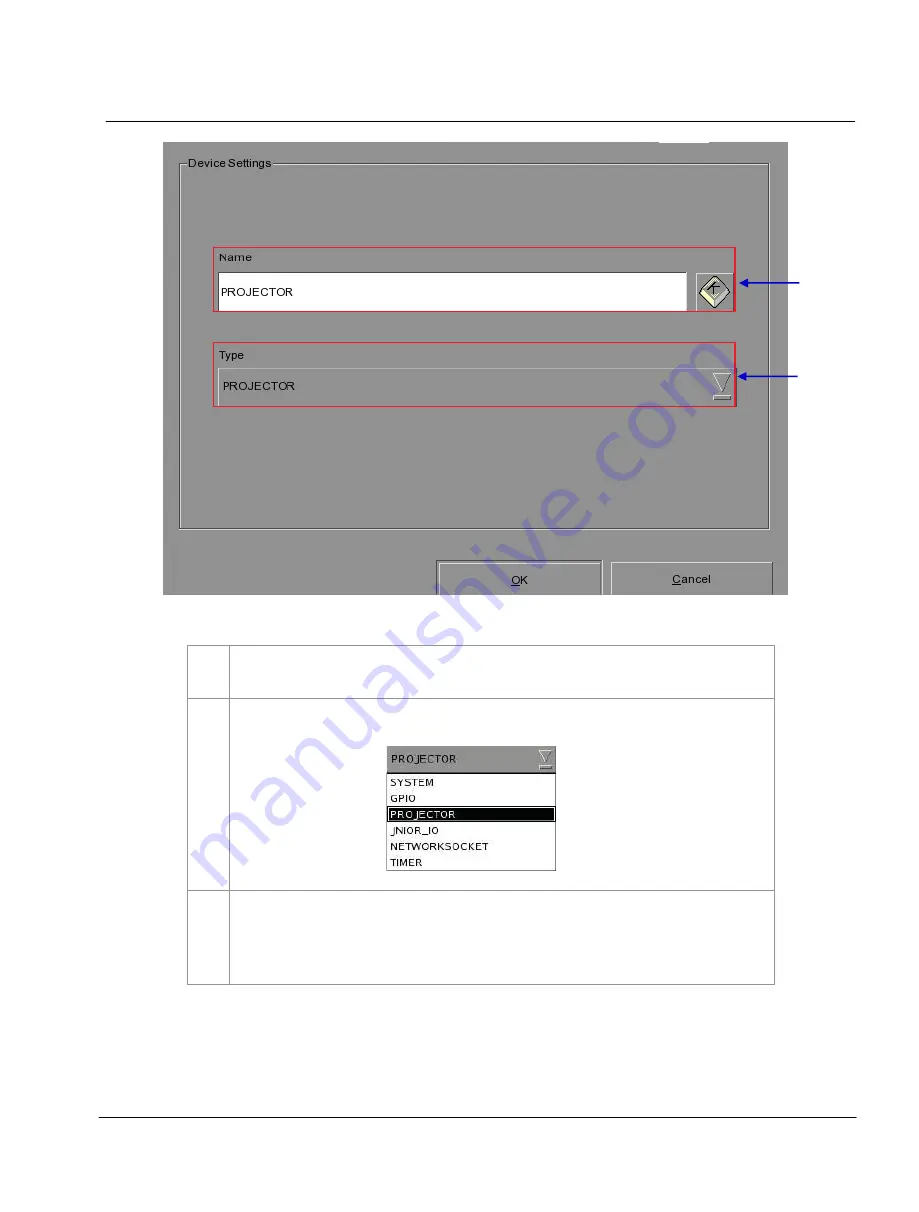
Figure 24    The device configuration window.


2


To add a new device,  press 

Add

. A new window  appears  as seen in 

Figure  24

. Type in the 

name  you want to assign  to a particular  device.


3


After adding  the device  name,  assign  the type of device  you want to use. Select  from a 

dropdown  list as seen below. 


4


You can edit or delete the device  name  on the dropdown  list in the


Devices  menu  (please  refer 

to 

Figure  23

). The device  configuration  window  as seen in 

Figure  24 

opens  when you press 

Edit 

to edit the existing  device  name. The device  name  is deleted  immediately  after pressing 

Delete

.


Summary of Contents for SX-3000

Page 1: ...USER MANUAL FOR SX 3000 STANDALONE INTEGRATED MEDIA BLOCK SMS version 9 0 February 14 2013...

Page 2: ......

Page 3: ...SX 3000 Standalone Integrated Media Block GDC Technology s Standalone Integrated Media Block IMB the SX 3000 the industry s first Standalone IMB eliminates the need for an external file server...

Page 4: ...Main Menu 14 2 3 2 Playlist Menu 16 2 3 3 Scheduler Menu 19 2 3 4 Configuration Menu 20 2 3 4 1 General 20 2 3 4 2 CineCanvas 23 2 3 4 3 Assistance 24 2 3 4 4 Audio Option 25 2 3 4 5 Closed Captions O...

Page 5: ...Clips for 3D MPEG2 61 2 7 IMB Configuration 63 2 7 1 CineCanvas and CineLink Configuration 63 2 7 2 Dolby 3D Setup 67 2 8 Series 2 DLP CINEMA Projector Setup 69 2 8 1 Automation Setup 69 2 8 2 Subtitl...

Page 6: ...tent Integrity 92 4 3 KDM Management 97 4 3 1 Manage KDM 97 4 4 Source Management 98 4 4 1 Adding a Data Source 98 4 4 2 Erasing a Data Source 101 4 4 3 Editing Sources 102 5 ADMIN PANEL 104 5 1 Gener...

Page 7: ...Timezone 128 5 3 2 6 Software Upgrade 129 5 3 3 System Information 131 5 3 3 1 Access to System Info 131 5 3 3 2 Software OS Version 132 5 3 3 3 Hardware Information 133 5 3 3 4 Hotfix Information 134...

Page 8: ...TABLE OF CONTENTS SX 3000 Standalone Integrated Media Block User Manual 8 February 14 2013 6 1 Power Up Sequence 149 6 2 Power Down Sequence 149...

Page 9: ...product development and improvements In no other event shall GDC Technology Limited be liable for any loss of profit or any other commercial damages including but not limited to special consequential...

Page 10: ...Av Josep Tarradellas 39 Healthy Street East n 38 08029 Barcelona North Point Hong Kong Tel 1 818 972 4370 Tel 1 877 337 0868 Tel 34 93 355 49 72 Tel 852 2523 6851 1 877 743 2872 Toll Free Toll Free Fa...

Page 11: ...mponents describing how it can be used to operate the IMB Control Panel The Control Panel UI enables access to all the other menus used to configure and operate the IMB SMS Main interface used for pla...

Page 12: ...qualified GDC Technology personnel All warnings on the IMB and in the documentation manual should be adhered to All instructions for operating and maintaining the IMB must be followed closely 1 2 2 El...

Page 13: ...the SMS Interface The SMS interface is used for playback control creating and editing playlists scheduling and also provides access to advanced configuration options 2 2 Accessing the SMS Interface F...

Page 14: ...mode 2 Pause button The button is enabled when the system is in playing or pause mode To resume from pause simply hit the Pause button again 3 Stop button The button is enabled when the system is in...

Page 15: ...the text box will show the serial number and software version of the IMB 9 SCREEN LOCK button The SCREEN LOCK function will prevent any unintentional screen touches or mouse clicks that could disturb...

Page 16: ...ents of the playlist being currently edited are shown here 3 Clip Information Displays information about the selected item in the Content This includes the Name total Duration Sound Audio format Conte...

Page 17: ...When is pressed the selected item will move to after the next clip 13 Shows This displays a list of all the playlists saved Selecting a playlist here displays the contents of the playlist for editing...

Page 18: ...ser Manual 18 February 14 2013 2 SMS Type in the desired name and press Enter to complete the action To cancel the action and return to the previous screen press Cancel 19 Close Exits the Playlist men...

Page 19: ...e Schedule Previous Next Deletes the currently selected show schedule Navigate show schedules by going forward and backward one at a time 5 Add to Schedule a Select the playlist to be scheduled The co...

Page 20: ...SX 3000 Standalone Integrated Media Block User Manual 20 February 14 2013 2 SMS 2 3 4 Configuration Menu 2 3 4 1 General Figure 6 Configuration General 10 11 14 17 15 12 7 6 3 2 1 4 5 9 8 13 16...

Page 21: ...e Reset TimeCode at end of clip option is not selected the system will retain the timecode at the point in which playback ends or stops The Slider Bar will remain at where the playback ends or stops 5...

Page 22: ...ear The first prompt is for the user to enter the old password the second prompt is for the user to enter the new password and the third prompt is for the system to verify the new password 15 SNMP Set...

Page 23: ...in seconds for communication with the projector Select the blank time of the projector during change of PCF or format This is to prevent noise when the PCF or format is changed 2 Enable Network Time...

Page 24: ...anual 24 February 14 2013 2 SMS 2 3 4 3 Assistance Figure 8 Assistance menu 1 USB Disk Press to perform software upgrades from USB Disk 2 Server Information Displays serial number OS version software...

Page 25: ...ore 2 Audio Output Enable Linear Time Code LTC output on audio channels 15 and 16 3 Audio Channel Mapping Use the audio channel mapping interface to map content audio channels to different audio outpu...

Page 26: ...Captions Option Figure 10 Closed Captions option 1 Enable Device Maximum waiting time Enable communication with a closed caption device that supports SMPTE 430 10 USL CCE 100 etc Specifies the maximu...

Page 27: ...2 Specify the IP address of the IMB This is the IP address of the Security Manager 3 This is the main IP address of the SX 3000 The SMS user interface can be reached at this IP address using VNC 4 Spe...

Page 28: ...User Manual 28 February 14 2013 2 SMS 6 Click to check all IP addresses entered above for correctness A dialog will be displayed showing the source and target IP addresses and any errors found in the...

Page 29: ...tem NAS which has an NFS share available to this SX 3000 system for the use as data storage 2 Configure the SX 3000 to use an attached eSATA RAID as data storage This is to be used with PSD 3000 3 Con...

Page 30: ...nitor IMB The SNMP interface contains many useful SNMP traps and is easy to configure 2 3 5 2 Accessing the SNMP Configuration Interface Boot directly to the SMS interface Press Configuration to switc...

Page 31: ...14 SNMP Configuration General 2 On the SNMP Configuration menu there are several tabs along the bottom of the screen The General option currently being shown in above System Info option System Setting...

Page 32: ...will continue to be resent only as long as the error condition exists 3 For System UpTime Threshold days indicate the threshold time in days NOTE When Trap is On a trap will be sent if the System UpTi...

Page 33: ...small box opposite the corresponding storage device NOTE When the Trap is On a trap will be sent to the SNMP Manager when the threshold temperature is reached 4 Activate the Trap by checking the smal...

Page 34: ...iguration Video Card Settings 1 On the SNMP Configuration menu select Video Card A new window opens as seen in Figure 17 above 2 Activate the Trap by checking the small box opposite Video Card Driver...

Page 35: ...ure 18 SNMP Configuration PCI RAID 1 On the SNMP Configuration menu select PCI A new window opens as seen in Figure 18 above 2 Activate the Trap by checking the small box opposite the corresponding PC...

Page 36: ...field or using an on screen keyboard Activate the Trap by checking the small box opposite System Temperature Threshold NOTE When the Trap is On a trap is sent if the system temperature exceeds the max...

Page 37: ...ress OK to confirm A small window pops out asking if you want to save the current SNMP configuration a Select OK to save the configuration b Select Cancel to cancel the configuration 2 Press Cancel if...

Page 38: ...alone Integrated Media Block User Manual 38 February 14 2013 2 SMS 2 3 5 3 7 Ethernet Figure 21 Ethernet settings 1 Enables sending an SNMP trap if the system detects that the selected network interfa...

Page 39: ...ia Block User Manual 2 3 6 Automation Please refer to Figure 6 to transit form Configuration to Automation Figure 22 Automation flowchart INPUT S EVENTS ACTIONS DEVICES INPUTS INPUTS ACTIONS ACTIONS A...

Page 40: ...playback stops or the Stop button is pushed automation will not run For Series 2 projectors please refer to Section 2 8 Figure 23 Devices menu 1 On the Automation menu press Devices A new window opens...

Page 41: ...sign to a particular device 3 After adding the device name assign the type of device you want to use Select from a dropdown list as seen below 4 You can edit or delete the device name on the dropdown...

Page 42: ...wn list b Set the parameters such as IP address Port and Status of the selected device Login name and Password Use the on screen keyboard to type in the IP address Port Login name and Password c The s...

Page 43: ...in Figure 25 On the Inputs menu press Add to enter the selected device NOTE Only devices capable of sending a signal to the IMB can be added under Inputs a Select a Trigger number from 0 7 Only one tr...

Page 44: ...menu press Add located at the top portion of the screen An on screen keyboard opens Type in your desired label name and press Enter 10 Press Add located at the lower portion the screen to append an ac...

Page 45: ...is a Projector select primitive or macro from a dropdown list under the Output Type column 1 If primitive is selected the Value option will show a dropdown list of different projector options Select t...

Page 46: ...t an existing label s name select the label from the dropdown list and then press Edit An on screen keyboard opens Edit the existing label name and press Enter To delete an existing label select the l...

Page 47: ...User Manual 2 4 Show Playlist 2 4 1 Create a Show Playlist 2 4 1 1 Access to Playlist Menu Figure 27 Creating a show playlist 1 On the SMS interface press to open a Playlist menu for creating playlist...

Page 48: ...s 2 Select the composition to add to the playlist and press Repeat the same step to add other compositions e g trailers or advertisements to the playlist 3 Compositions in the playlist are shown in th...

Page 49: ...ia Block User Manual 2 4 1 3 Editing Cues Figure 29 Playlist menu 1 To edit a cue of a composition on the playlist select the desired composition from the Playlist menu and press Edit Cue A new window...

Page 50: ...me code for the activation of the cue press and a time code entry window will open Use the and buttons enter the desired time code Press OK to confirm your selection To specify a frame for the activat...

Page 51: ...in the desired frame number and press Enter 3 Press Marker to view any markers present in the composition If the composition does not contain any markers a small window pops up to indicate that there...

Page 52: ...on cue label from the dropdown list as seen below To specify the blank time press and a blank time entry window will open Key in the desired blank time and press Enter NOTE A start cue is activated im...

Page 53: ...cue s details will then be displayed in the cue window as seen below NOTE You can select a cue from the cue window at any time to edit its properties 7 To delete a cue from the composition select the...

Page 54: ...r Manual 54 February 14 2013 2 SMS 2 4 1 4 Saving the Playlist Figure 31 Saving the playlist 1 Press Save Show to save the playlist This ensures any changes to playlist will not be lost 2 Press Load S...

Page 55: ...ry 14 2013 SX 3000 Standalone Integrated Media Block User Manual 2 5 Show Schedule 2 5 1 Schedule a Show Figure 32 SMS Interface Scheduler 1 On the Main menu press Scheduler A new window opens as seen...

Page 56: ...Time indicate the date and time to schedule the show a The date format is DD MM YYYY and the time format is HH MM SS To select the day click on DD and adjust to the required day using and Repeat the...

Page 57: ...t d If you want the playlist to loop for a period of time check Loop Until and indicate the date and time to end the loop e Press Add after the schedule date time is fixed and playlist is selected f I...

Page 58: ...SX 3000 Standalone Integrated Media Block User Manual 58 February 14 2013 2 SMS Figure 34 Viewing schedule information 3 4...

Page 59: ...about the show such as name time and duration will be displayed in the Selected Schedule Information column beneath the time bar c To navigate to the previously scheduled show just before the selecte...

Page 60: ...recurrence option Only one option can be selected Upon selection all effective recurring dates will be listed in the Schedule recurrence dates column at the bottom 6 Press Apply recurrence rules to s...

Page 61: ...nual 2 6 Synchronizing Shows 2 6 1 Synchronizing Clips for 3D MPEG2 Figure 36 Synchronizing the clips 1 On the Playlist menu select the clip from the Contents you want to associate with another clip f...

Page 62: ...Contents and then press OK b Clips with the same number of frames will be immediately synchronized If the clips don t have the same number of frames a small window will pop out as seen below c Select...

Page 63: ...projector that will accept CineCanvas communication Make sure the IMB and projector are set on the same subnet network For example if the projector is set to 10 10 10 10 and the IMB is set to 192 168...

Page 64: ...SMS 1 On the Main menu press Configuration A prompt for Maintenance Technician password opens Select Maintenance from the dropdown list Type in the correct password and press Enter NOTE Only Maintena...

Page 65: ...65 2 SMS February 14 2013 SX 3000 Standalone Integrated Media Block User Manual Figure 38 Setting up Cinecanvas subtitling option 3 4 2 5...

Page 66: ...projector Make sure the IMB and projector are set on the same LAN network Loose network cable connection between the IMB and projector b At Projector blank time indicate how long the projector should...

Page 67: ...to the IMB network so that you can access a web interface on the IMB The Dolby colour test patterns must be ingested to the IMB Please contact your regional GDC support for the Dolby colour test patte...

Page 68: ...x is NOT checked 4 Once you have setup the DFC IP address check the box Enable Dolby 3D Correction 5 Setup the Dolby 3D filter wheel Dolby filter controller and glasses check that the IMB is able to a...

Page 69: ...jectors the section below details additional steps required for full Series 2 compatibility If any fields are left blank the default values are assumed Login and password fields only need to be entere...

Page 70: ...del BARCO The Device Type should be setup as PROJECTOR and Model set to BARCO 3 To set up the Christie Series 2 projector the Device Type should be setup as PROJECTOR and Model set to CHRISTIE 4 To se...

Page 71: ...nt 2 To setup Subtitle Overlay go to SMS Configuration Maintenance Access General Under Settings there is a box titled Subtitle Overlay You can also enter a Subtitle Delay in number of frames entering...

Page 72: ...SX 3000 Standalone Integrated Media Block User Manual 72 February 14 2013 2 SMS Figure 42 Control Panel Manu 2 From the Control Panel select Manage Content 2...

Page 73: ...ubtitle language 4 When subtitle overlay is selected the language for clips with subtitles can be configured in the Content Manager as seen in Figure 43 Setting the correct language for subtitles will...

Page 74: ...language options 6 As shown in Figure 44 the following languages can be set for each clip Simplified Chinese Traditional Chinese Korean Japanese English Spanish Italian Russian The language setting ca...

Page 75: ...nel 2 8 3 CineCanvasTM Support for Series 2 Projectors CineCanvasTM support for Series 2 projectors will be enabled automatically when the Subtitle Overlay checkbox is unchecked The IMB will determine...

Page 76: ...he user to select shutdown or restart application Restarting the application will not reboot the IMB It will only restart the software without affecting the hardware allow some time for the IMB to res...

Page 77: ...ck User Manual 3 CONTROL PANEL 3 1 About Control Panel The Control Panel UI provides access to all the other menus used to configure and operate the SX 3000 IMB To get to the Control Panel press Contr...

Page 78: ...own button and a Refresh status button System information including the serial number OS version SMS version network and storage information can also be seen on the Control Panel UI NOTE The Refresh s...

Page 79: ...User Manual 3 3 Manual Automation Execution Figure 49 Accessing Automation 1 Automation labels and projector commands can now be executed from an interface on the Control Panel Press Automation on the...

Page 80: ...Execute to execute the automation label 3 When a projector is configured for automation projector primitives and macros can be triggered from this interface as well Select the projector primitive or...

Page 81: ...d Media Block User Manual 3 4 Restarting the Control Panel Figure 51 Selecting Restart on the Control Panel menu 1 Press Restart to restart the Control Panel The Control Panel will restart and display...

Page 82: ...Shutdown on the Control Panel menu 2 A small window appears as seen in Figure 53 Select Shutdown to continue shutdown of IMB or Cancel to cancel shutdown of IMB All current playback will be stopped up...

Page 83: ...user to manage the contents of the IMB to 4 1 2 Accessing the Content Manager Figure 54 Manage Content Button 1 Download content from a disk or source on the network 2 Download keys KDM s required fo...

Page 84: ...e Main menu 2 Press Manage Content to go to the Content Manager main menu NOTE The Content Manager can run in the background and does NOT need to be exited 4 2 Content Management 4 2 1 Ingesting Conte...

Page 85: ...PL list 6 Press Import to queue downloading of the package or CPL To bypass ingestion for direct playback you can press Live Play instead Refer to Live Play below for more info 7 When done selecting t...

Page 86: ...Media Block User Manual 86 February 14 2013 4 CONTENT MANAGER 4 2 2 Ingesting Content from USB Disk Figure 56 Opening a USB disk connected to the IMB 1 Select USB drive from dropdown list and click O...

Page 87: ...4 2013 SX 3000 Standalone Integrated Media Block User Manual Figure 57 Selecting the USB storage device and its partition 2 Select a storage device and its partition from the dropdown lists 3 Press OK...

Page 88: ...2 Shows the KDMs present in the selected directory that are valid for this IMB 3 Click under the Transfer column to select the KDM you wish to download A green check indicates the selected KDM 4 Show...

Page 89: ...edia Block User Manual 4 2 4 Monitor Ingest Progress Figure 59 Monitoring the progress of download of the packages 1 Select the Status option 2 Shows the download status of the packages or CPLs In thi...

Page 90: ...nd will indicate that the download is being paused 2 Use the Move Up and Move Down buttons to move the highlight bar up and down to select the desired package or CPL when multiple packages or CPLs are...

Page 91: ...ect column opposite the package or CPL you want to delete A green check indicates the selection 2 Click View CPL to toggle between the package and CPL lists displayed in the content menu 3 You can sel...

Page 92: ...2 Verifying the integrity of the files in the package s or CPL s 1 Click View CPL to toggle between the package and CPL lists displayed in the content menu Click under the Select column opposite the p...

Page 93: ...ired files are present in the selected package s or CPL s a If Now is selected the package will be verified immediately as seen below b If Schedule is selected you need to assign a name and schedule t...

Page 94: ...ebruary 14 2013 4 CONTENT MANAGER Figure 63 Checking for stray files in package s or CPL s 4 You can check if there are stray files in the selected package s or CPL s by pressing Check Stray A small w...

Page 95: ...n case it is modified or corrupted by calculating hash for each file in the selected package s or CPL s 6 You will see OK under the Status column after verifying that no problems are detected If error...

Page 96: ...Manager Schedule 7 You can view the list of package s CPL s that you have scheduled for verification by selecting the Schedule option 8 Select the desired package or CPL and press View to see its sch...

Page 97: ...KDM Manager 1 Select the KDM tab in the Content Manager menu 2 Show the KDMs present in the selected directory that are valid for this IMB 3 Show the details of the selected KDM including target CPL...

Page 98: ...1 Adding a Data Source Figure 67 Content Manager Source 1 You can add a new source or edit an existing source by selecting the Source option 2 To add a new source enable the source name entry and sour...

Page 99: ...re 68 Content Manager Setting the data source parameters 3 Type in the new data source name on the Source Name entry NOTE You can type on each entry using an external keyboard or by using the on scree...

Page 100: ...path username and password are enabled The username and password are optional provided that the data source is not protected by username and password For example some window shares can be accessed wit...

Page 101: ...0 Standalone Integrated Media Block User Manual 4 4 2 Erasing a Data Source Figure 69 Deleting a previously saved data source 1 Select the data source you want to delete from the dropdown list 2 Press...

Page 102: ...13 4 CONTENT MANAGER 4 4 3 Editing Sources Figure 70 Editing a new data source 1 To edit an existing source select the data source you want to edit from the dropdown list 2 Press Edit to edit the sele...

Page 103: ...arameters of the selected data source 3 You can edit change the source name parameter settings username or password by typing on each entry using an external keyboard or an on screen keyboard NOTE For...

Page 104: ...IMB A comprehensive array of easy to access menu pages are provided to simplify configuration and maintenance via a combination of simple buttons and an on screen keyboard Secured Access Clearly indi...

Page 105: ...tus and performance of the IMB can also be done via the Admin Panel UI Other information including hardware and network setup of the IMB can also be accessed through the Admin Panel UI It also enables...

Page 106: ...g enables what you type in the onscreen keyboard to go into a specific window Without focusing on the particular window text will not appear even if you type something Click Focus again only when nece...

Page 107: ...u Figure 74 Admin Panel main menu 3 Select Quit if you wish to go back to Control Panel menu A small window pops out to confirm the selection Press Yes to confirm 4 Select Shut Down if you wish to shu...

Page 108: ...guration backups from the IMB 3 System Info Shows OS version licensing hardware and hotfix information 4 Touchscreen For selecting touchscreen type and calibrating the touchscreen 5 User Manager For a...

Page 109: ...Storage System Management Figure 75 Storage System Management menu 1 Select Storage System Management A small window for Storage System Management menu pops up 5 3 1 1 Create new RAID array Figure 76...

Page 110: ...ing HDD for RAID 2 Select the HDD by clicking up or down arrow keys and then clicking the space key on the on screen keyboard Repeat to select another HDD A minimum of three 3 HDDs is required for sel...

Page 111: ...ction of HDDs 4 Select Yes or No to confirm or cancel the selection by clicking the right or left arrow keys on the on screen keyboard and then click Return 5 If less than three 3 HDDs are selected a...

Page 112: ...ID Array Figure 79 Storage System Management Add disk to RAID array Figure 80 Selecting hard disks to add to RAID 3 Select the disk to add to the RAID and then press Select 1 Select Add disk to RAID a...

Page 113: ...anual Figure 81 Confirmation of adding a disk to the RAID 4 A new window appears confirming that the hard disk is successfully added to the RAID Press Save output to USB to save a screenshot of the in...

Page 114: ...Management Remove disk from RAID array 1 Select Remove disk from RAID array A new window appears as seen in Figure 83 Figure 83 List of hard disks that can be removed from RAID 2 Select the hard disk...

Page 115: ...0 Standalone Integrated Media Block User Manual Figure 84 Confirming the removal of selected hard disk 3 Press Save output to USB to save a screenshot of the information to a USB disk Click Back to re...

Page 116: ...e System Management Monitor RAID status 1 Select Monitor RAID Status A new window appears as seen in Figure 86 Figure 86 Status of active RAID in the IMB 2 Press CTRL c to quit and return to the Stora...

Page 117: ...Information A new window appears as seen in Figure 88 Figure 88 Selecting the hard disk to be viewed 2 Select the disk you want to view the information from and press Select 3 A new window will show...

Page 118: ...SX 3000 Standalone Integrated Media Block User Manual 118 February 14 2013 5 ADMIN PANEL Figure 89 List of information for selected hard disk 3...

Page 119: ...90 Storage System Management Hard Disk Usage 1 Select Hard Disk Usage from Storage System Management menu 2 A new window showing hard disk usage appears as seen in Figure 91 Click Back to return to t...

Page 120: ...nstructions to set up a PSD 3000 U P with the SX 3000 Once the PSD 3000 U P is connected to the SX 3000 the RAID disks on the PSD 3000 U P has to be configured to work with the SX 3000 2 Go to Admin P...

Page 121: ...e Performance Figure 93 Storage System Management Storage performance 1 Select Storage performance A new window showing a list of hard disks appears as shown in Figure 94 2 Select the hard disk you wa...

Page 122: ...95 Shows information on storage performance of the selected hard disk 3 A new window showing information on hard disk performance appears as seen in Figure 95 Press Save output to USB to save a scree...

Page 123: ...Integrated Media Block User Manual 5 3 2 Diagnostics Maintenance 5 3 2 1 Access to Diagnostics Maintenance Figure 96 Diagnostics Maintenance menu 1 On the Main menu select Diagnostics Maintenance A s...

Page 124: ...5 ADMIN PANEL 5 3 2 2 Extract Logs Configuration Figure 97 Diagnostics Maintenance Extract logs 1 Select Extract logs A pop up window shows that backup is in the progress 2 Once extract log files fini...

Page 125: ...guration Figure 98 Diagnostics Maintenance Backup configuration 1 The Backup Configuration saves the IMB configuration to a backup file on a USB disk or thumb drive Attach a USB thumb drive to the IMB...

Page 126: ...on files are included in the backup file Network configuration information Automation configuration SNMP configuration SMS configuration Content manager source configuration Network Time Protocol NTP...

Page 127: ...guration is pressed a list of backup files present on the USB disk is displayed Select the backup file to restore and then press Select Figure 102 Confirm restore 3 Information on the backup file will...

Page 128: ...Configure Timezone Figure 104 Selecting the timezone of specific region 1 Select Configure Timezone A new window will appear as seen in Figure 104 2 Move the highlight bar to your geographical area b...

Page 129: ...tware Upgrade 1 From the Software Upgrade button in the Admin Panel you can run any GDC issued script once you press the button you will be prompted for the upgrade password as seen in Figure 107 3 Mo...

Page 130: ...February 14 2013 5 ADMIN PANEL Figure 107 Diagnostics Maintenance Software Upgrade 2 Enter the password of the upgrade file and press Enter Figure 108 Diagnostics Maintenance Software Upgrade 3 Select...

Page 131: ...14 2013 SX 3000 Standalone Integrated Media Block User Manual 5 3 3 System Information 5 3 3 1 Access to System Info Figure 109 System Info menu 1 On the Main menu select System Info A small window fo...

Page 132: ...are OS Version Figure 110 System Info Software OS version 1 Select Software OS version on System Info menu 2 The OS and Software versions of the IMB are shown in a new window as seen in Figure 111 Pre...

Page 133: ...n 1 Select Hardware information on the System Info menu 2 A new window showing the list of hardware information including the Motherboard Video card and MPEG card used in the IMB as seen in Figure 113...

Page 134: ...gure 114 System Info Hotfix information 1 Select Hotfix information It allows the user to check on the patches and upgrades installed on the IMB 2 A new window showing hotfix information appears as se...

Page 135: ...13 SX 3000 Standalone Integrated Media Block User Manual 5 3 4 Touchscreen 5 3 4 1 Access to Touchscreen Figure 116 Touchscreen menu 1 On the Main menu select Touchscreen A Touchscreen menu appears sh...

Page 136: ...box pops up warning that the cursor may stop working if a change is made to the touchscreen type Select Yes to confirm the change in touchscreen type 2 A small menu for selecting the touchscreen type...

Page 137: ...7 5 ADMIN PANEL February 14 2013 SX 3000 Standalone Integrated Media Block User Manual A small window indicating no change in touchscreen type will appear if The selected screen type is already activa...

Page 138: ...ibrate Touchscreen 2 If Calibrate Touchscreen is selected when in TK USB screen the screen will appear as seen in Figure 119 Figure 119 Calibrating the touchscreen by 4 pt calibration method 3 Touch t...

Page 139: ...ess to User Manager Figure 120 User Manager menu 1 On the Main menu select User Manager A small window for User Manager menu appears 5 4 2 Add Edit user Figure 121 User manager Add Edit user 1 On the...

Page 140: ...DMIN PANEL Figure 122 Username and Password entries 2 Type in your desired Username and Password using the on screen keyboard to create a new username and password and press OK 3 A small window will a...

Page 141: ...ur new password A small window pops up asking if you want to change the password Press Yes to confirm A new window appears to confirm the password has changed Press OK to exit and return to User Manag...

Page 142: ...lecting the username to be deleted 2 Select the username you want to delete and press Select A small window pops up to confirm if you want to continue to delete the user Select Yes to confirm A small...

Page 143: ...ser manager Change current user password 1 Select Change current user password A new window for password entry appears as seen in Figure 126 Figure 126 Password entry to change password 1 Type in your...

Page 144: ...ock User Manual 144 February 14 2013 5 ADMIN PANEL 5 5 DCI Compliance 5 5 1 Access to DCI Compliance Figure 127 DCI compliance menu 1 Press the DCI compliance button to access the RTC time offset or e...

Page 145: ...egrated Media Block User Manual 5 5 2 Offset RTC Time Figure 128 RTC Offset 1 The allowed offset range is set to plus or minus 360 seconds 2 The Offset can be set or within the allowed offset range se...

Page 146: ...y 14 2013 5 ADMIN PANEL 5 5 3 Get SM Log Figure 129 Set time for SM log 1 Choose the date and time range for SM log extraction It is possible to alter the name of the output file with the Key Pad butt...

Page 147: ...tdown Figure 130 Quit Shutdown menu 1 On Main menu select Quit Shutdown A small window shows the Quit Shutdown menu a Select Quit to switch to the Control Panel menu b Select Shut Down to turn off the...

Page 148: ...art all services to restart all automation communications playback and content management services on the IMB Playback will be stopped while services are restarted Select Yes to restart services or No...

Page 149: ...NAS before powering up the projector The external storage must be powered up first to be correctly identified by the SX 3000 6 2 Power Down Sequence Always power down the SX 3000 system and projector...

Page 150: ......

Page 151: ...3 3523 2650 Singapore 10 Ubi Crescent Ubi Tech Park Lobby B 06 25 Singapore 408564 Tel 65 6222 1082 China Shenzhen 5th Floor GDC Building No 9 Hi tech Middle 3 Road Science Technology Park Nanshan Dis...

Reviews: