background image

35

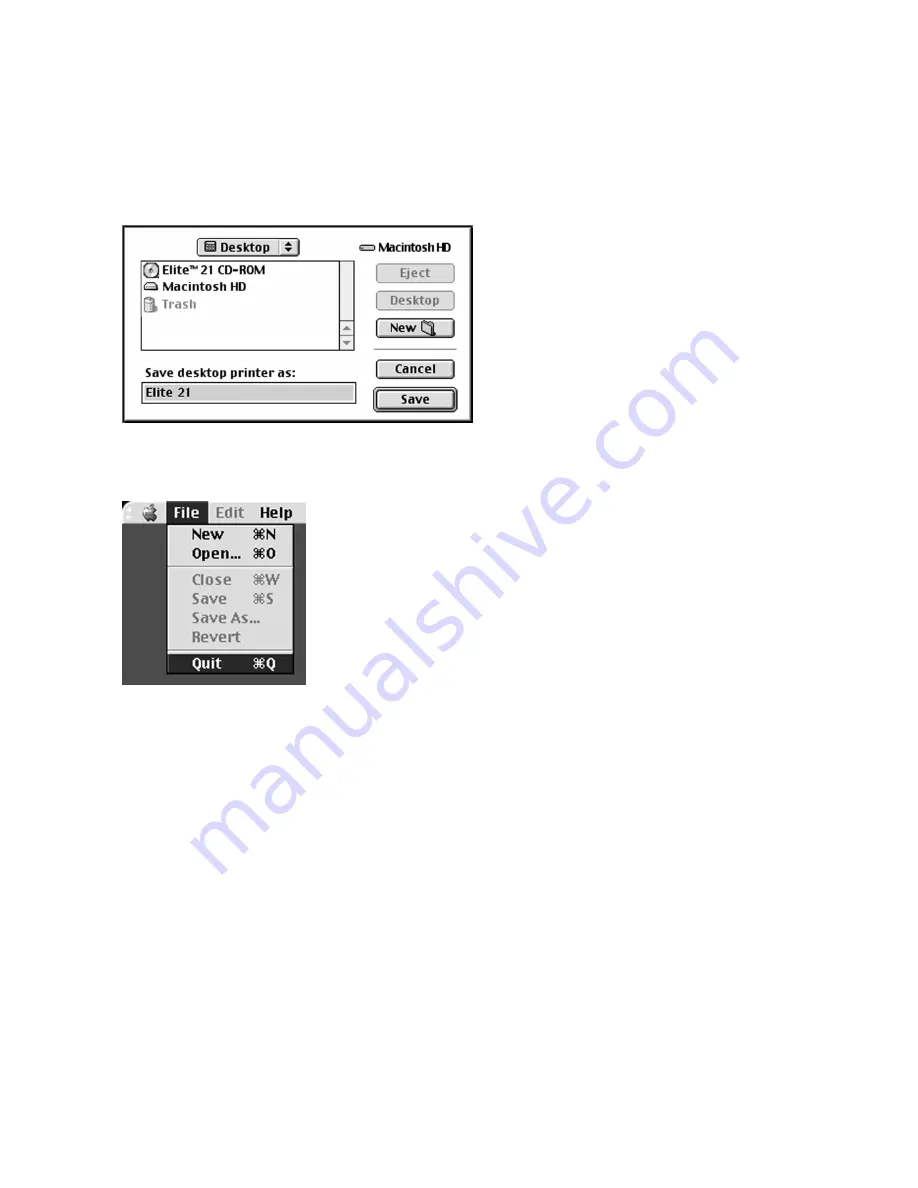
9. A Save dialog box opens, asking you to

save the desktop printer. Type in a
name for the desktop printer, or leave
the default name. Click Save.

A new Desktop Printer icon will appear
on the desktop with the name that you
assigned.

10.Go to File and Quit to exit the Desktop

Printer Utility. The printer is selected
and ready to print.

The GCC Product Registration utility will
run after the printer is setup. Please
follow the registration instructions to
register your printer.

Summary of Contents for Elite 21DN

Page 1: ......

Page 2: ...ELITE 21 SERIES INSTALLATION GUIDE...

Page 3: ...hnologies or from an Authorized GCC Technologies dealer CLASS 1 LASER PRODUCT LASER SAFETY This printer is certified as a Class 1 laser product under the U S Department of Health and Human Services DH...

Page 4: ...be using it Configurations This printer is available in three configurations as described below Elite 21N A high resolution networkable 1200 dpi laser printer with USB Parallel and Ethernet ports Com...

Page 5: ...ded in Adobe Acrobat PDF format on the CD ROM that shipped with the printer See the Using the CD ROM User s Manual section on page 86 of this manual for instructions on accessing and using the full do...

Page 6: ...age Contents Step 2 Prepare Printer Location Step 3 Locate Printer Parts Step 4 Remove Internal Packaging Step 5 Install Toner Cartridge Step 6 Load Paper Tray Step 7 Connect Printer Cables Step 8 Att...

Page 7: ...at 800 422 7777 North America only outside of North America refer to the back cover or visit our web site at http www gccprinters com Elite 21 Laser Printer 550 sheet Universal Paper Cassette Power C...

Page 8: ...from direct sunlight or areas where the air temperature and humidity can vary widely Do not obstruct the fan vent on the right side of the printer 7 87 200mm 23 62 600mm Minimum Recommended Clearances...

Page 9: ...er Output Tray Paper Exit Slot Top Cover Ventilation Slots Control Panel Front Cover Multi Purpose Feeder Tray 1 Tray Extension Power Switch 550 sheet Universal Cassette Tray 2 Rear Cover Power Cord R...

Page 10: ...ture all the interfaces are simultaneously active This means you can connect more than one interface at a time You don t have to select a port this feature works automatically Ethernet 10 100BaseT Bi...

Page 11: ...8 Step 4 Remove Tape 1 Remove packaging tape from the front and rear covers of the printer...

Page 12: ...acers inserted in the printer by pulling them out of the printer as shown Note The toner cartridge contains a microfine plastic powder that is fused to the paper during the printing process If toner s...

Page 13: ...curely with one hand Grasp and pull the sealing tape straight out from the side of the cartridge as shown Pulling the tape out at an angle may cause it to break Do not shake the cartridge or subject i...

Page 14: ...11 6 Close the front cover Press on the center part of the front cover until the cover locks securely...

Page 15: ...A4 size The standard paper tray holds up to 550 sheets of 20 lb copier type paper It can handle the following sizes of paper Letter Legal 13 A4 A5 Executive Legal 14 B5 12 Step 6 Load Paper Tray 1 Pl...

Page 16: ...section of the tray adjusts to three different positions Choose the position that most closely matches the paper size being loaded 4 Squeeze the right side paper guide as shown Lift the guide slightly...

Page 17: ...the paper stack as this could cause paper feed jams 7 Squeeze the paper length guide at the rear of the tray as shown Lift the guide slightly and slide it towards the paper stack until the guide match...

Page 18: ...9 Gently slide the paper tray all the way into the printer 10 The paper level indicator on the front of the tray will rise to show the remaining level of paper in the tray Replenish paper as necessar...

Page 19: ...Serial connectors have screws on either side that should be used to secure the cable to the printer Improperly inserted cables are the cause of many networking and printer related problems Universal...

Page 20: ...s Serial connections are slower than parallel or Ethernet connections therefore the RS 232 connection is only recommended for users who require a cable connection greater than 6 5 feet and do not have...

Page 21: ...ower switch at the front of the printer to confirm that it is in the Off O position 3 Plug the power cord into a grounded wall outlet or power strip 4 Switch the power switch to the On I position Afte...

Page 22: ...inting Software Driver software for the printer must be installed on every computer that will print to the unit This section includes installation instructions for Macintosh Windows 95 98 Windows 2000...

Page 23: ...ion PPD files for the Elite 21 Series and screen fonts for each of the resident PostScript printer fonts This section details installation instructions for installing drivers for Macintosh Important R...

Page 24: ...sk Double click the Elite 21 Installer icon within the disk window 2 An introduction screen marked Elite 21 Series Installer will appear Click OK 3 The software license agreement will appear Read the...

Page 25: ...also available If you only wish to install certain components of the printing software click on the Elite 21 Software pull down menu and select Custom Install Select the items you wish to install by...

Page 26: ...is complete a dialog box will appear asking if you want to setup a Desktop Printer Click Yes to setup the printer 9 A dialog box asking how the printer is connected will appear Make sure the printer i...

Page 27: ...on process is complete the installation will finish Click Restart to restart the Mac 10 Clicking the Setup Printer button will open either Apple s Desktop Printer Utility USB or LPR connections or the...

Page 28: ...tosh installation steps in Part 1 of this section In Step 9 select USB as the connection method and click Setup Printer 2 This will open up Apple s Desktop Printer Utility and the New Desktop Printer...

Page 29: ...ill appear Click on your printer model from the list then click OK 5 The Untitled 1 dialog box will return Click on the Auto Setup button at the top right of the box 6 A status window appears showing...

Page 30: ...e desktop printer Type in a name for the desktop printer or leave the default name Click Save A new Desktop Printer icon will appear on the desktop with the name that you assigned 9 Go to File and Qui...

Page 31: ...this manual have been followed Follow the Macintosh installation steps in Part 1 of this section In Step 9 select AppleTalk as the connection method and click Setup Printer Due to potential incompati...

Page 32: ...n the name of your printer from the list The default printer name will be the same as the model name of the printer i e Elite 21N Click Create 4 The Chooser will open a connection to the printer and a...

Page 33: ...ions sets the Memory Configuration Additional Trays Envelope Feeder and Upper Bin status Set these items using the pull down menus and then click on the Options Installed 1 pull down menu Pull down to...

Page 34: ...the Mac it will appear with a bold outline around it indicating that this is the default printer for the computer You can set the printer as the default by clicking once on the Desktop Printer icon t...

Page 35: ...ps in the Hardware Setup section of this manual have been followed Follow the Macintosh installation steps in Part 1 of this section In Step 9 select LPR as the connection method and click Setup Print...

Page 36: ...of the Elite 21 User s Manual Networking the Elite 21 Printer on the printer s CD ROM If a Queue name is being used enter it in the Queue field 5 After entering the IP address and Queue if needed clic...

Page 37: ...e Select a PostScript Printer Description File box will open Choose your printer model from the list of printers and click Select 8 The Untitled 1 dialog box returns again The icon in the PostScript P...

Page 38: ...k Save A new Desktop Printer icon will appear on the desktop with the name that you assigned 10 Go to File and Quit to exit the Desktop Printer Utility The printer is selected and ready to print The G...

Page 39: ...ndows NT 4 0 This section details installation instructions for installing drivers for Windows 95 98 Windows 2000 and Windows NT 4 0 Information on networking printers with Windows is on the Elite 21...

Page 40: ...steps Windows 95 98 uses a Wizard to help you install printer software A Wizard is a series of dialog boxes In each dialog box you make configuration choices then click the Next button to move to the...

Page 41: ...he CD window Double click the Win98 USB folder then double click the Install exe icon within this folder 2 This will bring up the USB Driver Installer window Click Install 3 A status window will appea...

Page 42: ...printer and wait for the LCD display to read Ready Turn on the computer A dialog box showing Building Printer Database may appear 4 The Add New Hardware Wizard will appear automatically telling you t...

Page 43: ...Open the folder on the CD that corresponds to the language being used English French German Italian or Spanish Open the WIN9x folder within this folder Select the GCCE21 INF item in this folder Click...

Page 44: ...to a Network Select Local Printer unless the printer that you are selecting is attached to another PC or accessed via an NT or Win2000 server Click Next Note If setting up the printer as a stand alone...

Page 45: ...o the language being used English French German Italian or Spanish Open the WIN9x folder within this folder Select the GCCE21 INF item in this folder Click OK You will be returned to the Install From...

Page 46: ...ck Next If more than one printer is installed on this computer this window will also ask if you wish to make this printer the default printer for your Windows applications Click Yes or No Click Next 8...

Page 47: ...y appear telling you that necessary files on the CD cannot be found Make sure the Windows CD is inserted then use the Browse button to access the Windows CD Select the folder called WIN95 on the Windo...

Page 48: ...ppear 13 When the installation is complete you will be returned to the Printers window and a new icon for the printer will appear If installing a local printer you are now ready to print to the Elite...

Page 49: ...rd is a series of dialog boxes In each dialog box you make configuration choices then click the Next button to move to the next dialog box Note These instructions cover installing the Elite 21 as a lo...

Page 50: ...e parallel or USB cable to the computer and printer Make sure that there is paper in the printer s tray 3 Turn on the printer and wait for the LCD display to read Ready Turn on the computer 4 The Foun...

Page 51: ...tton to select your Elite 21 Series CD ROM Open the folder on the CD that corresponds to the language being used English French German Italian or Spanish Open the WIN9x folder within this folder Selec...

Page 52: ...on the CD that corresponds to the language being used English French German Italian or Spanish Open the WIN2000 folder within this folder Select the GCCE21 INF item in this folder Click OK 10 The Comp...

Page 53: ...l Printer unless the printer that you are selecting is attached to another PC or accessed via an NT or 2000 server De select the box marked Automatically detect and install my Plug and Play printer Cl...

Page 54: ...ries CD ROM in the CD drive of your computer and click Have Disk 5 This will bring up the Install From Disk window Use the Browse button to select your Elite 21 Series CD ROM Open the folder on the CD...

Page 55: ...new name or keep the default name If more than one printer is installed on the system this window will also ask if you want to use this printer as the Default Printer Click Yes or No Click Next 8 The...

Page 56: ...appear asking if you wish to print a test page Click Yes if you are installing a local printer Click No if you are installing the driver and will be setting up the printer as a network device later C...

Page 57: ...r the printer will appear If installing a local printer you are now ready to print to the Elite 21 printer If installing as a stand alone Ethernet network device proceed to the Windows 2000 section in...

Page 58: ...doing the installation Note These instructions cover installing the Elite 21 as a local printer connected via a parallel or serial port on a Windows NT 4 0 workstation or server If installing the pri...

Page 59: ...r Select My Computer unless the printer that you are selecting is attached to another PC or accessed via an NT or Win2000 server Note If setting up the printer as a stand alone Ethernet network device...

Page 60: ...eries CD ROM in the CD drive of your computer and click Have Disk 5 This will bring up the Install From Disk window Use the Browse button to select your Elite 21 Series CD ROM Open the folder on the C...

Page 61: ...name for the printer You can type in a new name or keep the default name If more than one printer is installed on the system this window will also ask if you want to use this printer as the Default P...

Page 62: ...OM Eject the GCC Elite 21 CD and install the Windows NT 4 0 CD If the blue Windows NT CD window appears close this window Use the Browse button to access the NT CD Select the folder called i386 on the...

Page 63: ...the printer will appear If installing a local printer you are now ready to print to the Elite 21 printer If installing as a stand alone Ethernet network device proceed to the Windows NT 4 0 section i...

Page 64: ...r s Duplex Unit Elite 21N only Upper Output Bin Envelope Feeder Additional Memory RAM Accessories can be ordered through GCC Technologies via our web site at http www gccprinters com You can also cont...

Page 65: ...to the printer and disconnect the power cord from the AC outlet and the printer 3 Close the Multi Purpose Feeder and remove any printouts left in the paper output tray Step 10a Paper Feeder Installati...

Page 66: ...eder Align the five posts on the feeder with the corresponding holes on the bottom of the printer Be sure to lower the printer gently as lowering it too quickly may damage the printer or feeder 6 Inse...

Page 67: ...64 7 Load paper into the tray then insert both trays into the printer Reconnect the AC power cord to the printer and outlet then restart the printer...

Page 68: ...per feeder with the holes on the bottom of the first feeder and stack the two feeders up together 3 Insert the supplied screws into the three holes on the inside of the top feeder as shown to secure t...

Page 69: ...the power to the printer and disconnect the power cord from the AC outlet and the printer 5 Close the Multi Purpose Feeder and remove any printouts left in the paper output tray 6 Remove the cassette...

Page 70: ...er Be sure to lower the printer gently as lowering it too quickly may damage the printer or feeders 8 Insert the three supplied screws into the holes inside of the printer as shown to secure the feede...

Page 71: ...s Click on the Device Options tab Under Installable Options click on Additional Trays Under Change Setting for change the selection to either Tray 3 for one tray or Tray 3 and 4 for two trays Click Ap...

Page 72: ...pen the rear cover 3 Line the Duplex Unit up with the left and right channels inside the printer as shown and slide the unit firmly all the way into the printer Step 10b Duplex Unit Installation Note...

Page 73: ...70 4 Slide the green tabs on the left and right of the Duplex Unit outward to secure the unit to the printer 5 Close the rear cover making sure it latches completely...

Page 74: ...inter and select Properties Click on the Device Options tab Under Installable Options click on Duplex Unit Under Change Setting for change the selection to Installed Click Apply and OK to accept the c...

Page 75: ...rom the printer if installed 2 Squeeze the latch at the upper left of the rear cover and pull towards you to open the rear cover 3 Locate the two plastic tabs which hold the top cover in place as show...

Page 76: ...ront of the tray into the slot on the printer as shown 5 Lower the rear of the tray into position making sure that the two plastic tabs at the rear of the tray match up with the slots in the printer T...

Page 77: ...74 7 Lift up the paper stopper arm and open the tray as shown 8 Extend the paper tray all the way out and lift up the paper stopper 9 Adjust the tray to match the paper size being output...

Page 78: ...n for your Elite 21 printer and select Properties Click on the Device Options tab Under Installable Options click on Upper Bin Under Change Setting for change the selection to Installed Click Apply an...

Page 79: ...er at the left rear of the feeder opening by pushing it inward while lifting up on its front edge with your finger as shown Store the gear cover in a safe place 3 Push the Envelope Feeder into the fee...

Page 80: ...r Elite 21 printer and select Properties Click on the Device Options tab Under Installable Options click on Envelope Feeder Under Change Setting for change the selection to Installed Click Apply and O...

Page 81: ...printers ship with enough standard RAM to handle most print jobs at the largest page size and resolution supported by the printer Some print jobs however may be more complex than the standard RAM is a...

Page 82: ...unplug the power cord from the wall Removing the side cover of the printer while the unit is turned on may result in damage to the printer 2 Loosen the two thumbscrews at the top and bottom of the le...

Page 83: ...d Depending on the existing RAM configuration of the printer the other slot may or may not be open 5 If replacing existing memory with larger capacity SIMMs remove the existing SIMM s as shown Install...

Page 84: ...t at the top of the printer 1 and the small tab at the bottom of the cover with the slot in the printer 2 7 Slide the cover forward to lock it into place as shown 8 Secure the screws at the top and bo...

Page 85: ...e printer icon for your Elite 21 printer and select Properties Click on the Device Options tab Under Installable Options click on VM Option Under Change Setting for change the selection to the correct...

Page 86: ...he printer Select Set as Default from the list Once the printer is selected open an application on the computer such as SimpleText on the Mac or NotePad in Windows and create a simple file Go to File...

Page 87: ...Disabled appears Press Select to accept the new setting Press Menu up or down until the display returns to Ready The Startup Page will not print out the next time the printer is started Note The facto...

Page 88: ...your Elite 21 printer and select Properties Click on the Device Options tab Under Installable Options click on Internal Hard Disk Under Change Setting for change the selection to Installed Click Appl...

Page 89: ...n the English folder of the Elite 21 Series CD ROM You can also open Acrobat by double clicking the Acrobat Reader icon then open the manual file by going to File selecting Open and browsing to the En...

Page 90: ...you ve chosen shows less than a full page you ll see the top part of each page followed by the bottom part You can also use the tool bar buttons to move from page to page The GCC manual also has a ta...

Page 91: ...nd Service Center support GCC offers worldwide services from its dealers and service centers They are supported by training technical documentation and technical support Extended warranties GCC offers...

Page 92: ...kup purposes only PROHIBITED USES THE LICENSE OF THE SOFTWARE AND THE DOCUMENTATION GRANTED TO YOU IS LIMITED AND YOU MAY NOT 1 Make copies of any of the Documentation or make copies of the Software o...

Page 93: ...he Software the Documentation and this License Agree ment in contract tort including negligence or otherwise exceed the original price paid by you for your Product THE WARRANTY AND REMEDIES SET FORTH...

Page 94: ...TO THE PRODUCT EXPRESS OR IMPLIED INCLUDING BUT NOT LIMITED TO ANY IMPLIED WARRANTIES OF MERCHANTABILITY OR FITNESS FOR A PARTICULAR PURPOSE UNDER NO CIRCUMSTANCES SHALL GCC S LIABILITY ARISING OUT O...

Page 95: ...nslow Middlesex TW3 1SE Tel 44 208 754 6000 Fax 44 208 754 6060 GERMANY Vertriebsb ro Deutschland Hahnbuschweg 2 4 D 24147 Klausdorf bei Kiel Tel 49 431 7997610 Fax 49 431 7997666 TO ORDER SUPPLIES OR...

Reviews: