background image

Guangcheng Technology

GC-6101 user manual

2. Equipment installation and use

This chapter will explain in detail the installation method, wiring method, the
meaning of the indicator light and the meaning of the interface of the GC-6101
module.

2.1 Module fixing

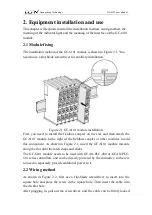
The installation method of the GC-6101 module is shown in Figure 2.1. You
need to use a flat-blade screwdriver for auxiliary installation.

Figure 2.1 GC-6101 module installation

First, you need to install the fieldbus coupler on the rail, and then attach the
GC-6101 module to the right of the fieldbus coupler or other modules to add
this component. As shown in Figure 2.1, insert the GC-6101 module inwards
along the slot until the latch snaps and clicks.
The GC-6101 module needs to be used with GCAN-PLC-400 or GCAN-PLC-
510 series controllers, and can be directly powered by the controller, so there is
no need to separately provide additional power to it.

2.2 Wiring method

As shown in Figure 2.2, first use a flat-blade screwdriver to insert into the
square hole and press the screw in the square hole. Then insert the cable into
the circular hole.
After plugging in, pull out the screwdriver, and the cable can be firmly locked

Summary of Contents for GC-1008

Page 1: ...GC 1008 Extended RS232 and RS485 communication module User manual Document version V3 01 2017 10 22...

Page 2: ...angcheng Technology GC 6101 user manual Revise history version date the reason V1 00 2015 09 16 Create document V2 01 2015 12 20 Correct equipment working parameters V3 01 2017 10 22 Add some paramete...

Page 3: ...Functional Overview 4 1 2 Performance characteristics 4 1 3 Typical applications 4 2 Equipment installation and use 5 2 1 Module fixing 5 2 2 Wiring method 5 2 3 System statusindicator 7 3 Technical...

Page 4: ...ial automation or serial bus control system 1 2 Performance characteristics The extended serial port is 1 RS232 1RS485 The wiring form is standard RS232 line send receive ground and RS485 line send re...

Page 5: ...ail and then attach the GC 6101 module to the right of the fieldbus coupler or other modules to add this component As shown in Figure 2 1 insert the GC 6101 module inwards along the slot until the lat...

Page 6: ...e 2 2 GC 6101 module installation Figure 2 3 GC 6101 module terminal block The terminal block of GC 6101 module is shown in Figure 2 3 GC 6101 contains 2 extension serial ports The serial numbers corr...

Page 7: ...ble 2 2 When the indicator is on the GC 6101 module status is shown in Table2 3 Indicator light Colour Indication status POWER green Power indicator INIT red Initialization status indication Table 2 2...

Page 8: ...oupler consumes about 200mA Configuration method By configuring the function block definition in the program Environmental test Operating temperature 40 85 Working humidity 95 RH No condensation EMC t...

Page 9: ...arefully Once used it is deemed to be an endorsement and acceptance of the entire content of this statement Please strictly abide by the manual product description and related laws regulations policie...

Page 10: ...2CAN Digital input GC 1008 Digital input PNP 24V DC 8 channel GC 1018 Digital input NPN 24V DC 8 channel GC 1502 Counter 200kHz max 2 channel Digital output GC 2008 Digital output PNP 24V DC 8 channe...

Page 11: ...16 bits 10V 10V 2 channel GC 4642 Current output 16 bits 0 20mA 2 channel GC 4652 Current output 16 bits 4 20mA 2 channel GC 4662 Voltage output 16 bits 0 5V 2 channel GC 4672 Voltage output 16 bits...

Page 12: ...nual Sales and service Shenyang Guangcheng Technology Co Ltd Address No 135 21 Changqing Street Hunnan Shenyang Liaoning China E mail sygckj gmail com Tel Whatsapp 86 13644001762 Skype live sygckj WeC...

Reviews: