background image

5

USP 13

SET-UP INSTRUCTIONS:

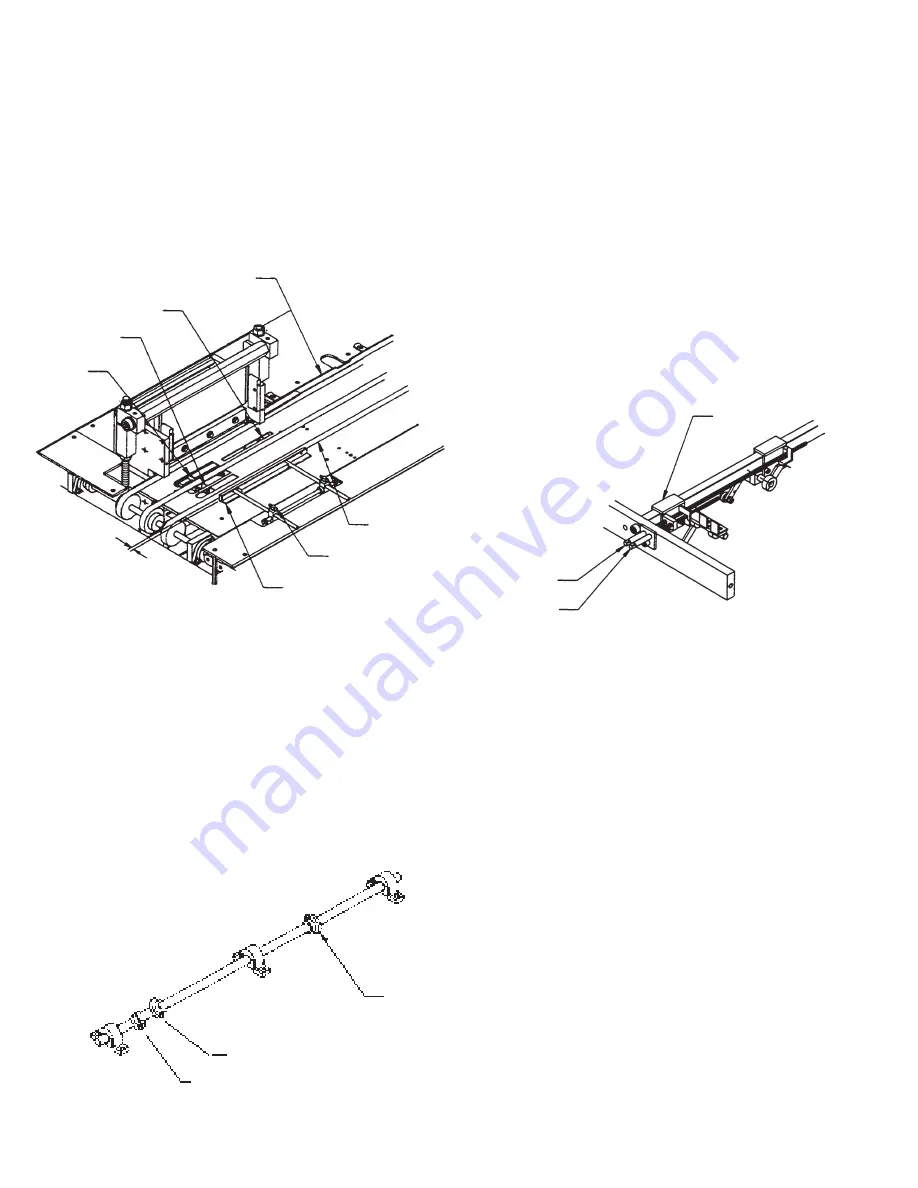
After the punching die is properly installed, position the

back gauge rail (#108, Figure 7) slightly ahead of the

punch die back gauge so that a piece of paper can slide

freely into the throat of the die and not hit the back

gauge of the punch die.

Cam (#37) activates the rear jogger (#34) and the side

jogger (#29). Adjust the cam so that when the longest

punch pin appears in the throat of the punching die, the

rear jogger (#34) should have just reached the full

vertical position.
Cam (#44) activates the front stop (#26). Adjust the cam

so that when the front stop finger (#100) reaches the full

vertical position, the side jogger (#29) starts its cycle

inward.

 Loosen locking bolt (S40) under front bearing block

(#93, Figure 9) prior to setting registration.

Position the front stop (#26) so it is in its full up

position. Place a sample sheet of paper against the front

stop and punch paper. If the punch pattern is not

centered on the paper, adjust the front stop by turning

the front stop adjustment rod (#117) until the punch

pattern is centered. Once the front stop is set properly,

adjust the rear jogger so that it touches the paper. To do

this, turn the rear jogger stop adjustment (#118).

SETTING REGISTRATION

CONVEYOR SYSTEM

Cycle this machine manually by turning the hand wheel

until the rear jogger is in its full up position. Install side

jogger (#29) to slightly buckle a sheet of paper. Lock in

place with T-knobs (#248, Figure 7).

Adjust the outer transfer belt (#255, Figure 7) so that it

sets about 1/4” (.25) away from fully jogged side jogger.

When registration is set, lock in place by tightening

locking bolt. (S40, Ref. Page 30).

Figure 7

Figure 9

Figure 8

248

29

.25

26

34

100

108

OUTER BELT

117

118

93

44

37

43

Summary of Contents for USP 13

Page 1: ...USP 13 UNIVERSAL SPEED PUNCH Operator Manual ...

Page 2: ...ts Operating Instructions 1 Service and Maintenance Agreement 2 Selecting Knife Set Up 3 Installation of Punching Die 4 Set Up Instructions 5 Quick Reference Instructions 8 Maintenance Instructions 9 General Rules for Grinding Pins 10 Options and Accessories 11 ...

Page 3: ...lift to less than maximum 070 is a good operating lift to avoid excessive wear on the punch pins and to maintain a quality hole With proper maintenance the Universal Speed Punch will provide troublefree continuous operation for many years Important Only a sharp well lubricated and properly installed die set will have a long life and give good quality punching Clean punching without paper welding y...

Page 4: ...EMA for your USP 13 eliminates this possibility by providing you with a low fixed annual cost for protecting your valuable machine investment For full details about purchasing an EMA consult with your GBC Sales Representative or contact General Binding Corporation 500 Bond Street Lincolnshire IL 60069 Or Call 1 800 790 7787 A GBC Authorized Technician must perform all service and maintenance unles...

Page 5: ...from the trailing edge of the claw Figure 2 4 Cam 36 sets when the selecting knife will lift Adjust the cam to get a lift of about 1 8 13 Figure 3 5 The separating knife should now enter the stack then raise support the stack and the claw will then select the lift Figure 3 6 To adjust the thickness of the lift turn the T knob 248 Figure 1 clockwise for thicker lifts and counterclockwise for thinne...

Page 6: ... quick release lock down bolts to secure the base of the punching tool to the lower die support Once the lock down bolts are tight remove block of wood and bring head down to bottom of stroke Loosen both lock down bolts and then retighten the lock down bolts This assures the alignment between the top and the bottom of the punching dies Check to eliminate the possibility of any movement between the...

Page 7: ...gistration Position the front stop 26 so it is in its full up position Place a sample sheet of paper against the front stop and punch paper If the punch pattern is not centered on the paper adjust the front stop by turning the front stop adjustment rod 117 until the punch pattern is centered Once the front stop is set properly adjust the rear jogger so that it touches the paper To do this turn the...

Page 8: ...heet of paper against pusher Adjust the punch cam 43 Figure 8 so that when the machine is cycled by hand the paper is about 1 away from the front stop as it just reaches it full up position Figure 11 There must be an O ring on the paper at all times Wheel 167 is set on the edges of the paper so that they turn even when the paper is being punched SUPPLY STACK GUIDE Cycle the machine by hand until t...

Page 9: ... is required Locate adjustable stack guide post 59 so that the post is in line with the separating knife Figure 13 Install front guide rail 55 so that there is about 1 8 to 1 4 clearance between the lift being transferred and the front guide rail Cycle machine and check results 48 56 49 59 29 55 108 TO BE IN LINE Figure 13 Figure 14 ...

Page 10: ...COMES TO FULL UP JUST AS SIDE AND REAR JOGGER START TO MOVE 6 SET REGISTRATION WITH SAMPLE STOCK 7 LOCK FRONT STOP IN PLACE 8 SET SIDE JOGGER TO SLIGHTLY BUCKLE A SHEET OF PAPER SET OUTER BELT TO 1 4 OF FULLY JOGGED LIFT 9 SET UP TRANSPORT WHEELS AND BELTS 10 POSITION LONG SMALL ROLLER ASSEMBLY 11 ATTACH SKID STRAPS END OF STRAPS 1 SHORT OF LEADING EDGE OF LIFT 12 SET PUSHER SO THAT LEADING EDGE O...

Page 11: ...should be replenished occasionally as required with Lubriplate 630AA obtainable at any Lubriplate dealer USP 13 Universal Speed Punch MAINTENANCE INSTRUCTIONS All punching tools should be lubricated daily AT THE BEGINNING OF EACH SHIFT IT IS SUG GESTED TO GREASE THE PUNCHING PINS OF EACH TOOL BY APPLYING GEAR GREASE WITH A SMALL BRUSH PAINT THE GREASE ON THE FRONT AND THE REAR OF THE TOOL ACROSS A...

Page 12: ...ED EVERY SECOND OR THIRD TIME THE PINS ARE SHARPENED All punching tools must be sharpened every 100 hours of operation or sooner depending on abrasiveness of stock being punched IMPORTANT Sharp punching tools are necessary to produce clean holes which are essential to maintain high binding production and the prevention of premature wear of punching tools In general the diameter of the grinding whe...

Page 13: ...n be purchased separately include 1 Small Roller Assembly 2 Small Sheet Jog Adaptor 3 Tabbed Stock Jog Adaptor R H 0165036200 L H 0165036300 4 Light Weight Paper Support Assembly The Universal Speed Punch comes equipped with all the tools and parts necessary to run standard size sheets of paper Additional accessories are included to run some of the more non standard sizes of paper They include ...

Page 14: ...12 ...

Page 15: ...13 016509000 LONG SMALL ROLLER ASSEMBLY The Long Small Roller Assembly is used when the standard Large Roller Assembly does not allow enough reach to grab a lift of paper when it is fully jogged ...

Page 16: ...14 ...

Page 17: ...General Binding Corporation Northbrook Il 60062 4195 http www GBC com PN 0165999900 Rev B ...

Reviews: