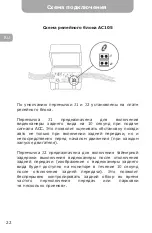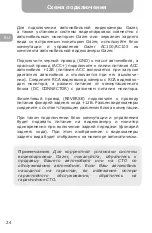
Connection scheme
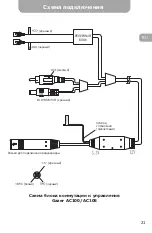
To connect a Gazer car camera or install a video parking
system with Gazer car monitor or Gazer rear-view mirror with
a built-in monitor, use Gazer AC100/AC105 switching and
control unit supplied with the Gazer car camera.
Connect the black wire (GND) to the car ground line and the
red wire (ACC +) to the car’s ACC supply line (ACC power goes
ON and OFF automatically when the car engine is ON or OFF).
Connect the camera’s RCA video output to the monitor’s RCA
video input, and the switching unit power connector
(DC CONNECTOR) to the monitor’s power connector.
Connect the purple wire (REVERSE) to the reverse lights power
wire +12V. Connect the camera connector to the
corresponding switching unit connector.
Once connected this way, the switching and control unit will
simultaneously supply power to the camera and the monitor
whenever the car is put in the reverse gear (backup lamps light
up). In this case, this image from the rear view camera is
displayed on the monitor screen automatically.
Note:
For correct Gazer video parking system
installation, please contact your dealer or service station.
To avoid warranty loss, if your car is still under warranty,
please contact the warranty service station.
Camera installation
Installing Gazer CC1XX-xxx/CC1XX-xxx-L cameras
Installing Gazer CC20XX-xxx camera
Disconnect the AC power light plate and remove the lamp
lighting. If necessary, relocate the lamp socket and light plug
connector from the original housing to Gazer СС1ХХ-xxx
camera housing. Install the license plate light lamp into the
camera housing. Connect the license plate light power
connector. If you use Gazer CC1XX-xxx-L camera (with
LED-based backlight), connect the power wires of the camera
lights to the power wires of car license plate light (red wire
+12V, black wire – vehicle earth).
Connect the camera to the switching and control block, as
shown on p.9. Install Gazer camera instead of the license
plate light lamp.
Detach the car trunk release button power connector and only
then remove the trunk lid grip. Install the camera instead of
the grip and reattach the car trunk release button power
connector.
13
ENG
Summary of Contents for CC Series
Page 1: ...USER MANUAL OF BACKUP CAMERAS GAZER CC series ...
Page 2: ......
Page 39: ......
Page 40: ......

