background image


30


31


M

ain

tenanc

e and inspec

tion

cable 

attachment

cable 

attachment

adjusting screw

adjusting screw

seat tube

seat tube

2,4 mm

65

66

Adjusting the derailleurs

Front derailleur: adjusting the lowest gear

Place the chain on the largest sprocket at the back and the 
smallest chainwheel at the front. Turn the adjusting screw (A) in 
such a way that the play between the inside of the chain guide 
and the chain is no more than half a millimetre (fig. 65).

Front derailleur: adjusting the highest gear

Place the chain on the smallest sprocket at the back and the 
largest chainwheel at the front. Turn the adjusting screw (B) in 
such a way that the play between the inside of the chain guide 
and the chain is no more than half a millimetre (fig. 65).

Front derailleur: adjusting the intermediate gear

Place the chain on the largest sprocket at the back and the 
middle chainwheel at the front. Adjustment for the intermediate 
gear is made with the adjusting barrel on the cable where it 
emerges from the front gear shifter on the handlebar. Adjust so 
as to set the play between the inside of the chain guide and the 
chain to half a millimetre (fig. 65). Adjusting the front derailleur 
with spcm unit is done as follows: align both markers beneath 
the spcm unit when the shifter is in position “1” (fig. 66).

Rear derailleur: adjusting the highest gear

To adjust the highest gear, turn adjusting screw (A). Make sure 
that the chain is on the outer sprocket and turn the adjusting 
screw in such a way that the guide wheel, looking from the rear 
of the bicycle, sits directly under this sprocket (fig. 67).

Rear derailleur: adjusting the lowest gear

To adjust the lowest gear, turn adjusting screw (B). Make sure that 
the chain is on the inner sprocket and turn the adjusting screw 
in such a way that the guide wheel, looking from the rear of the 
bicycle, sits directly under this sprocket. Now check second gear. 
If the chain is running against an adjacent sprocket, this can be 
adjusted using the cable adjusting screw (C). In some models the 
adjusting screws are in another position on the derailleur. Making 
adjustments is done in the same way as described above (fig. 67).

Shimano Nexave rear derailleur: adjusting the lowest gear

Place the chain on the largest sprocket at the back. Turn the 
adjusting screw (A) in such a way that the guide wheel, looking 
from the rear of the bicycle, sits directly under the largest 
chainwheel (fig. 68).

Shimano Nexave rear derailleur: adjusting the highest gear

Place the chain on the smallest sprocket at the back. Turn the 
adjusting screw (B) in such a way that the guide wheel, looking 
from the rear of the bicycle, sits directly under the smallest 
chainwheel (fig. 68).

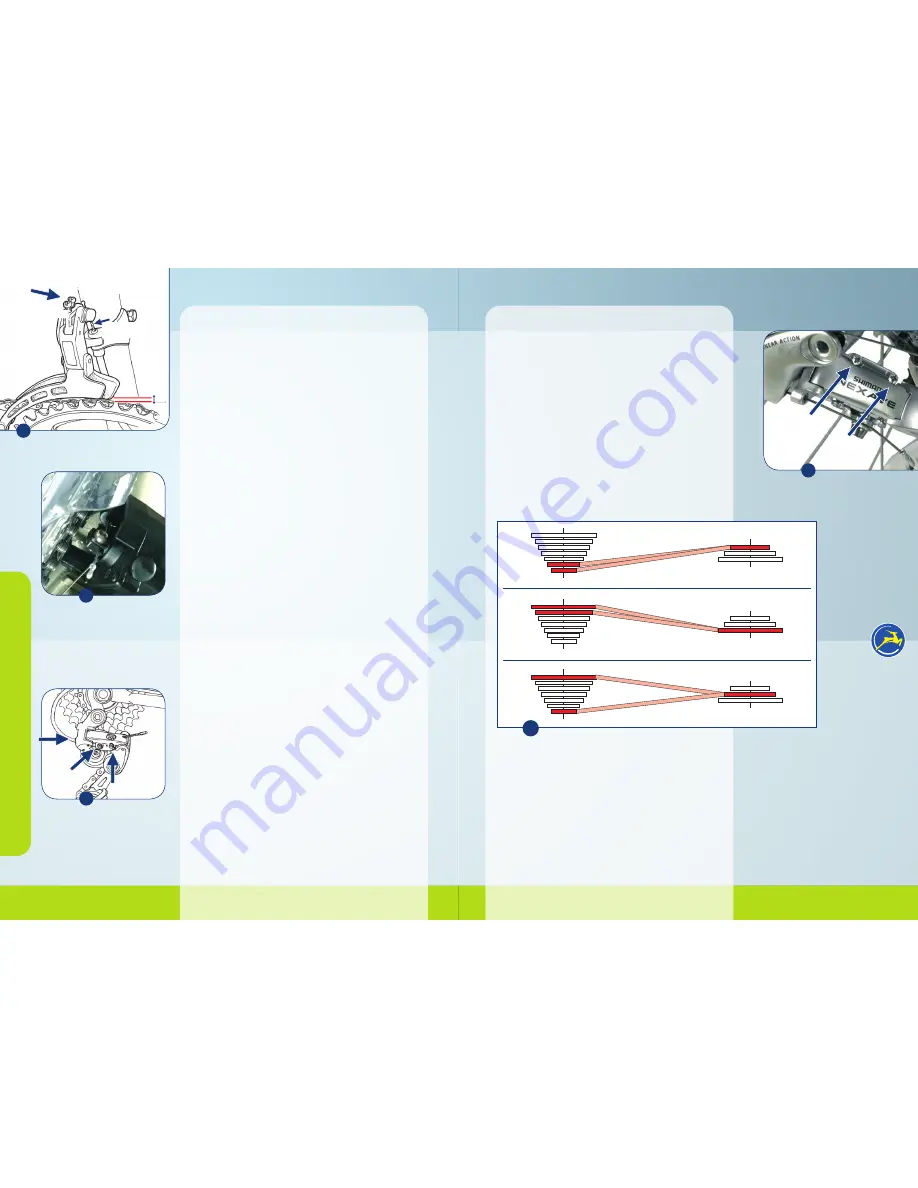
Note: the chain should move in as straight a line as possible. This 
means that, when shifting, some combinations serve no purpose and 
will lead to unnecessary wear on the chain and chainwheels. If the 
chain is on the smallest chainwheel at the front, then prevent it from 
being positioned on the two smallest sprockets at the back. If the 
chain is on the largest chainwheel at the front, then prevent it from 
being positioned on the two largest sprockets at the back. It’s also 
advised not to combine the middle chainwheel at the front with the 
smallest or largest rear sprockets. Therefore the red positions in fig. 69 
are 

not

 advisable.

69

A+B

67

B

A

C

68

A

B

Summary of Contents for bike

Page 1: ...User Manual www gazelle nl...

Page 2: ...nature seller Signature owner What to do in the case of theft If you are unfortunate enough to have your bike stolen report it to the police When you do so bring this booklet so that the police will h...

Page 3: ...e frame 24 Technical maintenance 25 Adjusting the derailleurs 30 Recommended tightening torques 33 Tyre inspection and maintenance 33 MINOR REPAIRS Repairing a puncture 34 Removing the front wheel 35...

Page 4: ...e can offer you a long lasting warranty In the back of this booklet you will find the certificate of guarantee To get the best out of your new bike on a continuous basis it is recommended that you mai...

Page 5: ...rate the lever you can slightly loosen nut M If you loosen the nut too much the seat will tilt If you loosen bolt B you can adjust the seat to the front or back fig 2 Gazelle Comfort Post and Gazelle...

Page 6: ...cking system Some models have a handlebar locking system on the headset fig 11 This can be activated by turning the black ring to the left counter clockwise which engages a ratchet mechanism The turni...

Page 7: ...possibility to adjust the spring tension but also to temporarily turn off the suspension completely the Lock out function B This is recommended to prevent loss of energy during a climb fig 14 Adjusti...

Page 8: ...eam angle of the Gazelle LED battery headlight is adjustable By slightly loosening the bolt A you can easily direct the light Subsequently properly retighten the bolt fig 20 To replace the batteries u...

Page 9: ...ached to your car under those circumstances it is undesirable that the light switches on It s also a convenient way to shut off the standlight function when you park your bike When the batteries of th...

Page 10: ...er use the front brake only Always use the front as well as the rear brake This type of brake does feature a power modulator It prevents powerful braking from being applied immediately providing a sli...

Page 11: ...e chapter Maintenance and inspection on pages 27 through 29 tells you how to adjust gear hubs When shifting see to it that you lessen the pressure on the pedals or temporarily stop pedalling Derailleu...

Page 12: ...poke is broken the wheel can deform as a result of which there is a great chance that more spokes will break Please be aware that under wet conditions pedals can be slippery Some bikes are fitted with...

Page 13: ...sc brakes make sure that no spray wax gets on the braking disc or rims It can adversely affect the braking efficiency Chromed parts With regard to chromed parts such as the handlebar hubs cranks or se...

Page 14: ...egularly also beneath the rubber parts After cleaning Teflon containing oil should be reapplied to them fig 53 Disc brake maintenance The disc brake consists of 2 movable brake pads If the braking pow...

Page 15: ...ocated in the groove in the axle B in fig 60 If for some reason it is necessary to readjust the Spectro gear hub the twist grip should be set to the right gear first This is third gear for a 5 speed h...

Page 16: ...sprocket fig 67 Rear derailleur adjusting the lowest gear To adjust the lowest gear turn adjusting screw B Make sure that the chain is on the inner sprocket and turn the adjusting screw in such a way...

Page 17: ...t on the opposite side of the axle until it can t go any further Now push up the lever so that it reaches position 2 fig 71 This is the only way to make sure that the wheels are held securely Beware o...

Page 18: ...the manufacturer s instructions Subsequently you can stick a patch on it which you should press firmly onto the tube fig 79 To check if the puncture has been repaired inflate the tube and hold it unde...

Page 19: ...rame figs 83 and 84 If you turn the locking plate B in fig 85 to the left you can remove the gear shift unit This must be done in first gear Don t loosen the gear shift unit cable during removal or th...

Page 20: ...e to it that they protrude on the other side at least six millimetres Then you can fold the bundles of wire back tightly over the plug pins On a separate note in the dynamo the two connections on the...

Page 21: ...e wheel forwards a bit If your bike is fitted with a Sram Spectro 3 gear hub you have to correct the hub adjustment after tensioning the chain How you can do this you can read in the chapter Maintenan...

Page 22: ...urdy Gazelle bike bags fig 101 One of the most common causes of bike accidents is hanging bags on the handlebar Prevent this danger and never hang a bag on your handlebar If you want to transport more...

Page 23: ...your Gazelle dealer for a good bike carrier Be aware though that your bicycle is subjected to considerable forces when transported on a car Therefore always check if there are no components that can...

Page 24: ...competing in races With regard to bike rental different warranty terms apply Apart from these warranty terms the buyer can hold the seller liable on the grounds of rights or claims that the law grant...

Page 25: ...p tube seat tube lock down tube head set handlebar stem handlebar headlight V Brake dynamo front fork hub mudguard stay gear operations brake levers bottle bottle holder rear derailleur cassette rear...

Page 26: ...50 51 Notes...

Reviews: