background image

ZZZ-210.W1610.1207-18.GP.EN.SUN                                               WEB VERSION 


         SUN-HI                 7 

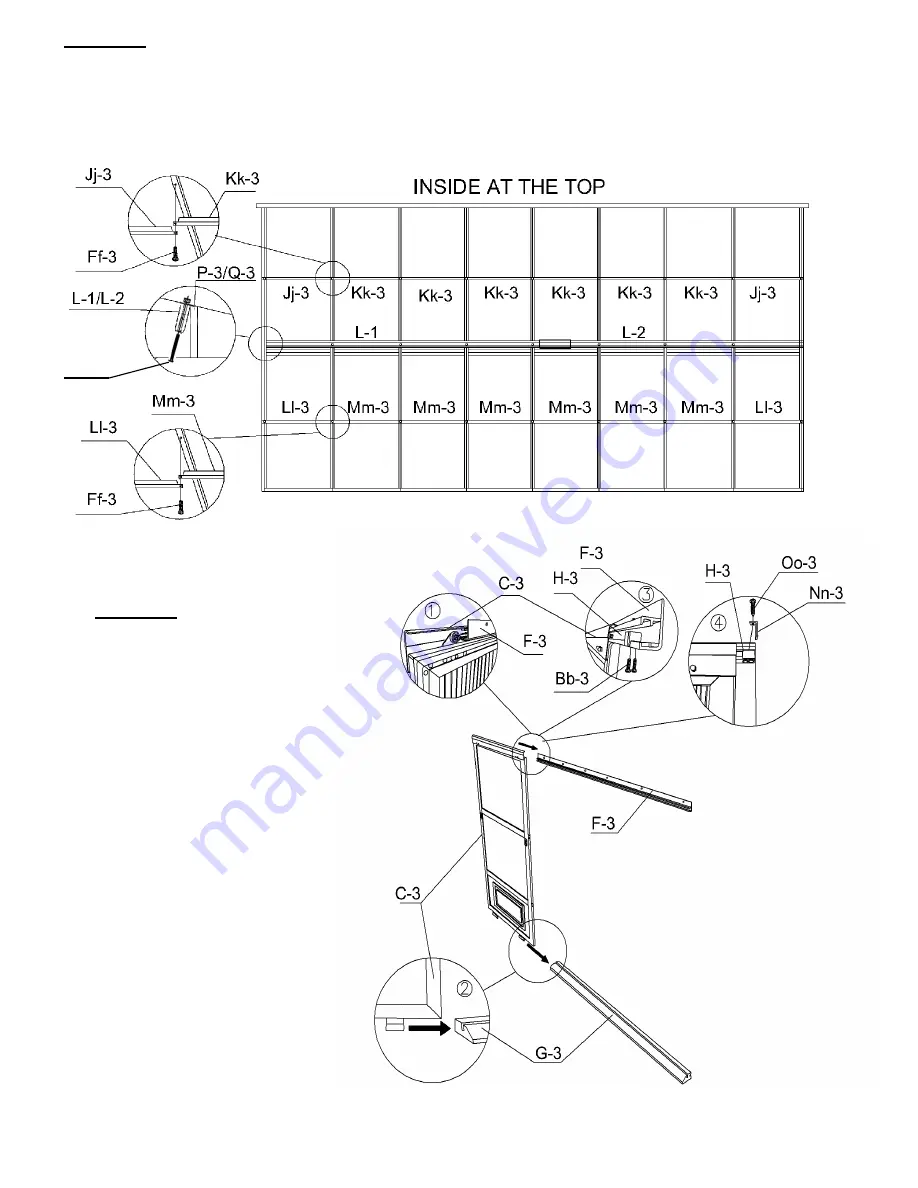
STEP #11 
 

On the inside of the solarium under each rafter there are two rows of inserts with threads, and one crossbeam in 
two pieces. Start the upper row with a Jj-3 at either end and Kk-3 between panels, screwing them in place with Ff-
3. Use Ff-3 screws for the lower row Ll-3 at the 2 ends and Mm-3 between panels. Lastly, assemble crossbeam 
L-1 and L-2, then secure to rafters using bolts Cc-3. Make sure screws are manually tight.  


STEP #12


DOOR UNIT(S) MUST BE 
ASSEMBLED INSIDE OF 
SOLARIUM. 

Slide  upper  door  track  F-3  into 
wheels of sliding door C-3.  Slide 
lower  door  track  G-3  and  make 
sure  inserts  are  close  enough  to 
the  frame  to  attach.      Use  bolt 
Bb-3  to  affix  the  plastic  stopper 
H-3  on  each  end  of  top  door  rail 
F-3.  Use  Oo-3  screws  to  affix 
upper  door  rail  and  cap  Nn-3,  at 
each end of top rail door. 

Cc-3 

Summary of Contents for W1610 1/2

Page 1: ...TIONS DO NOT DESTROY THE BOXES UNTIL COMPLETELY ASSEMBLED PLEASE VERIFY THE CONTENT OF EACH BOX AGAINST THE LIST OF PARTS Assembly by two or three adults is suggested Requires 96 clearance at the wall Base Dimensions 190 x 118 Largest Dimensions 190 x122 see pg 14 customerservice gazebopenguin com ...

Page 2: ... direction of the door when open Ensure frames A 3 are at the front of the sides Use E 3 between frame ends and use two 2 K 3 joints for corners NOTE When placing the door frame opening make sure the inserts on the frame are on the inside and on the upper half of the frame of the solarium because the door will be set on the inside due to clearance NOTE When sliding the connectors shake the frame s...

Page 3: ... wall track is in place apply silicone along the top of the wall track and at the joint of the two tracks Silicone is not supplied ASSEMBLE PIECES BEFORE SCREWING THEM TO THE WALL STEP 3 Assemble ML 3 N 3 O 3 and MR 3 as shown and position evenly above vertical guides with the top fo the track at 96 from the ground Secure wall track and vertical tracks to brick or cement wall by drilling through t...

Page 4: ...ing through joint K 3 with the Bb 3 screw Secure to Q 3 bracket with self tapping screw PQ 3 Repeat on left side with rafter S 3 STEP 6 Set U 3 rafters over the middle of each panel with Bb 3 screws at the top and two 2 Z 3 screws over the brackets on frame manually Set U 3 rafter on each joint and use Z 3 screws manually Do not use power drill Z 3 ...

Page 5: ...Pp 3 should go first and last with the Qq 3 panels in between STEP 8 Insert the aluminum middle roof joint between the rafters making sure the slotted holes are at the bottom Slide into upper and lower grooves of the rafters then slide all the way into the panels Make sure the panels are inside the aluminum middle roof joint groove Insert a V 3 at either end then insert all W 3 and then the remain...

Page 6: ...s between the panels and gently tap on the panel to guide it into the aluminum groove Use a spatula if needed to make it fit Insert two 2 Pp 3 on either end then insert the Qq 3 panels STEP 10 Starting at either end add X 3 edging and one 1 R 3 bracket and screw with Bb 3 manually do not use power drill Add Y 3 edging and repeat until you reach the end then add the X 3 edging ...

Page 7: ...3 at the 2 ends and Mm 3 between panels Lastly assemble crossbeam L 1 and L 2 then secure to rafters using bolts Cc 3 Make sure screws are manually tight STEP 12 DOOR UNIT S MUST BE ASSEMBLED INSIDE OF SOLARIUM Slide upper door track F 3 into wheels of sliding door C 3 Slide lower door track G 3 and make sure inserts are close enough to the frame to attach Use bolt Bb 3 to affix the plastic stoppe...

Page 8: ... and washers Gg 3 on the inside and female bolts Cc 3 2 on the outside for the top assembly See diagram below Attach lower track with bolts Cc 3 and washers Gg 3 Set up door latch on the side required for your door to lock adjust latch as required Sliding door should be installed from the inside of the solarium Sliding door should be installed from the inside of the solarium Ww ...

Page 9: ...s push or pull to one side making sure that locking pin is not locked then remove panels gently panels are easy to remove NOTE This unit is not waterproof For best protection against rain close the windows of each frame with the outside window in the center and the inside window at the top CLEANING INSTRUCTIONS Use only mild or warm soapy water no strong or abrasive cleaning products Be sure to re...

Page 10: ...IDING DOOR FRAME D 3 2 2 11 544 12 CONNECTING PIECE E 3 4 14 11 545 12 TOP DOOR RAIL F 3 4 2 11 546 12 BOTTOM DOOR RAIL G 3 4 2 08 138 12 PLASTIC STOPPER H 3 5 4 12 142 12 LEFT SIDE RECEIVER I 3 4 1 12 143 12 RIGHT SIDE RECEIVER J 3 4 1 10 502 12 CORNER CONNECTOR K 3 4 2 12 157 12 LEFT CROSSBEAM L 1 4 1 12 156 12 RIGHT CROSSBEAM L 2 4 1 10 532 12 TRACK ML 3 4 1 10 533 12 TRACK MR 3 4 1 10 505 12 T...

Page 11: ...MIDDLE ROOF JOINT V 3 5 2 10 514 12 MIDDLE ROOF JOINT W 3 5 6 10 515 12 EDGING X 3 5 2 10 516 12 EDGING Y 3 5 6 08 156 12 SCREW Z 3 5 14 08 158 12 BOLT Bb 3 5 32 08 161 12 BOLT Cc 3 5 25 12 037 12 FEMALE BOLT Cc 3 2 5 12 08 165 12 RIGHT DOOR LATCH Dd R 3 5 2 08 169 12 LEFT DOOR LATCH Dd L 3 5 2 08 167 12 SCREW Ee 3 5 12 08 168 12 BOLT Ff 3 5 20 08 187 WASHER Gg 3 5 25 08 193 PLASTIC PLUG Ii 3 5 12...

Page 12: ...50 63 x 23 REGULAR ROOF PANEL Qq 3 1 12 12 151 LEFT BACK GABLE PANEL Rr 3 1 1 12 152 LEFT FRONT GABLE PANEL Ss 3 1 1 12 153 RIGHT BACK GABLE PANEL Tt 3 1 1 12 154 RIGHT FRONT GABLE PANEL Uu 3 1 1 10 527 12 LEFT WALL GUIDE Vv 3 4 1 10 528 12 RIGHT WALL GUIDE Ww 3 4 1 10 529 12 SCREW FOR FIXING TO WALL Xx 3 5 26 10 530 12 REGULAR TOP FILLER Yy 3 5 6 10 531 12 END TOP FILLER Zz 3 5 2 12 047 12 BOLT W...

Page 13: ...493 PVC WINDOW replacement material only 11 824 12 BOTTOM PLASTIC PANEL for wall panels 85 417 P ROUND SPLINE FOR PVC WINDOW 11 825 12 BOTTOM PLASTIC PANEL for doors 15 123 12 PIN FOR PVC WINDOW 12 173 12 BOTTOM PLASTIC PANEL FOR HALF FRAME A 3 1 2 13 055 PC WINDOW for sliding door 15 097 12 DOOR WHEEL ASSEMBLY 12 174 12 MOSQUITO SCREEN in frame 10 458 REPLACEMENT WEATHERSTRIP 124 12 175 12 MOSQUI...

Page 14: ...LIDING DOOR FRAME D 3 2 2 11 544 32 CONNECTING PIECE E 3 4 14 11 545 32 TOP DOOR RAIL F 3 4 2 11 546 32 BOTTOM DOOR RAIL G 3 4 2 08 138 32 PLASTIC STOPPER H 3 5 4 12 142 32 LEFT SIDE RECEIVER I 3 4 1 12 143 32 RIGHT SIDE RECEIVER J 3 4 1 10 502 32 CORNER CONNECTOR K 3 4 2 12 157 32 LEFT CROSSBEAM L 1 4 1 12 156 32 RIGHT CROSSBEAM L 2 4 1 10 532 32 TRACK ML 3 4 1 10 533 32 TRACK MR 3 4 1 10 505 32 ...

Page 15: ...MIDDLE ROOF JOINT V 3 5 2 10 514 32 MIDDLE ROOF JOINT W 3 5 6 10 515 32 EDGING X 3 5 2 10 516 32 EDGING Y 3 5 6 08 156 32 SCREW Z 3 5 14 08 158 32 BOLT Bb 3 5 32 08 161 32 BOLT Cc 3 5 25 12 037 32 FEMALE BOLT Cc 3 2 5 12 08 165 32 RIGHT DOOR LATCH Dd R 3 5 2 08 169 32 LEFT DOOR LATCH Dd L 3 5 2 08 167 32 SCREW Ee 3 5 12 08 168 32 BOLT Ff 3 5 20 08 187 WASHER Gg 3 5 25 08 193 PLASTIC PLUG Ii 3 5 12...

Page 16: ...50 63 x 23 REGULAR ROOF PANEL Qq 3 1 12 12 151 LEFT BACK GABLE PANEL Rr 3 1 1 12 152 LEFT FRONT GABLE PANEL Ss 3 1 1 12 153 RIGHT BACK GABLE PANEL Tt 3 1 1 12 154 RIGHT FRONT GABLE PANEL Uu 3 1 1 10 527 32 LEFT WALL GUIDE Vv 3 4 1 10 528 32 RIGHT WALL GUIDE Ww 3 4 1 10 529 32 SCREW FOR FIXING TO WALL Xx 3 5 26 10 530 32 REGULAR TOP FILLER Yy 3 5 6 10 531 32 END TOP FILLER Zz 3 5 2 12 047 32 BOLT W...

Page 17: ...493 PVC WINDOW replacement material only 11 824 12 BOTTOM PLASTIC PANEL for wall panels 85 417 P ROUND SPLINE FOR PVC WINDOW 11 825 12 BOTTOM PLASTIC PANEL for doors 15 123 12 PIN FOR PVC WINDOW 12 173 12 BOTTOM PLASTIC PANEL FOR HALF FRAME A 3 1 2 13 055 PC WINDOW for sliding door 15 097 12 DOOR WHEEL ASSEMBLY 12 174 12 MOSQUITO SCREEN in frame 10 458 REPLACEMENT WEATHERSTRIP 124 12 175 12 MOSQUI...

Page 18: ...ZZZ 210 W1610 1207 18 GP EN SUN WEB VERSION SUN HI 18 ...

Page 19: ...ces CONDITIONS FOR EXERCISING THE WARRANTY The warranty only applies to the original purchaser with the bill In order to properly exercise your warranty please comply with the following Carefully inspect the contents of the carton for missing or damaged components Should you discover damaged or missing parts do not return the product to the place of purchase but contact Gazebo Penguin Customer Ser...

Reviews: