background image

CHAPTER

4

: Upgrading Your Computer

56

7

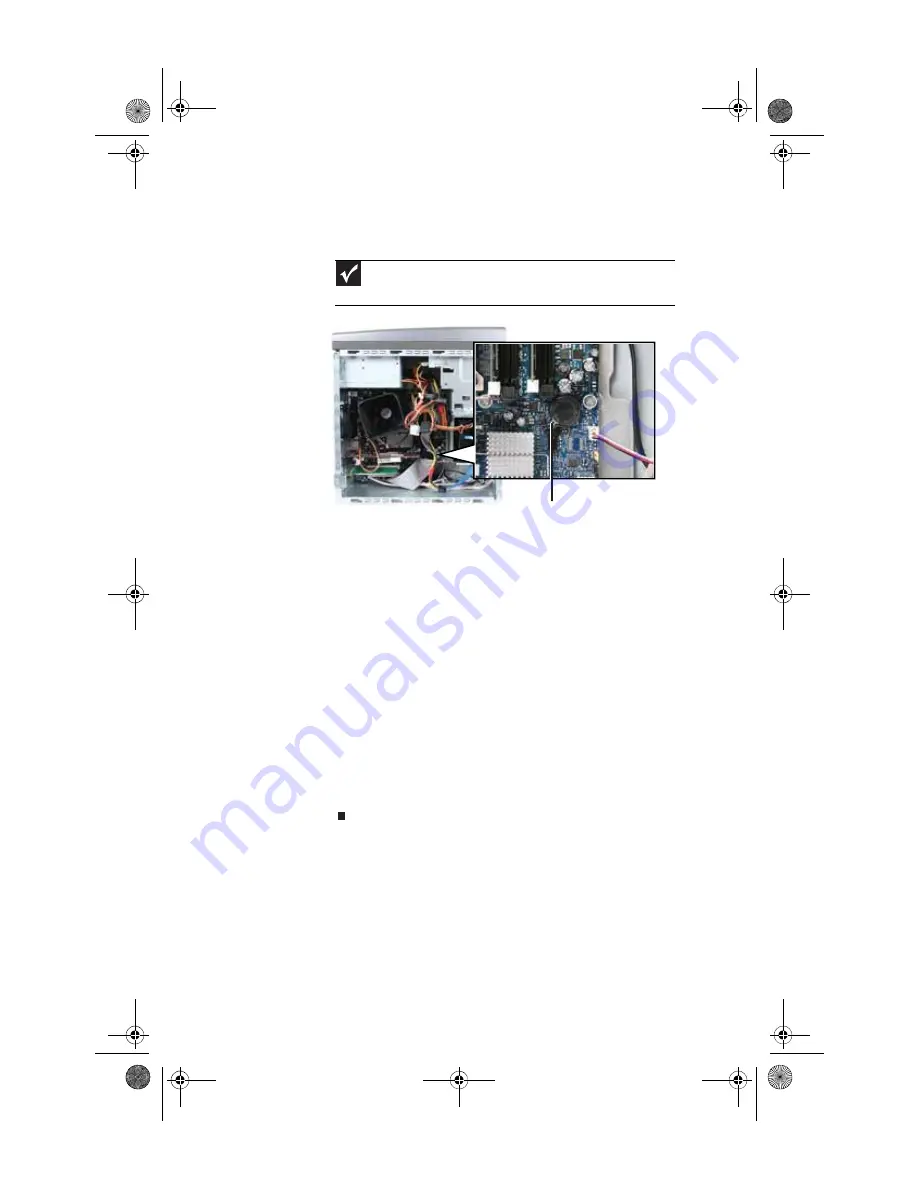
Locate the old battery on the system board and note 
its orientation. You will need to install the new battery 
the same way.

8

Push the battery release tab. The battery pops out of 
the socket.

9

Make sure that the positive (+) side of the new battery 
is facing up (usually the side that the battery type and 
model number are etched into), then press the battery 
into the socket until it snaps into place.

10

Replace the side panel by following the instructions in 

“Replacing the side panel” on page 40

.

11

Reconnect all external cables and the power cord.

12

Turn on your computer.

13

While your computer starts, press and hold the 

F1

 key. 

The main menu of the BIOS Setup utility opens.

14

In the BIOS Setup utility, restore any settings that you 
wrote down in 

Step 3

.

15

Save all your settings and exit the BIOS Setup utility.

Important

Your computer’s battery location may vary from the illustration 

below.

Battery release tab

8512243.book  Page 56  Monday, February 12, 2007  4:35 PM

Summary of Contents for GT5062b

Page 1: ...GATEWAY COMPUTER REFERENCEGUIDE 8512243 book Page a Monday February 12 2007 4 35 PM...

Page 2: ...8512243 book Page b Monday February 12 2007 4 35 PM...

Page 3: ...repetitive strain 14 Preparing power connections 14 Protecting from power source problems 14 Checking the voltage selection 15 Connecting to a broadband modem or network 15 Connecting a dial up modem...

Page 4: ...he side panel 40 Replacing the color panel 40 Installing memory 43 Adding or replacing an optical disc drive 45 Replacing the memory card reader 47 Adding or replacing a hard drive 49 Replacing the he...

Page 5: ...s automatically 73 Transferring files and settings manually 74 Chapter 6 Troubleshooting 77 Safety guidelines 78 First steps 78 Troubleshooting 79 Add in cards 79 Audio 79 CD or DVD drives 79 Diskette...

Page 6: ...Using Microsoft System Restore 106 Recovering your system to its factory condition 109 Recovering your system using the Windows DVD 110 Telephone support 111 Before calling Gateway Customer Care 111 S...

Page 7: ...About This Reference About this guide Accessing the online User Guide Gateway contact information Microsoft Certificate of Authenticity For more information 8512243 book Page 1 Monday February 12 200...

Page 8: ...ddress shown on your computer s label The Support page also has links to additional Gateway documentation and detailed specifications Accessing the online User Guide In addition to this guide your Use...

Page 9: ...call for assistance Microsoft Certificate of Authenticity The Microsoft Certificate of Authenticity label found on the back or side of your computer includes the product key code for your operating sy...

Page 10: ...CHAPTER 1 About This Reference 4 8512243 book Page 4 Monday February 12 2007 4 35 PM...

Page 11: ...CHAPTER2 5 Checking Out Your Computer Front Back 8512243 book Page 5 Monday February 12 2007 4 35 PM...

Page 12: ...crophone jack Power button power indicator DVD CD drive optional Headphone jack IEEE 1394 FireWire port USB ports Video jack optional Audio left jack optional Audio right jack optional Diskette or rem...

Page 13: ...r removable hard drive optional Use this drive to read from and write to 3 5 diskettes or use this bay to connect a removable hard drive Headphone jack Plug powered analog front speakers an external a...

Page 14: ...2 keyboard into this port Telephone jack PS 2 mouse port PS 2 keyboard port Voltage switch Power connector Ethernet network jack Audio in side speaker jack Case cover thumbscrew Headphone front speak...

Page 15: ...Microphone jack pink plug Plug a microphone into this jack Headphone analog speakers jack green plug OR Front speakers jack This jack is user configurable for one of the following Headphone Plugheadph...

Page 16: ...page 32 Audio input Line in jack blue plug OR Side speaker jack This jack is user configurable for one of the following Stereo in Plug an external audio input source such as a stereo into this jack s...

Page 17: ...a dial up modem Starting your computer Turning off your computer Restarting rebooting your computer Using the keyboard Using the mouse Using optical drives Using the memory card reader Using the diske...

Page 18: ...lel to the floor Adjust the screen so it is perpendicular to your line of sight and the top of the screen is no higher than eye level Place your feet flat on the floor or on a footrest Keep ventilatio...

Page 19: ...is the appropriate height and the chair helps you maintain good posture Select a flat surface for your computer desk Adjust the height of the computer desk so your hands and arms are positioned paral...

Page 20: ...o your computer can increase to far above normal levels and cause data loss or system damage Protect your computer and peripheral devices by connecting them to a surge protector which absorbs voltage...

Page 21: ...o a wired Ethernet network To connect to a broadband modem or to an Ethernet network 1 Insert one end of the network cable into the network jack on the back of your computer 2 Insert the other end of...

Page 22: ...nnections 3 If you are starting your computer for the first time follow the on screen instructions to select the language and time zone and to create your first user account 4 Attach and turn on any U...

Page 23: ...t does turn off or slow down most system operations to save power and saves your desktop layout so the next time you restore power the programs are laid out just as you left them Waking your computer...

Page 24: ...1 Click Start click the arrow next to the lock icon then click Shut Down The computer turns off 2 To completely disconnect all power such as for servicing internal components also disconnect the powe...

Page 25: ...ons to copy cut and paste Function keys Press these keys to start program actions Each program uses different function keys for different purposes See the program documentation to find out more about...

Page 26: ...responding key to activate the function Windows keys Press one of these keys to open the Windows Start menu These keys can also be used in combination with other keys to open utilities like F Find Sea...

Page 27: ...or SCROLL LOCK keys are activated Press the corresponding key to activate the function Windows keys Press one of these keys to open the Windows Start menu These keys can also be used in combination wi...

Page 28: ...he computer display This illustration shows the standard mouse As you move the mouse the pointer arrow on the display moves in the same direction You can use the left and right buttons on the mouse to...

Page 29: ...Select an object on the computer display Position the pointer over the object Quickly press and release the left mouse button This is called clicking Start a program or open a file or folder Position...

Page 30: ...al disc drive 2 Place the disc in the tray with the label facing up 3 Press the eject button to close the tray Important When you place a single sided disc in the tray make sure that the label side is...

Page 31: ...s playing audio CDs playing DVDs and accessing data DVD RW Installing programs playing audio CDs playing DVDs accessing data and recording video and data to CDs and DVD R or DVD RW discs DVD R RW Inst...

Page 32: ...playing audio CDs playing DVDs accessing data and recording video and data to CDs and DVD RAM DVD R or DVD RW discs Blu ray Disc Installing programs playing audio CDs playing DVDs playing Blu ray Disc...

Page 33: ...an hold 50 GB of files about 23 hours of standard definition video or about nine hours of high definition video Blu ray Discs can be played on a Blu ray compatible player or a Blu ray drive equipped c...

Page 34: ...create video files from home video For more information see your online User Guide Copying optical discs You can copy optical discs to make backups of your data For more information see your online Us...

Page 35: ...lick the drive letter for example the E drive then double click the file name To remove a memory card Wait for the memory card reader access indicator to stop blinking then pull the memory card out of...

Page 36: ...drive letter for example the A drive then double click the file name 3 To remove the diskette make sure that the drive activity light is off then press the eject button Adjusting the volume You can a...

Page 37: ...mute the volume click Mute To restore volume click it again 4 To adjust device volume levels click Mixer The Volume Mixer dialog box opens where you can click and drag sliders for individual devices T...

Page 38: ...ct your audio device s to the computer audio jack s 2 Click Start then click Control Panel The Control Panel window opens 3 Click Hardware and Sound Sound the Playback tab then click Configure OR If y...

Page 39: ...you plug it into the appropriate port When you use an IEEE 1394 or USB device for the first time your computer will prompt you to install any software the device needs After doing this you can discon...

Page 40: ...CHAPTER 3 Setting Up and Getting Started 34 8512243 book Page 34 Monday February 12 2007 4 35 PM...

Page 41: ...color panel Installing memory Replacing the system battery Adding or replacing an optical disc drive Replacing the memory card reader Adding or replacing a hard drive Replacing the heat sink and proc...

Page 42: ...istatic bags only when you are ready to use them Do not lay components on the outside of antistatic bags because only the inside of the bags provide electrostatic protection Always hold expansion card...

Page 43: ...device cables 3 Press the power button for ten seconds to drain any residual power from your computer 4 Loosen the two captive thumbscrews on the back edge of the side panel These screws cannot be re...

Page 44: ...front bezel 1 Remove the side panel by following the instructions in Removing the side panel on page 37 2 Press the three bezel retention tabs then swing the left side of the bezel away from the compu...

Page 45: ...ezel into the slots on the right side of the computer 2 Swing the left side of the bezel in to insert the release tabs on the left side of the bezel into the slots on the left side of the computer 3 P...

Page 46: ...the two thumbscrews on the back edge of the side panel then reconnect the cables and power cord Replacing the color panel To replace the color panel on the front bezel 1 Find the panel release lever...

Page 47: ...bezel You should press the two points against the computer until you hear or feel a click which is the sound of the panel s internal locking tabs unlocking 3 Swing the bottom of the panel away from t...

Page 48: ...bs You should press the two points against the computer until you hear or feel a click which is the sound of the panel s internal locking tabs locking the panel partially into place 6 While pressing t...

Page 49: ...more stability place your computer on its side To avoid scratching the case place it on a towel or other non abrasive surface 3 Find the memory module banks on your system board 4 If you are removing...

Page 50: ...he module is secure you hear a click 6 Replace the side panel by following the instructions in Replacing the side panel on page 40 7 Return your computer to its upright position 8 Reconnect the cables...

Page 51: ...to Step 8 For the location of the screws see the photo in Step 6 4 If you are replacing an existing drive disconnect the cables from the drive noting their locations and orientation You will reconnec...

Page 52: ...on the drive then replace the two drive retention screws 9 Reconnect the drive cables using your notes from Step 4 or according to the manufacturer s instructions 10 Replace the front bezel by followi...

Page 53: ...the front bezel on page 38 3 Slide the top bezel toward the front of the computer about 3 4 inch then remove it from your computer 4 Remove the two screws that secure the card reader to the computer...

Page 54: ...ved previously 7 Plug the cable into the card reader 8 Place the top bezel on top of the computer then slide bezel toward the back of the computer until it clicks into place 9 Reinstall the bezel by f...

Page 55: ...side panel on page 37 2 Disconnect and label all hard drive cables noting their locations and orientation You will reconnect the cables after you install the new drive 3 Disconnect the hard drive cag...

Page 56: ...cage 7 If you are replacing a drive note any jumper settings on the old drive and set the jumper on the new drive to be the same OR If you are adding a new drive set the jumper as instructed by the d...

Page 57: ...the new hard drive as your primary drive install Windows using the operating system DVD that came with your computer For more information on restoring your system see Recovering your system on page 9...

Page 58: ...release lever down lift it completely up then lift the processor retention bracket 6 Remove the processor from the system board 7 Install the new processor onto the system board Make sure that Pin 1 o...

Page 59: ...to the system board 10 Connect the heat sink fan cable to the system board 11 Replace the side panel by following the instructions in Replacing the side panel on page 40 Adding or replacing an expans...

Page 60: ...s 6 If you have just replaced an expansion card reconnect the expansion card cables if any using your notes from Step 2 If you have added a new expansion card connect its cables according to its user...

Page 61: ...us then exit from the utility 4 Shut down your computer 5 Remove the side panel by following the instructions in Removing the side panel on page 37 6 For more stability place your computer on its side...

Page 62: ...socket until it snaps into place 10 Replace the side panel by following the instructions in Replacing the side panel on page 40 11 Reconnect all external cables and the power cord 12 Turn on your comp...

Page 63: ...wer and data cables from the system board noting their locations and orientation You will reconnect the cables after you install the new board 5 Remove the four screws that secure the power supply to...

Page 64: ...by following the directions in the same procedure 10 Slide the power supply back into the case then install the four screws to secure the power supply to the case 11 Connect all power and data cables...

Page 65: ...g up a maintenance schedule Caring for your computer Cleaning your computer Updating Windows Using BigFix Managing hard drive space Scheduling maintenance tasks Moving from your old computer 8512243 b...

Page 66: ...e schedule Maintenance task Weekly Monthly When needed Check for viruses X X X Run Windows Update X X Manage hard drive space X Clean up hard drives X X Scan hard drive for errors X X Defragment hard...

Page 67: ...d easy to break in cold temperatures and can melt or warp in high temperatures Damage due to either extreme is not covered by your warranty As a general rule your computer is safest at temperatures th...

Page 68: ...nt free cloth to clean your computer and other parts of your system Do not use household abrasive or solvent cleaners because they can damage the finish on components Your computer is cooled by air ci...

Page 69: ...use a soft cloth and water to clean the screen Dampen the cloth never apply liquid directly to the screen then wipe the screen with the cloth To clean a CRT monitor use a soft cloth and glass cleaner...

Page 70: ...always get the most recent updates and fixes to protect your computer and keep it running smoothly Windows Update scans your computer and provides you with a tailored selection of updates that apply...

Page 71: ...dates from BigFix sites on the Internet Whenever BigFix detects a problem it alerts you by flashing the blue taskbar icon To fix the problem click on that icon to open BigFix To start BigFix 1 Click S...

Page 72: ...use to check hard drive space delete unnecessary files defragment files and back up files Checking hard drive space To check hard drive space 1 Click Start then click Computer The Computer window open...

Page 73: ...y files Delete unnecessary files such as temporary files and files in the Recycle Bin to free hard drive space To delete unnecessary files 1 Click Start All Programs Accessories System Tools then clic...

Page 74: ...d marks flawed areas on the hard drive so Windows does not use them If you use your computer several hours every day you probably want to run Error checking once a week If you use your computer less f...

Page 75: ...ation stored on the drive can improve hard drive performance While Disk Defragmenter is running do not use your keyboard or mouse because using them may continuously stop and restart the defragmenting...

Page 76: ...removing them from the hard drive frees space for new files on the hard drive It also protects you from losing important information if the hard drive fails or you accidentally delete files You should...

Page 77: ...ick the Tools tab 3 Click Backup Now then click Run a file backup now 4 Follow the on screen instructions to select a backup storage location and the files and folders to back up Help For more informa...

Page 78: ...eduler dialog box opens 2 Click Create Basic Task for basic tasks or click Create Task for more complex tasks then follow the on screen instructions to finish setting up and scheduling the task Import...

Page 79: ...rams on the new computer before running Windows Easy Transfer Windows Easy Transfer copies only the software s settings not the software itself to the new computer 2 Click Start All Programs Accessori...

Page 80: ...Start then click Documents The Documents folder opens and displays many of your saved personal data files Go to Step 4 OR In Windows XP click Start then click My Documents The My Documents window open...

Page 81: ...ick Start then click Search The Search Results window opens OR In Windows XP click Start then click Search The Search Results window opens OR In Windows 98 Windows Me or Windows 2000 click Start Find...

Page 82: ...CHAPTER 5 Maintaining Your Computer 76 8512243 book Page 76 Monday February 12 2007 4 35 PM...

Page 83: ...CHAPTER6 77 Troubleshooting Safety guidelines First steps Troubleshooting Recovering your system Telephone support 8512243 book Page 77 Monday February 12 2007 4 35 PM...

Page 84: ...followed each instruction If an error occurs in a program see the program s printed documentation or the online help Warning Never open your computer case while your computer is turned on and while th...

Page 85: ...ntify your drive type see Identifying optical drive types on page 25 Your computer may be experiencing some temporary memory problems Shut down and restart your computer Some music CDs have copy prote...

Page 86: ...that the disc label is facing up then try again Try a different disc Occasionally discs are flawed or become scratched and cannot be read by the DVD drive Clean the disc For more information see Clea...

Page 87: ...see an Access Denied or Write protect error message Move the write protection tab in the upper right corner of the diskette down unprotected The diskette may be full Delete unnecessary files on the d...

Page 88: ...re that the video cable is connected to the video port on your computer Connect an external display that you know works to your computer Reinstall the device driver The color is not uniform Make sure...

Page 89: ...on your network have the same workgroup name Make sure that all computers are using the same Subnet Mask If you assigned IP addresses to the computers make sure that all computers have different IP ad...

Page 90: ...tion see the documentation that came with your expansion card Reseat the card File management A file was accidentally deleted If a file was deleted while holding down the SHIFT key the file cannot be...

Page 91: ...ixing hard drive problems see Checking the hard drive for errors on page 68 The hard drive cannot be accessed or you see a General failure reading drive C error message If a diskette is in the diskett...

Page 92: ...Web address incorrectly you have lost your Internet connection or your ISP is having technical difficulties Double check the URL or try a different URL If the error message still appears disconnect fr...

Page 93: ...ver A keyboard character keeps repeating or you see a keyboard stuck or key failure error message Make sure that nothing is resting on the keyboard Make sure that a key is not stuck Press each key to...

Page 94: ...the connection type has an affect on the video quality The Media Center has two video outputs VGA If your TV includes a VGA port connect the VGA cable from the computer s VGA monitor port to the TV s...

Page 95: ...rlaced video displays a video frame with two passes of alternating scan lines The TV screen first displays the video image odd lines one at a time sequentially from top to bottom then it fills in the...

Page 96: ...play recorded programs on other computers A DVR MS file recorded to DVD can be replayed on another computer running Media Center or on any computer that has a DVD player and DVD decoder software such...

Page 97: ...ndow The memory card reader was temporarily uninstalled using the Remove Hardware icon in the system tray Reboot your computer and your card reader will be re installed Modem cable or DSL My computer...

Page 98: ...messages are cleared and call waiting is disabled before using the modem Contact your telephone service to get the correct code to temporarily disable the service Also make sure that the modem dialing...

Page 99: ...one line either a different telephone number in your house or a telephone line at a different location If you can connect on this line call your telephone service Try connecting with the modem at a lo...

Page 100: ...n Shut down and restart your computer Run Windows modem diagnostics To run modem diagnostics 1 Close all open programs 2 Click Start then click Control Panel The Control Panel window opens 3 Click Har...

Page 101: ...k Control Panel The Control Panel window opens 2 Click Hardware and Sound then click Phone and Modem Options The Phone and Modem Options dialog box opens 3 Click the Modems tab click the modem you wan...

Page 102: ...dem or network on page 15 your online User Guide or Ethernet on page 83 Passwords Your computer does not accept your password Make sure that CAPS LOCK is turned off then retype the password Power Your...

Page 103: ...inter make sure that you have selected it in the printer setup To set a default printer 1 Click Start then click Control Panel The Control Panel window opens 2 Click Hardware and Sound then click the...

Page 104: ...akers Make sure that the volume controls are turned up For more information see Adjusting the volume on page 30 Make sure that mute controls are turned off For more information see Adjusting the volum...

Page 105: ...en everything was working correctly For instructions see Using Microsoft System Restore on page 106 If nothing else has solved the problem and you want to return your system to factory condition see R...

Page 106: ...covery Center Preparing for software and device driver recovery You can usually recover your pre installed software and drivers from your hard drive However if you ever re install Windows from the Win...

Page 107: ...to perform this procedure To create discs for recovering pre installed software and drivers 1 Click Start All Programs Gateway Recovery Center then click Gateway Recovery Center The Gateway Recovery...

Page 108: ...pleted 6 If multiple discs are required insert the additional blank disks when prompted 7 When the process is finished the Congratulations window opens 8 Click Finish 9 Remove your final disc then lab...

Page 109: ...pplication recovery OR To recover device drivers that were pre installed click Hardware then click Device driver recovery Important If you have recently reinstalled Windows or installed a new hard dri...

Page 110: ...isc does not offer the software or driver you need to recover try another disc To recover software and drivers using recovery discs 1 Insert a software and driver recovery disc into a CD or DVD drive...

Page 111: ...ecover pre installed device drivers click Device driver recovery then click the type of driver you want to recover 3 Click Next 4 If the software or driver is not shown on the list and you have a mult...

Page 112: ...day and also each time you install software or device drivers You can also create a restore point manually For instructions see Manually creating a restore point on page 108 To restore using Microsoft...

Page 113: ...restore point dialog box opens 3 Click the restore point you want click Next then click Finish A confirmation message box appears 4 Click Yes Your system is restored using the restore point you speci...

Page 114: ...er opens 2 On the left side of the window click Create a restore point or change settings then click Next The System Properties dialog box opens to the System Protection tab 3 Click Create The Create...

Page 115: ...ecovery Options screen opens If Windows starts to load instead restart the computer and try again 3 Press the arrow keys on your keyboard to select Repair Your Computer then press ENTER Gateway System...

Page 116: ...D If you install a new hard drive or completely re format your original hard drive you must recover your system using the Windows Vista operating system DVD You also need to recover your computer s pr...

Page 117: ...commendations before contacting Gateway Customer Care Make sure that your computer is connected correctly to a grounded AC outlet that is supplying power If you use a surge protector make sure that it...

Page 118: ...ftware In many cases additional product information and online documentation for Gateway supplied hardware can be found in our Web site s Documentation Library This Reference Guide and your online Use...

Page 119: ...your computer contains information that identifies your computer model and serial number Gateway Customer Care will need this information if you call for assistance Technical Support telephone number...

Page 120: ...CHAPTER 6 Troubleshooting 114 8512243 book Page 114 Monday February 12 2007 4 35 PM...

Page 121: ...APPENDIXA 115 Legal Notices Important safety information Regulatory compliance statements Environmental information Notices 8512243 book Page 115 Monday February 12 2007 4 35 PM...

Page 122: ...sert objects of any kind into the computer ventilation openings Some products are equipped with a three wire power cord to make sure that the product is properly grounded when in use The plug on this...

Page 123: ...Federal Communications Commission FCC Unintentional emitter per FCC Part 15 This device has been tested and found to comply with the limits for a Class B digital device pursuant to Part 15 of the FCC...

Page 124: ...porarydiscontinuanceofservice mayberequired Thetelephonecompanymay request that you disconnect the equipment until the problem is resolved The telephone company may make changes inits facilities equip...

Page 125: ...epairs or alterations made by the user to this equipment or equipment malfunctions may give the telecommunications company cause to request the user to disconnect the equipment Users should make sure...

Page 126: ...antenna discharge unit connection to grounding electrodes and requirements for the grounding electrode Cable distribution system should be grounded earthed in accordance with ANSI NFPA 70 the National...

Page 127: ...n to keep from touching such power lines or circuits Contact with them could be fatal Reference Grounding component 1 Electric service equipment 2 Power service grounding electrode system NEC Art 250...

Page 128: ...erstanding and using the energy saving features of this product where applicable recycling the inner and outer packaging including shipping containers this product was delivered in and by disposing of...

Page 129: ...egistered trademarks of their respective companies Macrovision statement If your computer has a DVD compatible drive and an analog TV Out port the following paragraph applies This product incorporates...

Page 130: ...APPENDIX A Legal Notices 124 8512243 book Page 124 Monday February 12 2007 4 35 PM...

Page 131: ...19 21 B backing up files 70 battery replacing 55 bezel removing 38 replacing 39 BigFix 65 Blu ray playing 27 recording 28 Blu ray drive locating drive 7 broadband connection 15 modem 15 broadband con...

Page 132: ...SL modem 15 PS 2 keyboard 8 PS 2 mouse 9 to Ethernet network 10 15 to Internet 10 to network 10 15 connections analog speakers 9 audio in 10 cable modem 15 center speaker 10 dial up modem 10 16 digita...

Page 133: ...ng 23 dragging 23 drivers recovery discs 101 104 re installing 99 100 drives backing up files 70 CD 25 checking for errors 68 checking for free space 66 defragmenting 69 diskette 30 DVD 25 optical 24...

Page 134: ...ace 66 defragmenting 69 deleting files and folders 67 removable 7 replacing 49 scanning for errors 68 troubleshooting 85 HD DVD drive locating 7 HD DVD playing 27 recording 28 headphone jack 7 9 heat...

Page 135: ...ning CD 64 cleaning computer display 63 cleaning computer screen 63 cleaning DVD 64 cleaning keyboard 63 cleaning monitor 63 cleaning mouse 63 cleaning optical disc 64 defragmenting 69 deleting files...

Page 136: ...83 96 numeric keypad 20 21 indicator 20 21 O opening computer case 37 files 23 folders 23 front bezel 38 programs 23 shortcut menu 23 optical connection 9 optical drive eject button 24 eject hole 24...

Page 137: ...00 programs 99 100 software 99 100 Windows 99 with Gateway Recovery Center 103 with Windows DVD 110 with Windows System Restore 106 removable hard drive 7 removing files and folders 67 resetting compu...

Page 138: ...3 static electricity 36 surge protector 14 system battery replacing 55 system board replacing 57 system identification label 3 113 T Task Schdeuler 72 techinal support Support 2 technical support tips...

Page 139: ...ating Windows 64 UPS 14 USB port 7 9 33 V video playing 27 video jack 7 voltage checking selection 15 selection switch 15 volume adjusting 30 adjusting dial up modem 95 controls 30 muting 30 troublesh...

Page 140: ...134 Index 8512243 book Page 134 Monday February 12 2007 4 35 PM...

Page 141: ...8512243 book Page 135 Monday February 12 2007 4 35 PM...

Page 142: ...MAN GERSHWIN UK REF R1 2 07 8512243 book Page 136 Monday February 12 2007 4 35 PM...

Reviews: