background image

A MAN US 8450R SYS GDE R0 6/00

8450R Server

System Manual

Summary of Contents for 8450R

Page 1: ...A MAN US 8450R SYS GDE R0 6 00 8450R Server System Manual ...

Page 2: ...ding the Power On Self Test 21 Setting up the operating system 21 Turning off the server 22 Resetting the server 23 3 Case Access 25 Preventing static electricity discharge 25 Opening the case 26 Opening the bezel door 27 Removing the bezel 27 Removing the back top panel 28 Removing the front top panel 29 Closing the case 31 Replacing the front top panel 31 Replacing the back top panel 33 Replacin...

Page 3: ...ot swapping a power supply module 83 Replacing the power supply 84 Fans 89 Replacing the fans 89 Replacing the fan power distribution board 90 Replacing the front panel board 95 Replacing the hot plug PCI indicator board 97 Replacing the system board 98 5 Using the BIOS Setup Utility 111 About the BIOS Setup utility 111 Updating the BIOS 113 Setting the system board jumpers 114 The CMOS Clear jump...

Page 4: ...panion CD 130 7 Troubleshooting 131 Introduction 131 Troubleshooting checklist 131 Verifying your configuration 131 Troubleshooting guidelines 132 CD drive problems 132 Diskette drive problems 133 Hard drive problems 134 Memory and processor problems 134 Modem problems 135 Peripheral Adapter problems 136 Printer problems 137 System problems 138 Video problems 140 Error messages 142 A Safety Regula...

Page 5: ...iv 8506284 book Page iv Thursday July 13 2000 11 43 AM ...

Page 6: ...nd messages that appear on your monitor are printed in bold User s Guide Names of publications are printed in italic Viewpoint All references to front rear left or right on the server are based on the server being in a normal upright position as viewed from the front Important A note labeled important informs you of special circumstances Caution A caution warns you of possible damage to equipment ...

Page 7: ...ther Gateway products Some types of information you can access are Hardware driver and program updates Technical tips Service agreement information Technical documents and component information Frequently asked questions FAQs Documentation for peripherals or optional components Online technical support 8506284 book Page vi Thursday July 13 2000 11 43 AM ...

Page 8: ...all computer systems interface SCSI controller Integrated Adaptec AIC 7880 narrow wide Ultra SCSI controller Integrated ATI Rage IIC video controller with 2 MB of SDRAM PCI hot plug controller which supports six full length hot pluggable PCI slots Two half length PCI slots Baseboard Management Controller BMC hardware management ATX form factor system board and dedicated rackmount chassis One 3 5 i...

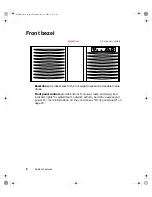
Page 9: ...ives Front panel controls provide buttons for power reset and sleep and indicator lights for system fault network activity hard drive access and power For more information on the controls see Front panel board on page 16 Bezel door Front panel controls 8506284 book Page 8 Thursday July 13 2000 11 43 AM ...

Page 10: ...e bay includes up to five hot swappable drives connected to a hot swap backplane The drive bays support 1 0 inch drives Hot swap drives plug into the hot swap drive bay Slimline diskette drive writes to and reads from 3 5 inch 1 44 MB diskettes Slimline CD drive plays data or audio CDs Power supply modules provide N 1 redundant power if all three modules are installed Slimline CD drive Slimline di...

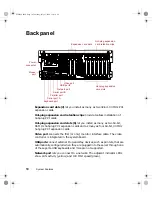
Page 11: ...he system board USB ports connect external Plug and Play devices such as printers that are automatically configured when they are plugged into the server through one of these ports USB keyboards and mice are not supported Network port lets you connect to a network The adjacent indicator LEDs show LAN activity yellow and 100 Mbit speed green MOUSE PARALLEL COM1 COM2 KEYBD NETWORK LAN 10 100 MB ACT ...

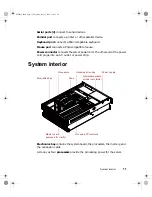
Page 12: ...rd The other end of the power cord plugs into an AC outlet or power strip System interior Electronics bay contains the system board the processors the memory and the expansion cards As many as four processors provide the processing power for the server Electronics bay Processors Fans Hot swap drive bay Removable media drives not visible Power supply Hot swap PCI curtains Memory card removed for cl...

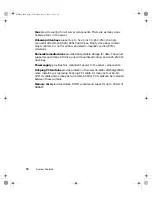
Page 13: ...ransportable storage for data The server supports one slimline CD drive one slimline diskette drive and one 5 25 inch drive bay Power supply provides N 1 redundant power to the server components Hot plug PCI curtains provide protection from electro static discharge ESD when installing or replacing hot plug PCI cards As many as four 64 bit 33 MHz cards and as many as two 64 bit 66 MHz PCI cards can...

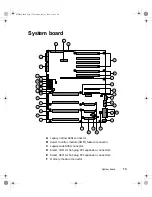
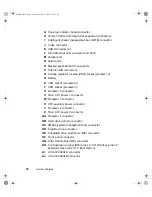
Page 14: ...connector C Legacy wide SCSI connector D 64 bit 33 MHz hot plug PCI expansion connectors E 64 bit 66 MHz hot plug PCI expansion connectors F Memory module connector A C D I J K L M N O P Q V W S X E G R Y Z AA B F H T U AB AC AD AE AF AG AH AI AJ 8506284 book Page 13 Thursday July 13 2000 11 43 AM ...

Page 15: ...M socket processor 3 U Processor 4 connector V Main ATX power 1 connector W Processor 3 connector X ATX auxiliary power connector Y Processor 2 connector Z Main ATX power 2 connector AA Processor 1 connector AB Hard drive activity connector AC SMBus system management bus connector AD Diskette drive connector AE Integrated drive electronics IDE connector AF Front panel connector AG Intra Module Bus...

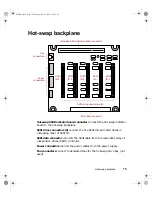
Page 16: ...connector connects the SCSI cable from the redundant array of inexpensive drives RAID controller Power connectors connect the power cables from the power supply Fan connectors connect to dedicated fans for the hot swap drive bay not used Fan connectors Power connectors SCSI data connector Hot swap SCSI indicator board connector SCSI ID 3 SCSI ID 4 SCSI ID 1 SCSI ID 2 SCSI ID 0 SCSI drive connector...

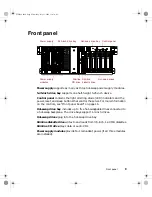
Page 17: ... writing data and glows amber if a drive fails Power LED glows green whenever the server is turned on The LED also flashes when the server is in sleep mode Sleep button lets you put the server into sleep mode to reduce power consumption Power button turns the server on and off Front panel connector connects the controls on the front panel with the system board NMI switch allows a technician servic...

Page 18: ...tus of the board plugged into the slot Indicator LEDs indicate whether the hot plug PCI slot is active or if it is safe to replace the board in the indicated slot Data cable connector connects to the system board and carries the data indicating which slots are active Indicator LEDs Data cable connector 8506284 book Page 17 Thursday July 13 2000 11 43 AM ...

Page 19: ...18 System Features 8506284 book Page 18 Thursday July 13 2000 11 43 AM ...

Page 20: ...hat may damage the server Protect the server from extreme temperature and humidity Do not expose it to direct sunlight heater ducts or other heat generating objects Keep the server away from equipment that generates magnetic fields such as unshielded stereo speakers Even a telephone placed too close to the server may cause interference Plug the server into a wall outlet power strip or UPS Importan...

Page 21: ...e power strip or UPS 2 Turn on the monitor 3 Turn on the server The LED on the control panel is lit when the power is on 4 Turn on any other components connected to the server such as speakers a printer or a scanner If nothing happens when you turn on the server Make sure that the power cables are securely plugged in and that the power strip or UPS if you are using one is plugged in and turned on ...

Page 22: ... Refer to your operating system documentation for specific questions regarding the operating system To complete the operating system setup 1 After the server starts the start up wizard opens Click Next 2 Type the requested information in the appropriate text boxes When you have finished typing the information click Next 3 Continue following the instructions and selecting options in the start up wi...

Page 23: ...ying It is now safe to turn off your computer turn off the server by pressing the power button 3 Turn off the monitor and peripherals Caution When you turn the server off some electric current still flows through it Before opening the server case or connecting or removing any peripherals turn off the server then unplug the power cord Important For other operating systems such as Windows 2000 or No...

Page 24: ...ts you close a program that is not responding 2 Click Task Manager then select the program that is not responding 3 Close the program by clicking End Task 4 If the server does not respond press the reset button to restart the server As a part of the regular startup process a program to check the disk status runs automatically When the checks are finished Windows starts Important For other operatin...

Page 25: ...24 System Setup 8506284 book Page 24 Thursday July 13 2000 11 43 AM ...

Page 26: ...ces such as plastic and packing foam in your work area Remove the parts from their antistatic bags or containers only when you are ready to use them Do not lay parts on the outside of an antistatic bag or container because only the inside provides antistatic protection Always hold cards by the edges and their metal mounting brackets Avoid touching components on the cards and the edge connectors th...

Page 27: ...ic electricity make sure you follow the precautions at the beginning of this chapter to avoid static electricity damage Only qualified personnel should open the server for maintenance If you are qualified to maintain the server yourself make sure you are properly grounded before opening the server chassis Important All references to front back left or right on the server are based on the server be...

Page 28: ... open the bezel door 1 Grip the bezel door and pull the door straight out away from the chassis 2 Swing the door outward to the right Removing the bezel The bezel covers the hot swap power supply modules and the fasteners for the removable media drives You must remove the bezel to swap a power supply module or replace a removable media device 8506284 book Page 27 Thursday July 13 2000 11 43 AM ...

Page 29: ...processors and VRMs and the standard PCI slots To remove the back top panel 1 Observe all safety and static electricity precautions see Preventing static electricity discharge on page 25 Important You do not have to turn off the server to open the back top panel However do not remove the EMI foam from the electronics bay unless you have turned the server off and unplugged the power cord 8506284 bo...

Page 30: ...chassis Removing the front top panel The front top panel provides access to the hot swap drive cage the drive cables the power supply cables and the front panel board To remove the front top panel 1 Turn off the server and disconnect all power cords 2 Observe all safety and static electricity precautions see Preventing static electricity discharge on page 25 Thumbscrew Thumbscrew 8506284 book Page...

Page 31: ...m the top of the front top panel 4 Slide the top panel slightly to the front disengaging the back edge of the panel from the top of the front panel 5 Lift the panel out and away from the chassis 8506284 book Page 30 Thursday July 13 2000 11 43 AM ...

Page 32: ... panel is on or off of the chassis You must replace the front top panel before you can operate the server If you do not a system intrusion event is logged by the system management hardware Be careful not to pinch any cables with the panel as you replace it To replace the front top panel 1 Place the front top panel on the top of the chassis approximately 3 4 inch forward from the front of the serve...

Page 33: ...toward the back of the chassis securing it in place The tabs on the back edge of the front top panel slide under the lip of the back top panel 3 Replace the screws you removed earlier 8506284 book Page 32 Thursday July 13 2000 11 43 AM ...

Page 34: ... the chassis approximately 3 4 inch back from the back edge of the front top panel 2 Slide the panel toward the front of the chassis securing it in place Be careful not to pinch any cables with the panel as you replace it 3 Tighten the thumbscrews you loosened earlier 8506284 book Page 33 Thursday July 13 2000 11 43 AM ...

Page 35: ... swap power supply modules and the fasteners for the removable media drives To replace the bezel 1 Align the four pins on the back of the bezel with the four holes in the sides of the front panel and press the bezel firmly into place 8506284 book Page 34 Thursday July 13 2000 11 43 AM ...

Page 36: ...o install drives keep the following in mind If you remove a drive place it in an antistatic bag or container Before you install a drive see the drive documentation for information on configuring the drive setting any jumpers on the drive and attaching cables to the drive If you are installing a drive that uses an add in controller install the expansion card before you install the drive You may nee...

Page 37: ...he system board Removing a hot swap drive The hot swap drives are located at right side of the front panel The hot swap drive bay supports as many as five 1 inch high 3 5 inch SCSI hard drives The hot swap drives are assigned SCSI ID numbers by the hot swap backplane with the drive on the right end of the hot swap bay assigned SCSI ID 0 The backplane assigns SCSI IDs to the other drives in order u...

Page 38: ...or as described in Opening the bezel door on page 27 4 Pinch the grip of the drive carrier handle to release the clip at the top 5 Swing the carrier handle down and pull the drive out of the drive cage Continue pulling until the drive is entirely out of the drive cage 6 Place the drive on a static free surface If you are replacing the drive see Installing a hot swap drive on page 38 8506284 book P...

Page 39: ...oving a hot swap drive on page 36 To install a hot swap drive 1 Follow the static electricity precautions in Preventing static electricity discharge on page 25 2 Remove the drive carrier as described in Removing a hot swap drive on page 36 3 Remove the four screws that secure the air baffles to the drive carrier If you are removing an existing drive the same four screws secure the old drive to the...

Page 40: ... drive bay 6 Slide the drive into the bay until the handle starts to close Make sure the tab on the bottom of the handle fits into the slot on the bottom of the drive cage 7 Close the handle securely to set the drive connector into the connector at the back of the drive cage 8 Close the bezel door 9 Use the SCSI control utility to format and configure the new drive Tab Slot 8506284 book Page 39 Th...

Page 41: ...city precautions in Preventing static electricity discharge on page 25 2 Turn off the server and disconnect the power cord and all other external peripheral devices 3 Remove the front top panel as described in Removing the front top panel on page 29 4 Disconnect all cables from the drive cage and the backplane 5 Remove all of the hot swap drive carriers from the hot swap drive cage as described in...

Page 42: ...Drives 41 7 When you have freed all four tabs push the drive cage out from the back then pull it out of the chassis 8506284 book Page 41 Thursday July 13 2000 11 43 AM ...

Page 43: ...wap drive cage then pull the backplane out of the drive cage The hot swap indicator board will also come out of the drive cage 9 Remove the hot swap indicator board and the plastic shield from the hot swap backplane and place both boards on a static free surface 8506284 book Page 42 Thursday July 13 2000 11 43 AM ...

Page 44: ...ug the hot swap indicator board into the new hot swap backplane 11 Put the plastic shield into place and carefully insert the two boards into the hot swap drive cage 8506284 book Page 43 Thursday July 13 2000 11 43 AM ...

Page 45: ...and slide the hot swap drive cage back into the chassis 14 Install all of the hot swap drive carriers as described in Installing a hot swap drive on page 38 15 Reconnect the cables to the hot swap backplane 16 Replace the front top panel as described in Replacing the front top panel on page 31 17 Plug in the peripherals and the power cord and turn on the server 8506284 book Page 44 Thursday July 1...

Page 46: ...power cord and all other external peripheral devices 2 Remove the front top panel See Removing the front top panel on page 29 and Preventing static electricity discharge on page 25 3 Remove the power and data cables from the back of the slimline diskette drive and the slimline CD drive noting their locations and orientations You will reconnect these cables after you install the new drive 4 Remove ...

Page 47: ...ps holding it in place 7 Pull the top right edge of the diskette drive free from the tray in the same manner 8 If necessary set any jumpers on the new diskette drive See your drive documentation for proper drive jumper settings and cable orientation 8506284 book Page 46 Thursday July 13 2000 11 43 AM ...

Page 48: ...e drive with the pins on the drive tray and press the diskette drive firmly in place 10 Align the holes on the bottom left edge of the CD drive with the pins on the drive tray and press the CD drive firmly into place 8506284 book Page 47 Thursday July 13 2000 11 43 AM ...

Page 49: ...o secure the tray in position 12 Connect the power and data cables making sure the cables are in their original positions 13 Close the case See Closing the case on page 31 14 Reconnect the power cord and all other external peripheral devices then turn on the server 8506284 book Page 48 Thursday July 13 2000 11 43 AM ...

Page 50: ...ng the bezel on page 27 3 Remove the front top panel See Removing the front top panel on page 29 and Preventing static electricity discharge on page 25 4 Pull out the metal electro magnetic interference EMI shield from the front of the 5 25 inch drive bay and save it in case you need to remove the 5 25 inch device you are installing 5 Install the drive rails on the 5 25 inch device See the documen...

Page 51: ...he case See Closing the case on page 31 9 Reconnect the power cord and all other external peripheral devices then turn on the server Replacing a 5 25 inch device The chassis supports a single half height 5 25 inch device The 5 25 inch drive bay is in the center of the front panel If you remove a device from the 5 25 inch drive bay you must either install a replacement device or install the metal E...

Page 52: ...t top panel on page 29 and Preventing static electricity discharge on page 25 4 Disconnect the power and data cables from the device If you intend to install a replacement device note the location and orientation of the cables to make installing the replacement device easier 5 Pinch the front ends of the drive rails toward the center of the drive bay and pull the drive out of the bay 8506284 book ...

Page 53: ...nally installed the 5 25 inch device 9 Close the case See Closing the case on page 31 10 Reconnect the power cord and all other external peripheral devices then turn on the server Memory Sixteen DIMM sockets on the separate memory board support up to 16 0 Gigabytes GB of PC 100 SDRAM Replacing memory The SDRAM DIMMs supported by your system board conform to the following standards 64 MB 128 MB 256...

Page 54: ...pe because the BIOS automatically detects this information 16 GB maximum system memory Memory banks are arranged as shown in the figure below To replace DIMMs 1 Turn off the server and disconnect the power cord and all other external peripheral devices 2 Remove the back top panel See Removing the back top panel on page 28 and Preventing static electricity discharge on page 25 C3 D3 C1 D1 C4 D4 C2 ...

Page 55: ...es 3 Remove the memory board retention bracket by removing the screw at the back end sliding the bar to the front and lifting the bracket out of the slot on the edge of the electronics bay 8506284 book Page 54 Thursday July 13 2000 11 43 AM ...

Page 56: ... it on a static free surface 5 Pull open the socket clamps on each side of the DIMM socket then lift the DIMM out of the socket Store the DIMM in an anti static container Boards shown outside chassis for clarity 8506284 book Page 55 Thursday July 13 2000 11 43 AM ...

Page 57: ...M with the two notches in the DIMM socket 7 Gently press the DIMM into the socket until it is firmly seated Inserting the DIMM automatically locks the socket clamps on each end of the DIMM 8 Once all DIMMs have been installed replace the memory board in the server 8506284 book Page 56 Thursday July 13 2000 11 43 AM ...

Page 58: ...se the case See Closing the case on page 31 11 Reconnect the peripherals and the power cord then turn on the server Installing memory The SDRAM DIMMs supported by your system board conform to the following standards 64 MB 128 MB 256 MB 512 MB and 1 GB ECC DIMMs PC100 compliant registered parity ECC SDRAM 8506284 book Page 57 Thursday July 13 2000 11 43 AM ...

Page 59: ...memory size or type because the BIOS automatically detects this information 16 GB maximum system memory Memory banks are arranged as shown in the figure below To add DIMMs 1 Turn off the server and disconnect the power cord and all other external peripheral devices 2 Remove the back top panel See Removing the back top panel on page 28 and Preventing static electricity discharge on page 25 C3 D3 C1...

Page 60: ...he back end sliding the bar forward and lifting the bracket out of the slot on the edge of the electronics bay 4 Pull the memory card out of the chassis and put it on a static free surface Boards shown outside chassis for clarity 8506284 book Page 59 Thursday July 13 2000 11 43 AM ...

Page 61: ...ning the two notches in the DIMM with the two notches in the DIMM socket 7 Gently press the DIMM into the socket until it is firmly seated Inserting the DIMM automatically locks the socket clamps on each end of the DIMM 8 Once all DIMMs have been installed replace the memory board in the server 8506284 book Page 60 Thursday July 13 2000 11 43 AM ...

Page 62: ...II 550 MHz and faster processors with 100 MHz FSB As many as four processors may be installed in the server they must have the same processor and FSB speed Processor and FSB speed are automatically detected by the server Processors must be installed in order from slot 1 through slot 4 and a VRM must be installed for each processor added to the server Whenever processors are installed the most curr...

Page 63: ...nd all external peripheral devices 2 Remove the back top panel See Preventing static electricity discharge on page 25 and Removing the back top panel on page 28 3 Remove the EMI foam cover over the processors Caution A heatsink must be installed on each processor Installing a processor without a heatsink could result in damage to or failure of the processor 8506284 book Page 62 Thursday July 13 20...

Page 64: ...crewdriver remove the two screws that hold the processor retention bracket in place 5 Pull the processor up and out of the slot 6 If the heatsink is separate attach it to the processor 8506284 book Page 63 Thursday July 13 2000 11 43 AM ...

Page 65: ...h the processor slot note that the processor slot is keyed so the processor can only be installed one way and press firmly to install it 8 Replace the processor support bracket using the two screws you removed in Step 4 8506284 book Page 64 Thursday July 13 2000 11 43 AM ...

Page 66: ... Installing a processor When replacing a processor order a processor upgrade kit from Gateway Important Gateway recommends that you run a processor retest from the BIOS Setup utility whenever you replace or add a processor Caution A heatsink must be installed on each processor Installing a processor without a heatsink could result in damage to or failure of the processor 8506284 book Page 65 Thurs...

Page 67: ...ver and disconnect the power cord and all external peripheral devices 2 Remove the back top panel See Preventing static electricity discharge on page 25 and Removing the back top panel on page 28 3 Remove the EMI foam cover over the processors 8506284 book Page 66 Thursday July 13 2000 11 43 AM ...

Page 68: ... screws that secure the processor retention bracket then remove the terminator card from the processor slot you want to install the new processor in 5 If the heatsink is separate attach it to the new processor 8506284 book Page 67 Thursday July 13 2000 11 43 AM ...

Page 69: ...y to install it 7 Secure the new processor with the processor retention bracket and the two screws you removed earlier Important As originally shipped the system board has all of the VRMs necessary to support a full complement of processors If you need to replace any of the VRMs you must install one VRM for each processor except the first 8506284 book Page 68 Thursday July 13 2000 11 43 AM ...

Page 70: ... server Replacing the battery The battery provides power for the server clock and CMOS memory which holds the system configuration information If your battery is failing you may notice the server clock slowing down and giving you the incorrect time Important Gateway recommends that you run a processor retest from the BIOS Setup utility whenever you replace or add a processor 8506284 book Page 69 T...

Page 71: ...op panel on page 28 and Preventing static electricity discharge on page 25 Warning There is a danger of explosion if the battery is incorrectly replaced Replace only with the same or equivalent type recommended by the manufacturer Dispose of used batteries according to the manufacturer s instructions Warnung Explosionsgefahr bel falsch eingebautter batterie Ersetzen der batterien nur mit batterien...

Page 72: ...e battery on the system board see System board on page 13 The battery is circular and has the positive pole mark on the top 7 Using a small flat bladed screwdriver carefully remove the battery from its socket on the system board 1 2 3 8506284 book Page 71 Thursday July 13 2000 11 43 AM ...

Page 73: ... and the power cord then turn on the server 12 If the CMOS data is not correct change the information in the BIOS Setup utility using the data you recorded in Step 2 Troubleshooting the battery installation If you have problems after installing the new battery try each of the items listed below Turn off the server and make sure that all exterior cables are attached and secured to the correct conne...

Page 74: ... proper test equipment make sure that the new battery has power Although unlikely your new battery may be defective Close the case as described in Closing the case on page 31 reconnect the power cord then turn on the server Expansion cards The server supports two 32 bit 33 MHz PCI cards Both slots support half length cards In addition the server supports six full length hot swap PCI cards Two of t...

Page 75: ...cording to the instructions in Removing the back top panel on page 28 4 Open the hot swap expansion card retention clip by pressing gently on the clip and rotating it through the back panel GREEN Power to slot AMBER Fault on slot Both Lights Power to slot and Fault condition Blinking GREEN Power Up or Down Cycle Hot plug Status LEDs Green and Amber LED s Press here then rotate Inside View Outside ...

Page 76: ...he end of the card and pull the card from the slot 6 Insert the replacement card in the slot Make sure it is fully seated 7 Push the hot swap expansion card retention clip back through the back panel until it clicks into place 1 3 2 2 1 3 8506284 book Page 75 Thursday July 13 2000 11 43 AM ...

Page 77: ... with the card Check the card documentation for additional information Replacing an expansion card The server supports as many as two 32 bit 33 MHz PCI expansion cards These cards are not hot swap cards and you must turn off the server before replacing one To replace an expansion card 1 Set any jumpers and switches on the replacement card if required in the card instructions 2 Turn off the server ...

Page 78: ...Expansion cards 77 4 Remove the EMI foam cover over the processors 5 Disconnect any cables attached to the card 8506284 book Page 77 Thursday July 13 2000 11 43 AM ...

Page 79: ...e the screw that holds the expansion card in place and pull the card carefully from its slot 7 Insert the replacement expansion card firmly into the slot then replace the screw you removed in Step 6 8506284 book Page 78 Thursday July 13 2000 11 43 AM ...

Page 80: ...d it 10 Close the case See Closing the case on page 31 11 Reconnect the peripherals and the power cord then turn on the server You may need to reconfigure the server after replacing an expansion card You may also need to install upgrade software that came with the card Check the card documentation for additional information 8506284 book Page 79 Thursday July 13 2000 11 43 AM ...

Page 81: ...sion card 1 Set any jumpers and switches on the replacement card if required in the card instructions 2 Turn off the server then disconnect the power cord and all external peripheral devices 3 Remove the back top panel according to the instructions in Removing the back top panel on page 28 See Preventing static electricity discharge on page 25 4 Remove the EMI foam cover over the processors 850628...

Page 82: ... slot cover 6 Insert the bottom edge of the expansion card the keyed edge with the contacts into the slot on the system board and push in firmly to seat the card 7 Replace the screw you removed earlier 8 Connect any cables to the card see card documentation for proper cable orientation 8506284 book Page 81 Thursday July 13 2000 11 43 AM ...

Page 83: ...ling some expansion cards You may also need to install software that came with the card Check the card documentation for additional information Power supplies The server ships with as many as three 350 W hot swap power supply modules With all three modules the server provides N 1 power supply redundancy letting you hot swap a power supply module if one fails If the power distribution system fails ...

Page 84: ...tatic electricity discharge on page 25 2 Determine which power supply has failed by checking the indicator LEDs or using your server management software 3 Remove the bezel See Removing the bezel on page 27 4 Loosen the captive thumbscrew at the bottom of the failed power supply module 5 Press down on the tab at the top of the failed module and pull the module out 6 Pull the power supply module ent...

Page 85: ...module 9 Replace the bezel Replacing the power supply The redundant 350 W power supply provides all system power If one of the components of the power distribution hardware fails you must replace the entire power supply To replace the power supply 1 Turn off the server and disconnect the power cord and all peripherals 2 Remove the bezel and the front top panel See Removing the bezel on page 27 Rem...

Page 86: ...drive bay bracket in place then slide the bracket forward before lifting it from the chassis 4 Disconnect all cables attached to the power supply Note their locations and orientations so you can reconnect them later 8506284 book Page 85 Thursday July 13 2000 11 43 AM ...

Page 87: ...w at the bottom center of the power supply front then slide the power supply forward until it stops 6 Tilt the power supply forward and lift it up and back to clear the tab on the bottom of the chassis Captive thumbscrew 8506284 book Page 86 Thursday July 13 2000 11 43 AM ...

Page 88: ...e tab on the bottom of the chassis then rotate it so that it rests flat on the bottom of the chassis 8 Slide the power supply back to insert the tabs on the back of the power supply under the slots on the bottom of the chassis Captive thumbscrew 8506284 book Page 87 Thursday July 13 2000 11 43 AM ...

Page 89: ...ake sure the tabs on the bottom of the bracket fit into the slots at either side of the chassis 11 Slide the upper drive bay bracket back to set the tabs then replace the four screws you removed in Step 3 12 Close the case See Closing the case on page 31 13 Reconnect the power cord and all external peripherals then turn on the server 8506284 book Page 88 Thursday July 13 2000 11 43 AM ...

Page 90: ... and the drive bays The fans are hot plug capable so you do not need shut down the server to replace a fan To replace a fan 1 Remove the back top panel See Removing the back top panel on page 28 and Preventing static electricity discharge on page 25 2 Determine which fan has failed by looking at the fan status LEDs in the fan tray 8506284 book Page 89 Thursday July 13 2000 11 43 AM ...

Page 91: ...e case on page 31 Replacing the fan power distribution board The fan power distribution board rests in the bottom of the fan tray and distributes power to all of the fans and the fan status LEDs The fan power distribution board also provides hardware monitoring for all fans To replace the power supply 1 Turn off the server and disconnect the power cord and all peripherals 2 Remove both top panels ...

Page 92: ... the location and orientation of each cable so you can connect them correctly to the new board 5 Remove the two screws that secure the hot plug fan tray then lift the tray out of the chassis and place it on a static free surface 8506284 book Page 91 Thursday July 13 2000 11 43 AM ...

Page 93: ...nges to expose the fan power distribution board 7 Lift off the plastic board shield then remove the four screws that secure the fan power distribution board to the bottom of the fan tray and lift the board out of the tray Plastic board shield Fan power distribution board Top of fan tray Fan tray 8506284 book Page 92 Thursday July 13 2000 11 43 AM ...

Page 94: ...s you removed in Step 7 9 Place the plastic board shield over the fan power distribution board then close the fan tray and secure it with the three screws you removed in Step 6 Plastic board shield Fan power distribution board Top of fan tray Fan tray 8506284 book Page 93 Thursday July 13 2000 11 43 AM ...

Page 95: ... screws you removed in Step 5 11 Reconnect the cables you removed in Step 4 12 Replace all of the fans in the fan tray 13 Close the case See Closing the case on page 31 14 Reconnect the power cord and all external peripherals then turn on the server 8506284 book Page 94 Thursday July 13 2000 11 43 AM ...

Page 96: ...ront top panel See Removing the front top panel on page 29 and Preventing static electricity discharge on page 25 3 Remove the two screws that secure the front panel board to the front of the chassis then remove the board from the server 4 Disconnect the cable from the front panel board Note the location and orientation of the cable as you remove it 5 Plug the front panel cable into the connector ...

Page 97: ... board by placing the board in position and replacing the two screws you removed in Step 4 7 Close the case See Closing the case on page 31 8 Reconnect the power cord and the external peripherals then turn on the server 8506284 book Page 96 Thursday July 13 2000 11 43 AM ...

Page 98: ... disconnect the power cord and all external peripherals 2 Remove the back top panel See Removing the back top panel on page 28 and Preventing static electricity discharge on page 25 3 Disconnect the cable from the hot plug PCI indicator board Note the location and orientation of the cable as you remove it 4 Remove the two thumbscrews that secure the board to the back panel then remove the board fr...

Page 99: ...nnect the power cord and the external peripherals then turn on the server Replacing the system board The system board integrates the other elements of the server such as the processor memory storage networking and communications To replace the system board 1 Turn off the server and disconnect the power cord and all external peripheral devices 2 Open the case See Opening the case on page 26 and Pre...

Page 100: ...n page 76 4 Disconnect all cables from the system board Note the location and orientation of each cable as you remove it 5 Remove the four screws that secure the electronics bay to the chassis then pull the electronics bay out through the back panel of the chassis and place it on a static free surface 8506284 book Page 99 Thursday July 13 2000 11 43 AM ...

Page 101: ...dding Internal Devices 6 Remove the memory board retention bracket by removing the screw at the back end sliding the bar forward and lifting the bracket out of the slot 8506284 book Page 100 Thursday July 13 2000 11 43 AM ...

Page 102: ...d 101 7 Pull the memory board out of the chassis and put it on a static free surface 8 Remove the EMI foam cover over the processors Boards shown outside chassis for clarity 8506284 book Page 101 Thursday July 13 2000 11 43 AM ...

Page 103: ...es 9 Remove the processors by removing the screws and the retention bracket 10 Remove all of the VRMs from the system board by pulling the clips back and pulling the VRM out of the socket 8506284 book Page 102 Thursday July 13 2000 11 43 AM ...

Page 104: ...Replacing the system board 103 11 Remove the plastic hot plug PCI curtains from the electronics bay by pulling them out of the supports at each end 8506284 book Page 103 Thursday July 13 2000 11 43 AM ...

Page 105: ... the two screws and pull out the system board 13 Remove the new system board from its anti static bag and set any jumpers that you may need to set for your configuration See System board on page 13 and Setting the system board jumpers on page 114 8506284 book Page 104 Thursday July 13 2000 11 43 AM ...

Page 106: ...Replacing the system board 105 14 Place the new system board in the chassis and secure it with the screws you removed in Step 12 8506284 book Page 105 Thursday July 13 2000 11 43 AM ...

Page 107: ...tic system board shield then replace the plastic hot plug PCI curtains in the electronics bay 16 Replace all of the VRMs in the system board Press each one firmly into the socket until the clips snap into place 8506284 book Page 106 Thursday July 13 2000 11 43 AM ...

Page 108: ...Replacing the system board 107 17 Replace all of the processors in the system board and secure them with the retention brackets and two screws each 8506284 book Page 107 Thursday July 13 2000 11 43 AM ...

Page 109: ...108 Replacing and Adding Internal Devices 18 Replace the EMI foam cover over the processors 8506284 book Page 108 Thursday July 13 2000 11 43 AM ...

Page 110: ...memory board in the chassis then replace the memory board retention bracket by hooking the bar over the edge of the electronics bay and securing the other end with the screw you removed in Step 6 8506284 book Page 109 Thursday July 13 2000 11 43 AM ...

Page 111: ...rd See System board on page 13 for reference 22 Replace the expansion cards and connect any required cables to the expansion cards 23 Close the case See Closing the case on page 31 24 Reconnect all peripherals and the power cord then turn on the server 25 Open the BIOS setup utility and correct any inaccurate settings See About the BIOS Setup utility on page 111 for more information 8506284 book P...

Page 112: ...the startup process The Main BIOS Setup utility screen opens It may not look exactly like the screen shown below BIOS Setup Utility Main Advanced Security Server Boot Exit Item Specific Help System Time System Date Legacy Diskette A Legacy Diskette B Hard Disk Pre Delay Primary IDE Master Primary IDE Slave Secondary IDE Master Secondary IDE Slave Processor Settings Language xx xx xx xx xx xxxx ena...

Page 113: ...ity F9 opens a screen that lets you return all values to their default settings F10 opens a screen that lets you save all settings then exit the BIOS Setup utility The main screen has the following menu selections at the top of the screen Main gives you access to basic information and settings related to your system hardware and configuration Advanced gives you access to information and settings f...

Page 114: ...e the BIOS update diskette Update the BIOS Restore the BIOS settings Follow the detailed instructions for updating the BIOS that are included in the self extracting file that you can download from the technical support area of Gateway s Web site Important Whenever the BIOS is updated the microcode table is returned to the default setting To update the table to the proper settings for your processo...

Page 115: ...BMC See the figure on page 13 for the location of the jumper The following table shows the settings required to perform those tasks Make sure you turn off the server and unplug the power cord before moving the jumper Mode Jumper Setting Action When Set CMOS protected Pins 1 2 Normal operation Clear CMOS Pins 2 3 Causes the server to clear all BIOS settings and return to defaults Caution Moving the...

Page 116: ...tings required to perform this task Make sure you turn off the server and unplug the power cord before moving the jumper Mode Jumper Setting Action When Set Protect Pins 5 6 Normal operation Clear Pins 6 7 Clears all passwords at bootup Caution Moving the jumper while the power is on can damage your server Always turn off the server and unplug the power cord s from the server before changing the j...

Page 117: ...er the BIOS no image appears on your monitor To recover the BIOS 1 Turn off the server and disconnect the power cord modem cord if installed and all external peripheral devices 2 Remove the back top panel See Removing the back top panel on page 28 and Preventing static electricity discharge on page 25 3 Remove the jumper from pins 9 10 of jumper J9F2 see System board on page 13 for location and pl...

Page 118: ...n page 28 and Preventing static electricity discharge on page 25 8 Place the jumper back on pins 9 10 of jumper J9F2 9 Close the case reconnect the cords then turn on the server 10 Enter the BIOS Setup utility by pressing F2 when the Gateway Logo screen appears 11 Once in BIOS Setup utility go to the appropriate tabs and select any BIOS fields you want to change then reenter the values you wrote d...

Page 119: ...118 Using the BIOS Setup Utility 8506284 book Page 118 Thursday July 13 2000 11 43 AM ...

Page 120: ...ing your server When purchasing a surge suppressor Make sure the surge suppressor meets the appropriate product safety certification for your location such as Underwriters Laboratories UL or Conformite European CE Check the maximum amount of voltage the suppressor allows to pass through the line The lower the voltage that the suppressor allows to pass through the better the protection for the serv...

Page 121: ... server from data loss during a total power failure A UPS uses a battery to keep your server running temporarily during a power failure and lets you save your work and shut down your server You cannot run your server for an extended period of time while using only the UPS Maintaining and managing your hard drive Regular maintenance can keep your hard drive operating efficiently and good file manag...

Page 122: ...e entire hard drive by selecting Scan for and attempt recovery of bad sectors 7 Click Start Check Disk checks the drive for errors 8 Follow any on screen instructions for completing the scan Hard drive management practices By deleting unneeded files from your hard drive and managing the space that is automatically allocated for saving certain files you can help maintain the performance of the hard...

Page 123: ...rd drive you free up space on the hard drive and help improve hard drive performance The following sections give you some simple ways to delete unneeded files Deleting Windows temporary files During normal operation Windows constantly creates new temporary tmp files You can safely delete all but the most recent tmp files To delete tmp files 1 Open Windows Explorer then select Tools Find then Files...

Page 124: ...ed from the hard drive Instead the file is moved into the Recycle Bin Because files are stored in the Recycle Bin and not deleted from the hard drive immediately you can retrieve a file that you accidentally delete from the hard drive To delete all the files from the Recycle Bin right click the Recycle Bin icon on the desktop then click Empty Recycle Bin You can save space on the hard drive by dec...

Page 125: ...the anti virus program you can back up your files to diskettes a separate hard drive or a high capacity storage drive Keeping your anti virus program updated Obtaining all software from reputable sources and checking the software for viruses before installing it Disabling macros on suspicious Microsoft Word and Excel files These programs will warn you if a document that you are opening contains a ...

Page 126: ...figure ISC to respond to variances in a number of ways from an entry in the event log to a displayed message or audio alarm or even a complete server shutdown ISC also provides a system hardware inventory SCSI controller status LAN adapter status and BIOS and system slot information You can find additional information about Intel Server Control under Documentation on the Server Companion CD which ...

Page 127: ... includes a chassis intrusion switch When the access cover is opened the switch transmits an alarm signal to the system board where server management software processes the signal You can program a response to an intrusion for example the server may power down or lock the keyboard Software locks through the BIOS Setup utility The BIOS Setup utility provides several security features to prevent una...

Page 128: ...re and enable the secure boot mode by using the BIOS Setup When secure mode is in effect you Can boot the server and run the OS but you must enter the user password to use the keyboard or mouse Cannot turn off server power or reset the system from the front panel switches Taking the system out of secure mode does not change the state of server power That is if you press and release the power switc...

Page 129: ... automatically enters secure mode All enabled secure mode features go into effect at bootup To leave secure mode enter the correct password s Disable writing to diskette In secure mode the server will not boot from or write to a diskette unless a password is entered To set these features see About the BIOS Setup utility on page 111 Disable the power and reset buttons If you enable this protection ...

Page 130: ... and before the server boots the BIOS automatically detects and tests the keyboard if present and displays a message Do not plug in a keyboard while the server is on Specify the boot sequence The sequence you specify in the BIOS determines the boot order see About the BIOS Setup utility on page 111 If secure mode is enabled user password is set you are prompted for a password before the server boo...

Page 131: ... you are prompted to create a startup diskette If you did not choose to create a startup diskette at that time you can create one later by running the Windows NT upgrade installation program Perform this process by going to the DOS Command Prompt changing to the C I386 subdirectory and typing winnt32 ox Press ENTER and follow the prompts Using your Server Companion CD The Server Companion CD inclu...

Page 132: ...ake sure that The power cord is connected to the AC power in connector and an AC outlet The AC outlet is supplying power If a power strip is used it is turned on If the power supply has a voltage selection switch the voltage selection switch reflects the proper voltage Verifying your configuration If the server is not operating correctly the BIOS may contain an invalid configuration parameter Open...

Page 133: ...See Chapter 3 Case Access for more information on preventing electrostatic damage to the server CD drive problems The server does not recognize the CD drive Probable cause Solution The CD is not intended for PC use Make sure that the disc is PC compatible The CD is loaded incorrectly Make sure that the label is facing up then try again The CD is scratched or dirty Try cleaning the CD with a lint f...

Page 134: ...are properly connected to the controller card Some servers do not have a floppy controller card because the floppy controller is built into the system board The drive controller is not seated properly Open the server then reseat the drive controller Some servers do not have a floppy controller card because the floppy controller is built into the system board Probable cause Solution The diskette is...

Page 135: ...rrectly Open the server and reseat the hot swap drive s This problem is most common immediately after shipping The SCSI bus is not properly terminated Open the server and make sure that the last device on the SCSI bus is properly terminated The drive is configured with a conflicting SCSI address Change the device s SCSI address to one that is not currently being used by the server The cables are n...

Page 136: ...r speed make sure that you have selected the proper speed The system only detected one processor Enable the processor retest in the BIOS Setup utility Probable cause Solution The modem has not been added as new hardware Add the modem as new hardware The modem is not connected to a live phone jack Make sure that the line connected to the modem is working and plugged into the appropriate port on the...

Page 137: ... terminated Make sure the last device on the SCSI bus is terminated The device cables are not installed correctly Open the server then check all cables between the controller and the device Probable cause Solution The interrupt or I O address is set incorrectly Check the address configuration of the adapter card and make sure that it does not conflict with another card in the server The card has n...

Page 138: ...ta cable between the printer and the system is properly connected Make sure that it is connected to the proper port Make sure the connector and cable have no bent or broken pins The printer is not designated as the default printer If the printer that you are trying to print to is not the default printer make sure that you have selected it through the program printer setup function The printer has ...

Page 139: ...o the port on the front panel and pressing the switch The power supply has failed The power supply alarm buzzes and all power supply status LEDs blink indicating a failed common component Replace the entire power supply housing One or more of the power supply modules may also be bad Probable cause Solution An error occurs during an application or the server may be out of memory Restart your server...

Page 140: ...ide up to let it dry before using the keyboard again The keyboard is defective Try a keyboard that you know is working Probable cause Solution Mouse is locked out when the password is set Enter the password The mouse is not plugged in or connected properly Make sure that the cable is plugged in correctly The mouse driver did not load when the server started Load the appropriate mouse driver manual...

Page 141: ...the center position The monitor is defective Connect a working monitor to the server The video card is not seated correctly Open the server then make sure the video card is seated properly Some servers do not have a video controller card because the video controller is built into the system board The video card is not compatible with the server Check the documentation or technical support to make ...

Page 142: ...that the monitor is turned on then restart the system The display type is set incorrectly In the Control Panel window Start Settings Control Panel double click Display set the display to the appropriate monitor type then restart the server Probable cause Solution The video cable is damaged Make sure the connector and cable have no bent or damaged pins The display setup is incorrect In the Control ...

Page 143: ...ectrical interference such as televisions unshielded speakers microwave ovens fluorescent lights and metal beams or shelves The monitor needs to be degaussed Turn off the server and monitor and leave them off for at least a half hour then restart the server Error message Solutions Access denied Try saving to a new file or diskette Move the write protection tab over the hole on the back of the disk...

Page 144: ... try to restart the server Gate A20 failure You may have an XT keyboard connected to an AT system or vice versa Make sure that the keyboard is configured to work with the appropriate system Some keyboards have a switch to select either AT or XT Hard disk controller failure Make sure that the hard drive cable is properly connected Open the BIOS Setup utility then make sure that the correct drive ty...

Page 145: ...eyboard then restart the server Check for sticking keys Clean the keyboard if necessary Memory errors were detected while the server powered up See The system detected memory errors during start up on page 134 for a possible solution Memory size error Enter the BIOS Setup utility and save the memory configuration Non system disk or disk error Eject the diskette then press ENTER If the diskette is ...

Page 146: ...t set Open the BIOS Setup utility then set the system date and time Write protect error Move the write protection tab over the hole on the back of the diskette Error message Solutions 8506284 book Page 145 Thursday July 13 2000 11 43 AM ...

Page 147: ...146 Troubleshooting 8506284 book Page 146 Thursday July 13 2000 11 43 AM ...

Page 148: ...in the documentation are followed Setting up your server Read and follow all instructions marked on the product and in the documentation before you operate your server Retain all safety and operating instructions for future use Do not use this product near water or a heat source such as a radiator Make sure you set up the server on a stable work surface The product should only be operated from the...

Page 149: ...ng to rest on it Do not spill anything on the server The best way to avoid spills is to avoid eating and drinking near your system Some products have a replaceable CMOS battery on the system board There is a danger of explosion if the CMOS battery is replaced incorrectly Replace the battery with the same or equivalent type recommended by the manufacturer Dispose of batteries according to the manuf...

Page 150: ...red o desconectar la fuente de alimentación SAFETY STEPS Whenever you remove the chassis covers to access the inside of the system follow these steps 1 Turn off all peripheral devices connected to the system 2 Turn off the system by pressing the power button 3 Unplug all AC power cords from the system or from wall outlets 4 Label and disconnect all cables connected to I O connectors or ports on th...

Page 151: ...e il sistema senza le coperture al loro proprio posto potrebbe danneggiare i componenti del sistema Per rimettere le coperture del telaio 1 Controllare prima che non si siano lasciati degli attrezzi o dei componenti dentro il sistema 2 Controllare che i cavi dei supporti aggiuntivi ed altri componenti siano stati installati appropriatamente 3 Attaccare le coperture al telaio con le viti tolte in p...

Page 152: ...r aufweisen in Regionen in denen elektrische Stürme auftreten mit einem Überspannungsschutzgerät verbunden sein während eines elektrischen Sturms sollte keine Verbindung der Telekommunikationsleitunge n mit dem Modem bestehen mit einer geerdeten Wechselstromsteckdose ausgerüstet sein über ausreichend Platz verfügen um Zugang zu den Netzkabeln zu gewährleisten da der Stromanschluß des Produkts haup...

Page 153: ...a residential installation This equipment generates uses and can radiate radio frequency energy and if not installed and used in accordance with the instructions may cause harmful interference to radio or television reception However there is no guarantee that interference will not occur in a particular installation If this equipment does cause interference to radio and television reception which ...

Page 154: ...rmation When programming or making test calls to emergency numbers Remain on the line and briefly explain to the dispatcher the reason for the call Perform such activities in the off peak hours such as early morning or late evenings The United States Telephone Consumer Protection Act of 1991 makes it unlawful for any person to use a computer or other electronic device to send any message via a tel...

Page 155: ...inal device provides an indication of the maximum number of terminals allowed to be connected to a telephone interface The termination on an interface may consist of any combination of devices subject only to the requirement that the sum of the Ringer Equivalence Numbers of all the devices does not exceed 5 European users European directives This Information Technology Equipment has been tested an...

Page 156: ...in a residential area or an adjacent area thereto and conforms to the standards set by the Voluntary Control Council for Interference by Information Technology Equipment aimed at preventing radio interference in such residential area When used near a radio or TV receiver it may become the cause of radio interference Read instructions for correct handling Australia and New Zealand users EMI stateme...

Page 157: ... call initiation and b The equipment shall go on hook for a period of not less than 30 seconds between the end of one attempt and the beginning of the next attempt The equipment shall be set to ensure that automatic calls to different numbers are spaced such that there is no less than 5 seconds between the end of one call attempt and the beginning of another The equipment shall be set to ensure th...

Page 158: ...it connection to grounding electrodes and requirements for the grounding electrode Lightning protection For added protection of any Gateway product during a lightning storm or when it is left unattended or unused for long periods of time unplug the product from the wall outlet and disconnect the antenna or cable system Power lines Do not locate the antenna near overhead light or power circuits or ...

Page 159: ...ower service grounding electrode system NEC Art 250 Part H 3 Ground clamps 4 Grounding conductors NEC Section 810 21 5 Antenna discharge unit NEC Section 810 20 6 Ground clamp 7 Antenna lead in wire 1 3 4 5 6 7 2 Antenna and satellite grounding 8506284 book Page 158 Thursday July 13 2000 11 43 AM ...

Page 160: ...al damages resulting from any defect or omission in this manual even if advised of the possibility of such damages In the interest of continued product development Gateway reserves the right to make improvements in this manual and the products it describes at any time without notices or obligation Trademark acknowledgments AnyKey black and white spot design CrystalScan Destination EZ Pad EZ Point ...

Page 161: ...160 Safety Regulatory and Notices 8506284 book Page 160 Thursday July 13 2000 11 43 AM ...

Page 162: ...5 25 inch device Diskette drive interface Diskette drive controller is integrated on the system board I O ports One parallel port two serial ports two USB ports one PS 2 keyboard port one PS 2 mouse port one RJ 45 network port and one video port Power supply Redundant N 1 power supply supporting as many as three 350 W power supply modules SCSI interfaces Integrated Adaptec AIC 7899 Dual Channel Ul...

Page 163: ...em board Drive Bays One slimline CD drive bay one slimline 3 5 inch drive bay occupied by diskette drive one half height 5 25 inch drive bay and five hot swap bays at least one is occupied by a 1 inch high hot swap drive Temperature operating 5 to 35 Celsius or 41 to 95 Fahrenheit Humidity operating 20 to 80 Altitude 200 feet to 5 000 feet Voltage AC input 90 to 135 VAC 180 to 255 VAC Frequency 47...

Page 164: ...placing 70 troubleshooting 72 bezel features 8 removing 28 replacing 34 bezel door opening 27 BIOS recovery mode 116 BIOS Setup utility 111 Advanced menu 112 Boot menu 112 Exit menu 112 Main menu 112 menus 112 navigating through 112 Power menu 112 Security menu 112 updating 113 Boot menu Setup utility 112 BOOT Option jumper setting 116 boot sequence setting 129 buttons control panel board location...

Page 165: ...roubleshooting not recognized 133 troubleshooting will not read write format 133 write protection summary 128 drive bay indicator board replacing 40 drives 5 25 inch installing 49 5 25 inch removing 50 cabling 36 CD replacing 45 checking available space 121 checking in Windows NT 121 disk activity LED 16 diskette replacing 45 hot swap installing 38 removing 36 troubleshooting 134 hot swap indicato...

Page 166: ...leshooting 134 hardware status 125 heatsink CPU 62 65 processor 62 65 hot plug fans replacing 89 PCI indicator board components 17 PCI indicator board features 17 PCI indicator board replacing 97 hot swap backplane components 15 backplane features 15 drive bay replacing 40 power supply module replacing 83 humidity operating 162 I I O ports 161 IDE drive maintenance 120 indicators 100 Mbit speed LE...

Page 167: ...ual conventions v memory characteristics 52 57 features 7 52 57 installing 57 removing 52 replacing 52 specifications 161 troubleshooting 134 troubleshooting errors during startup 134 messages error 142 modem troubleshooting 135 monitor adjusting 20 mouse port location 11 troubleshooting 139 N network activity LED 16 port location 10 NMI button location 16 O opening bezel door 27 case 26 operating...

Page 168: ...g the BIOS 116 recovery mode BIOS 116 recovery system 130 Recycle Bin emptying 123 resizing 123 regulatory compliance 152 removing 5 25 inch device 50 back top panel 28 bezel 28 drives hot swap 36 SCA 36 SCSI 36 front top panel 29 memory 52 system board 98 top panel back half 28 top panel front half 29 replacing adapter cards 76 adapter cards hot plug 73 add in cards 76 add in cards hot plug 73 ba...

Page 169: ...tte writes 128 disabling power and reset buttons 128 mechanical locks 126 secure boot mode 128 secure mode 127 set user password 129 setting the boot sequence 129 setting up in BIOS 126 software features 128 software locks 126 timeout 128 user and administrator passwords set 127 user password set only 127 using passwords 127 Security menu Setup utility 112 serial port location 11 server setting up...

Page 170: ...l removing back half 28 removing front half 29 replacing back half 33 replacing front half 31 troubleshooting adapter cards 136 add in cards 136 battery 72 BIOS recovery 117 black and white on color monitor 141 blank video 140 CD drive 132 checklist 131 CPU 134 dim video 141 diskette drive LED always on 134 diskette drive will not read write format 133 diskette drive not recognized 133 distorted d...

Page 171: ...black and white on color monitor troubleshooting 141 blank screen troubleshooting 140 dim screen troubleshooting 141 distorted display troubleshooting 142 garbled display troubleshooting 141 port location 10 troubleshooting 140 viruses protecting the server 124 W warnings safety 149 Windows NT setup 21 shut down procedures 22 8506284 book Page 170 Thursday July 13 2000 11 43 AM ...

Page 172: ...A MAN US 8450R SYS GDE R0 6 00 8450R Server System Manual ...

Reviews: