Gateway 400SD4 Replacement Manual Download Page 11

11

Replacing the Gateway 400 Keyboard

www.gateway.com

Replacing the bezel

If the bezel was mounted incorrectly, complete the following procedure.

To replace the bezel:
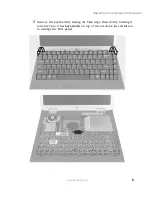
1

Insert a small flat blade screwdriver under the bottom-right corner of the 
keyboard bezel, between the 

I

NS

 and 

D

EL

 keys, and gently pry it up.
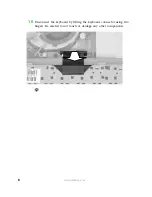
2

Pull the bezel off the notebook. You will hear small snapping sounds as 
the bezel comes off of the notebook. Be careful not to break off the tabs 
located on the left end of the bezel.

3

Slide the two tabs on the left end of the bezel under the notebook frame 
and press down on the bezel in several places until it clicks in place.

Technical Support

Refer to your user’s guide for Gateway Technical Support information.

Safety, Regulatory, and Legal Information

Refer to your user’s guide for important safety, regulatory, and legal 
information.

© 2002 Gateway, Inc. All rights reserved. Gateway, Gateway Country, the Gateway stylized logo, and the 
black-and-white spot design are trademarks or registered trademarks of Gateway, Inc. in the United States and 
other countries. All other brands and product names are trademarks or registered trademarks of their respective 
companies.

Warning

If the bezel is not correctly replaced, your notebook could 
be damaged when you try to close the LCD panel.

Summary of Contents for 400SD4

Page 1: ...ower Wear a grounding wrist strap available at most electronics stores and attach it to a bare metal part of the computer Touch a bare metal surface on the back of the computer Unplug the power cord a...

Page 2: ...ic bags because only the inside of the bags provide electrostatic protection Removing the keyboard To remove the keyboard 1 Follow the guidelines under Preventing static electricity discharge on page...

Page 3: ...small flat blade screwdriver under the bottom right corner of the keyboard bezel between the INS and DEL keys and gently pry it up Important Inserting a piece of cloth between the screwdriver and keyb...

Page 4: ...ill hear small snapping sounds as the bezel comes off of the notebook Be careful not to break off the tabs located on the left end of the bezel 8 With a small Phillips screwdriver remove the four keyb...

Page 5: ...ng the Gateway 400 Keyboard www gateway com 9 Remove the keyboard by raising the back edge then slowly rotating it toward you so it lies keys down on top of the notebook Be careful not to damage the L...

Page 6: ...6 www gateway com 10 Disconnect the keyboard by lifting the keyboard connector using two fingers Be careful to not touch or damage any other components...

Page 7: ...notebook with the space bar away from you 2 Insert the keyboard plug on the end of the keyboard cable onto the keyboard connector 3 Rotate the keyboard toward the LCD panel until the keyboard is almos...

Page 8: ...Insert the front of the keyboard under the palm rest 5 Gently press the keyboard down until it is flat all the way across The keyboard should easily fall into place Be careful not to damage the LCD p...

Page 9: ...9 Replacing the Gateway 400 Keyboard www gateway com 6 Replace the four keyboard screws 7 Slide the two tabs located on the left end of the bezel under the notebook frame Keyboard screws...

Page 10: ...he bezel should be flat all the way across If the bezel is mounted incorrectly complete the instructions under Replacing the bezel on page 11 9 Replace the battery 10 Plug in the AC adapter and modem...

Page 11: ...nder the notebook frame and press down on the bezel in several places until it clicks in place Technical Support Refer to your user s guide for Gateway Technical Support information Safety Regulatory...

Page 12: ...12 www gateway com MAN RPL 400 SD4 KBD INST R0 7 02...

Reviews: