background image

CHAPTER 11: Maintaining Your Computer

110

Cleaning the mouse

If the mouse pointer begins moving erratically across the computer screen or becomes difficult 
to control precisely, cleaning the mouse will likely improve its accuracy.

To clean the mouse:


Wipe the bottom of the mouse with a damp, lint-free cloth.

Cleaning optical discs

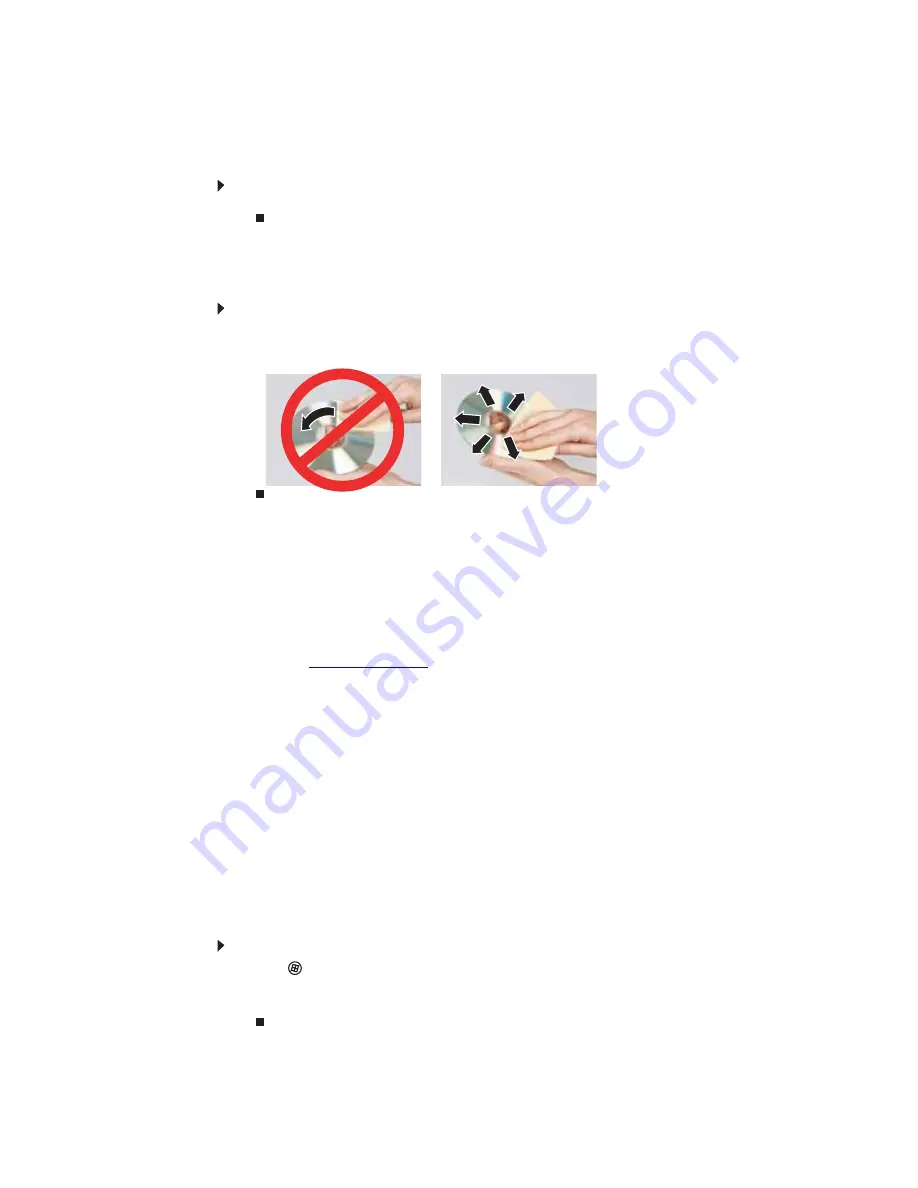
Optical discs (CDs, DVDs, and Blu-ray Discs) get dirty from frequent handling.

To clean an optical disc:


1

Wipe from the center to the edge, not around in a circle, using a product made especially 
for the purpose.

Recovering your system

System recovery options

Most computer problems can be solved by following the information in 

“Troubleshooting” on 

page 145

 or at 

www.gateway.com

. Problem-solving may also involve re-installing some or all of 

the computer’s software (also called 

recovering

 or 

restoring

 your system). Gateway provides 

everything you need to recover your system under most conditions.

To recover specific files and software, see 

“Recovering specific files and software” on 

page 110

.

To completely restore your system:

If you can still run Windows, se

“Recovering your system using Microsoft System 

Restore” on page 111

.

If you cannot run Windows, see 

“Recovering your system using the Windows DVD” on 

page 112

Recovering specific files and software

You can perform a partial recovery by recovering specific files, such as device drivers and most 
pre-installed software. If you need to recover software that did not come pre-installed on your 
system, you need to follow that software’s installation instructions.

To recover specific drivers and software:


1

Click (

Start

), 

All Programs

, then click 

Gateway Recovery

. The 

Gateway Recovery 

Center

 opens.

2

Click on the appropriate recovery option, then follow the on-screen instructions.

Summary of Contents for 3-Bay mBTX Pro

Page 1: ...3 Bay mBTX Pro USERGUIDE...

Page 2: ......

Page 3: ...r connections 12 Protecting from power source problems 12 Checking the voltage selection 13 Connecting to a broadband modem or network 13 Connecting a dial up modem 14 Starting your computer 14 Waking...

Page 4: ...ecking your e mail 40 Chapter 5 Sending and Receiving Faxes 41 Using Windows Fax and Scan 42 Sending a Fax 42 Setting up your cover page template 45 Faxing a scanned document or from programs 45 Cance...

Page 5: ...ng up multiple monitors 77 Changing system sounds 78 Changing mouse settings 79 Adding and modifying user accounts 80 Changing power saving settings 81 Changing the power scheme 81 Changing accessibil...

Page 6: ...enter 102 Using Windows Security Center 105 Security updates 106 Windows Update 106 BigFix 108 Chapter 11 Maintaining Your Computer 109 Setting up a maintenance schedule 110 Caring for your computer 1...

Page 7: ...lacing a CD DVD or Diskette Drive or a Memory Card Reader 129 Adding or replacing a hard drive 130 Replacing the front fan 132 Replacing the rear fan 132 Replacing the power supply 133 Replacing the h...

Page 8: ...Passwords 155 Power 155 Printer 155 Sound 156 Telephone support 156 Before calling Gateway Customer Care 156 Telephone numbers 157 Self help 158 Tutoring 158 Training 158 Appendix A Legal Notices 159...

Page 9: ...APTER1 1 Getting Help Thank you for purchasing our computer Using the Gateway Web site Using Help and Support Using online help Finding your model and serial number Microsoft Certificate of Authentici...

Page 10: ...your computer in good operating condition Gateway stands behind our value proposition to our customers to provide best of class service and support in addition to high quality brand name components at...

Page 11: ...and Support type a word or phrase keyword in the Search Help box located at the top of any Help and Support screen then press ENTER For each search you receive a list of suggested topics To find the a...

Page 12: ...ticles about their software tutorials and forums where problems and issues are discussed Finding your model and serial number The label on the side of your computer case includes your computer serial...

Page 13: ...er connections Connecting to a broadband modem or network Connecting a dial up modem Starting your computer Turning off your computer Restarting rebooting your computer Using the keyboard Using the mo...

Page 14: ...You can also configure the power button to operate in Standby Resume mode or Hibernate mode The indicator lights when the computer is turned on IEEE 1394 port optional Plug an IEEE 1394 also known as...

Page 15: ...jack This jack is color coded green Microphone jack Plug a microphone into this jack This jack is color coded red or pink Component Icon Description Cover release lever Move this lever to open the co...

Page 16: ...information on configuring this jack see Configuring the audio jacks on page 52 Parallel port Plug a parallel device such as a printer into this port For more information see Installing a printer scan...

Page 17: ...eo port integrated Plug a monitor into this port if you do not have an add in video port PS 2 mouse port Plug a Personal System 2 PS 2 keyboard into this port USB ports Plug USB Universal Serial Bus d...

Page 18: ...er holders at the same height and distance as the monitor Avoid focusing your eyes on your computer screen for long periods of time Every 10 or 15 minutes look around the room and try to focus on dist...

Page 19: ...ral devices by connecting them to a surge protector which absorbs voltage surges and prevents them from reaching your computer An uninterruptible power supply UPS supplies battery power to your comput...

Page 20: ...he network cable into the network jack on the back of your computer 2 Insert the other end of the network cable into a cable modem DSL modem or network jack Connecting a dial up modem Your computer ma...

Page 21: ...Sleep state is much faster than turning on your computer after it has been turned completely off To put your computer to sleep 1 Click Start then click power The computer saves your session and parti...

Page 22: ...al different types of keys and buttons Your keyboard also has status indicators that show which keyboard feature is active Feature Icon Description Editing buttons Press these buttons to copy cut and...

Page 23: ...on with other keys to open utilities like F Search utility R Run utility and E Explorer utility Application key Press this key to access shortcut menus and help assistants in Windows Directional keys...

Page 24: ...Windows keys Press one of these keys to open the Windows Start menu These keys can also be used in combination with other keys to open utilities like F Search utility R Run utility and E Explorer util...

Page 25: ...e set it down in the middle of the mouse pad then continue moving the mouse Select an object on the computer display Position the pointer over the object Quickly press and release the left mouse butto...

Page 26: ...ick Volume on the taskbar The volume control slider opens 2 Click and drag the slider up to increase volume and down to decrease volume 3 To mute the volume click Mute To restore volume click it again...

Page 27: ...s one or more of the following ports IEEE 1394 also known as Firewire or i Link Universal Serial Bus USB serial and parallel You use these ports to connect peripheral devices such as printers scanners...

Page 28: ...CHAPTER 2 Setting Up and Getting Started 20...

Page 29: ...CHAPTER3 23 Using Windows Vista Using the Windows desktop Working with files and folders Searching for files Working with documents Shortcuts...

Page 30: ...e right Other buttons on the taskbar represent programs that are running Click a program s button on the taskbar to open the program s window The Start button provides access to programs files help fo...

Page 31: ...e Start menu opens showing you the first level of menu items 2 Click All Programs to see all programs files and folders in the Start menu If you click an item with a folder icon the programs files and...

Page 32: ...er you double click the Local Disk C icon in the Computer window Every program window looks a little different because each has its own menus icons and controls Most windows include these items Help F...

Page 33: ...D or DVD drive To view the drives folders and files on your computer 1 Click Start then click Computer 2 Double click the drive icon Clicking the minimize button reduces the active window to a button...

Page 34: ...a file or folder you place a copy of the file or folder on the Windows clipboard which temporarily stores it Then when you decide what folder you want the copy to go in the destination folder you past...

Page 35: ...ere they remain until you decide to empty the bin You can recover any file in the Recycle Bin as long as the bin has not been emptied To delete files or folders 1 In the Computer or Windows Explorer w...

Page 36: ...ch 1 Click Start then click Search The Search Results window opens 2 If you want to search on your computer by file or folder name type in all or part of the file or folder name in the Search box in t...

Page 37: ...n a file cabinet in fact So you usually will have to search through levels of folders to find the file or folder that you need This is called browsing To browse for a file 1 Click Start then click Com...

Page 38: ...To save a document 1 Click File then click Save The Save As dialog box opens 2 Click Browse Folders to open the Folders list then click the folder where you want to save the file 3 Type a new file nam...

Page 39: ...ter documentation To print a document 1 Make sure that the printer is turned on and loaded with paper 2 Start the program and open the document 3 Click File then click Print The Print dialog box opens...

Page 40: ...er or window where you want to paste the object then press CTRL V Select multiple items in a list or window Click the first item press and hold down the CTRL key then click each of the remaining items...

Page 41: ...CHAPTER4 35 Using the Internet Learning about the Internet Setting up an Internet account Using the World Wide Web Using e mail...

Page 42: ...ok for a list of Internet service providers available locally A Web browser a program that displays information from the World Wide Web Microsoft Internet Explorer was included with your computer For...

Page 43: ...use your Internet connection Accessing your Internet account The method you use to access your Internet account varies from ISP to ISP Contact your ISP for the correct procedure Using the World Wide...

Page 44: ...s called a URL for Universal Resource Locator in the browser address bar for example www gateway com then click GO on the browser address bar OR On the current Web page click a link to a Web site The...

Page 45: ...on the Web site to run or install the program Using e mail E mail electronic mail lets you send messages to anyone who has an Internet connection and e mail address E mail is usually a free service o...

Page 46: ...l program opens 3 Click Send Receive 4 Double click the message you want to read For more information about managing and organizing your e mail messages see the online help in your e mail program Tip...

Page 47: ...CHAPTER5 41 Sending and Receiving Faxes Using Windows Fax and Scan Faxing a scanned document or from programs Receiving and viewing a fax...

Page 48: ...ormation is set up when you prepare to send the first fax from this computer You cannot send or receive a fax using a cable or DSL modem by following these instructions Many Internet services exist th...

Page 49: ...want to receive faxes then click Unblock when the The Security Alert window opens The New Fax window opens 7 Create your fax then open the Cover Page menu by clicking the arrow and selecting a cover p...

Page 50: ...tion Information dialog box opens 10 Type your location information then click OK The Dialing Rules dialog box opens 11 Highlight your location then click Edit The Edit Location dialog box opens 12 Co...

Page 51: ...tomatically calculated such as number of pages or date and time sent If you want to include text that always appears on your cover page such as a letterhead or address draw a box using the text box to...

Page 52: ...ax in the lower left corner of the window 3 Click Outbox then right click the fax you want to cancel 4 Click Delete to cancel the fax 5 Click Yes Receiving and viewing a fax To receive and view a fax...

Page 53: ...Using Your Hardware Using the diskette drive Using the CD or DVD drive Using the memory card reader Configuring the audio jacks Connecting a projector or monitor Connecting a television Connecting a v...

Page 54: ...diskette 1 Insert the diskette into the diskette drive with the label facing up or right depending on your configuration 2 To access a file on the diskette click Start then click Computer Double click...

Page 55: ...udio CDs and accessing data CD RW drive Installing programs playing audio CDs accessing data and creating CDs DVD CD RW drive Installing programs playing audio CDs accessing data creating CDs and play...

Page 56: ...button to close the tray Important Some music CDs have copy protection software You may not be able to play these CDs on your computer Important When you place a single sided disc in the tray make su...

Page 57: ...s assigned a different drive letter for example the E and F drives so data can be transferred from one memory card type to another Card Type Slot Insert Secure Digital top right Label facing up MultiM...

Page 58: ...er than the default audio device you need to configure them To configure the universal audio jacks 1 Connect your audio device s to the computer audio jack s 2 Click Start then click Control Panel The...

Page 59: ...Web site 5 After the driver is installed right click any empty space on the desktop then click Prersonalize The Personalization menu opens 6 Click Display Settings The Display Settings window opens 7...

Page 60: ...ecessary then click OK Connecting a video camera If your home video camera supports it it can be connected to your computer so that you can download video from the camera as data files You can also cr...

Page 61: ...CHAPTER7 55 Using Your Software Playing music and movies Creating audio files and music libraries Creating music CDs and video DVDs Creating and copying data discs Using Windows Media Center...

Page 62: ...video files including WAV MIDI MP3 AU AVI and MPEG formats To play a file using Windows Media Player 1 Click Start All Programs then click Windows Media Player Windows Media Player opens 2 Click Libra...

Page 63: ...re all optical discs Playing an optical disc using Windows Media Player Use Windows Media Player to listen to CDs or watch movies on DVDs HD DVDs or Blu ray Discs To play an optical disc 1 Make sure t...

Page 64: ...disc click Play Windows Media Player opens and begins playing the disc If Windows Media Player does not open automatically click Start All Programs then click Windows Media Player Windows Media Player...

Page 65: ...al types of audio files for your listening enjoyment including WAV MP3 and WMA files Recording audio files Sound recorder is a simple Windows program that lets you record and play audio files For info...

Page 66: ...quality WMA files end in the file extension WMA and MP3 files end in the file extension MP3 To create WMA or MP3 files 1 Click Start All Programs then click Windows Media Player Windows Media Player...

Page 67: ...u are connected to the Internet WMA and MP3 files that you download are automatically added to your music library Editing track information After you add a WMA or MP3 file to your music library you ca...

Page 68: ...he Burn tab then click and drag songs that you want to burn to CD from the Library to the Burn List 4 Click Start Burn The music is recorded onto the blank CD Important We recommend that you do not us...

Page 69: ...drive 2 Click Start All Programs then click Windows DVD Maker The Windows DVD Maker introduction window opens 3 Click Choose Photos and Videos The main screen opens Important We recommend that you do...

Page 70: ...box opens 5 Find and select the videos you want to add to the video DVD then click Add The videos are added to the video list and a graphic in the lower left corner of the window shows you how much d...

Page 71: ...compatible with all operating systems The instructions below show you how to burn a disc using the Mastered format which can be read by all personal computers regardless of the operating system instal...

Page 72: ...ing and managing media files Because the remote control is an optional accessory most instructions in this section assume you are using a mouse to navigate the Media Center menus Starting Windows Medi...

Page 73: ...os lets you view individual pictures pictures in a slideshow or select movies from your video library Music lets you select songs from your music library set up and use your FM radio tuner card if ins...

Page 74: ...u Numeric keypad data entry button Lets you enter numbers and characters from the remote control Power button Puts the Media Center computer in Sleep mode reduced power Transport buttons Let you contr...

Page 75: ...HAPTER8 69 Customizing Windows Changing screen settings Changing system sounds Changing mouse settings Adding and modifying user accounts Changing power saving settings Changing accessibility settings...

Page 76: ...h as icons and menu bars can be displayed on the monitor To change the color depth or screen resolution 1 Click Start Control Panel then under Appearance and Personalization click Adjust Screen Resolu...

Page 77: ...pearance dialog box opens 2 Click one of the color choices and adjust the Color intensity slider then click OK Your new color settings are applied 3 For even more color adjustment options such as colo...

Page 78: ...Screen saver list then click the screen saver you want to use An example of the screen saver plays on the preview screen To change the settings for the screen saver click Settings change the settings...

Page 79: ...ck tickers Slide shows and puzzles Calendars and contact lists Sticky notes To add a gadget 1 Click the at the top of the Sidebar or right click in an empty area of the Sidebar and click Add Gadgets T...

Page 80: ...ick the control you want to operate Configuring the gadget Sidebar You can change the appearance and behavior of the Sidebar To change Sidebar properties 1 Right click in an empty area of the Sidebar...

Page 81: ...led click Start Control Panel Appearance and Personalization Personalization then click Display Settings The Display Settings dialog box opens 6 Right click the second monitor icon labeled 2 click Att...

Page 82: ...anel Hardware and Sound then under Sound click Change system sounds The Sound dialog box opens 2 Click the Sound Scheme list then click the sound scheme you want OR Click an event in the Program list...

Page 83: ...e The Mouse Properties dialog box opens 2 Change the settings you want You can Switch the left and right buttons Change the double click speed Change the pointer appearance and speed Change the mouse...

Page 84: ...her computers on the network To add delete or modify user accounts 1 Click Start Control Panel then under User Accounts and Family Safety click Add or remove user accounts To create a new account clic...

Page 85: ...Sound then under Power Options click Change power saving settings The Select a power plan dialog box opens 2 Click a power plan default plans shown Balanced uses several energy saving features while...

Page 86: ...ange Power down times for your hard drive wireless network adapter USB devices and processor Power management settings for your display processor and expansion cards Behavior of your computer s power...

Page 87: ...Quick access to common tools section click one of the following options to make some of the most common accessibility changes to Windows Start Magnifier provides a close up view of the area near your...

Page 88: ...cognition on With an attached microphone you can then control your computer using voice commands Set up microphone configures your attached microphone to work correctly with speech recognition Take Sp...

Page 89: ...Your Computer Introduction to Networking Wired Ethernet networking Wireless Ethernet networking Setting up your network connection Testing your network Adding a printer to your network Sharing resour...

Page 90: ...s Most home networks are built using Standard or Fast Ethernet components Business networks are typically built using Fast or Gigabit Ethernet components To create a wired Ethernet network you or your...

Page 91: ...rk hardware DHCP server dynamic IP address assignment to automatically configure network and IP addresses Determining if an Ethernet card is already installed on your computer To determine if an Ether...

Page 92: ...jacket containing eight color coded wires and equipment compatible with this type of cable This type of cable is equipped with RJ 45 connectors like a large telephone jack connector but with eight pi...

Page 93: ...rresponding green indicator should light on the front of the router indicating a good connection 4 Repeat Step 3 for each computer on the network 5 For an Internet connection plug a straight through c...

Page 94: ...t card is already installed on your computer 1 Click Start then click Control Panel The Control Panel window opens 2 Click System and Maintenance then click System 3 Click Device Manager from the task...

Page 95: ...alling it and setting network security Setting up your network connection Naming the computers and the workgroup Make sure that you have set up your router wired network or access point wireless netwo...

Page 96: ...ng your router After you have named your computers and set up TCP IP on them you can configure your router using your Web browser For instructions see your router s documentation Connecting to a wirel...

Page 97: ...nect to it your network is using security Right click on the network then click Properties Modify the security settings to match the settings you set on your access point Wireless security For informa...

Page 98: ...lugging a printer into your computer you can add a printer to your network To add a printer to the network do one of the following Connect your printer to your networked computer then share the printe...

Page 99: ...ring to set sharing for this drive folder 4 Click OK then click Close Un sharing drives and folders To un share drives or folders 1 Click Start then click Computer 2 Right click the drive or folder th...

Page 100: ...older can be accessed as if the drive were attached directly to the computer For example a shortcut is created on computer 2 to the My Documents folder on computer 1 To access the My Documents folder...

Page 101: ...the file to then click Paste Printing files across the network To print files across the network 1 Open the file you want to print then click Print 2 Click the arrow button to open the printer name l...

Page 102: ...CHAPTER 9 Networking Your Computer 96...

Page 103: ...CHAPTER10 97 Protecting your computer Hardware security Data security Security updates...

Page 104: ...our computer You have to enter your password when you turn on your computer or access your files These passwords are set in your computer s BIOS setup utility Use a password that you can remember but...

Page 105: ...against the latest viruses Making sure the Windows Security Center is configured to provide you with the highest level of protection Your new Gateway computer may have the McAfee SecurityCenter instal...

Page 106: ...ed from your computer Updating your virus definitions McAfee is set up to automatically retrieve the latest virus definitions from the Internet and install them on your computer If you turn off this a...

Page 107: ...r You can also configure the types of files that it scans for To configure McAfee VirusScan 1 Click Start All Programs McAfee then click McAfee SecurityCenter McAfee SecurityCenter opens 2 Click Compu...

Page 108: ...to configure then set the options for that scan type 6 Click OK Using McAfee Parental Controls You can use McAfee Parental Controls to restrict your children from accessing specific Web sites or spen...

Page 109: ...s are disabled bar to expand that area then click Advanced 4 Click the control you want to configure then follow the instructions for modifying that control 5 Click OK Using Windows Security Center Wi...

Page 110: ...n programs from running on your computer that might be found on web sites 4 For more information about the Windows Security Center click Get help about Security Center Security updates To keep your co...

Page 111: ...hedule automatic updates Windows can routinely check for the latest updates for your computer and install them automatically To schedule automatic updates 1 Click Start Control Panel then click Securi...

Page 112: ...your computer for problems and conflicts It automatically gathers information about the latest bugs security alerts and updates from BigFix sites on the Internet Whenever BigFix detects a problem it a...

Page 113: ...Computer Setting up a maintenance schedule Caring for your computer Cleaning your computer Recovering your system Updating Windows Using BigFix Managing hard drive space Scheduling maintenance tasks...

Page 114: ...elt or warp in high temperatures Damage due to either extreme is not covered by your warranty As a general rule your computer is safest at temperatures that are comfortable for you Keep all liquids aw...

Page 115: ...int trapped under the keys To clean the keyboard 1 Use an aerosol can of air with a narrow straw like extension to remove dust and lint trapped under the keys 2 If you spill liquid on the keyboard tur...

Page 116: ...ter s software also called recovering or restoring your system Gateway provides everything you need to recover your system under most conditions To recover specific files and software see Recovering s...

Page 117: ...system running again To restore using Microsoft System Restore 1 Click Start Control Panel System and Maintenance then click Backup and Restore Center The Backup and Restore Center opens 2 On the left...

Page 118: ...smoothly Windows Update scans your computer and provides you with a tailored selection of updates that apply only to the software and hardware on your computer For information on running Windows Updat...

Page 119: ...ry files defragment files and back up files Checking hard drive space To check hard drive space 1 Click Start then click Computer The Computer window opens 2 Right click the drive that you want to che...

Page 120: ...ptions My files only cleans only the folders for the currently logged in user Files from all users on this computer cleans all folders The Disk Cleanup dilalog box opens 3 Click to select the types of...

Page 121: ...want to check for errors click Properties then click the Tools tab 3 Click Check Now then click Start Your drive is checked for errors This process may take several minutes After Windows has finished...

Page 122: ...r mouse because using them may continuously stop and restart the defragmenting process Also if you are connected to a network log off before starting Disk Defragmenter Network communication may stop t...

Page 123: ...d drive backup If you do not have a high capacity backup device and you want to purchase one you can visit the Accessories Store at www gateway com To back up files 1 Click Start then click Computer T...

Page 124: ...e computers To move files and settings from your old computer 1 If you want to transfer program settings to your new computer install those programs on the new computer before running Windows Easy Tra...

Page 125: ...our saved personal data files 4 Copy your personal data files to removable media or to another computer on your network Finding other files Use Windows Find or Search to locate other personal data fil...

Page 126: ...CHAPTER 11 Maintaining Your Computer 120...

Page 127: ...sing the case Installing memory Replacing the system battery Replacing a CD DVD or diskette drive or a memory card reader Replacing an expansion card Replacing the front fan Replacing the front I O bo...

Page 128: ...touching the edge connectors and components on the cards Never slide expansion cards or components over any surface Opening the case Your computer case provides easy access to internal components Remo...

Page 129: ...ver 5 Swing the side panel down from the top of the computer then lift the panel away from the computer Caution When you release the lever the top of the side panel may fall away from the computer Hol...

Page 130: ...Push the four black plastic retainer tabs indicated by the arrows on the bezel to disengage them from the front of the chassis then pull the bottom of the bezel out from the bottom of the computer 3...

Page 131: ...tabs on the bezel slide into the slots on the front of the chassis 3 Press the bottom of the bezel firmly until it snaps into place 4 Replace the metal reinforcing beam hard drive assembly by fitting...

Page 132: ...mputer Your computer uses DIMM memory To install or replace DIMM memory 1 Remove the side panel by following the instructions in Removing the side panel on page 122 2 For more stability place your com...

Page 133: ...m battery If the computer clock does not keep time or the settings in the BIOS Setup utility are not saved when you turn off your computer replace the system battery Use a battery of the same size and...

Page 134: ...de panel on page 126 13 Reconnect all external cables and the power cord 14 Return your computer to the upright position 15 Turn on your computer 16 Open the BIOS Setup utility 17 In the BIOS Setup ut...

Page 135: ...position on the 5 25 inch bay then slide the component forward and out of the bay 5 If you are only replacing a 5 25 inch component note any jumper settings on the old drive and set the jumper on the...

Page 136: ...ep 3 13 Replace the front bezel and the reinforcing beam hard drive assembly then replace the side panel Replacing an expansion card To replace an expansion card 1 Remove the side panel by following t...

Page 137: ...llowing the instructions in Replacing the side panel on page 126 Replacing the front fan To replace the front fan 1 Remove the side panel by following the instructions in Removing the side panel on pa...

Page 138: ...nect the cables from the 5 25 inch component noting their locations and orientation You will reconnect the cables after you reinstall the component DVD drive shown 6 Pull the release latch down to the...

Page 139: ...release latch to move it to the Lock position 14 Reconnect the cables using your notes from Step 5 15 Replace the metal reinforcing beam hard drive assembly being careful not to pinch the hard drive...

Page 140: ...o pinch the hard drive cables then replace the bezel 8 Replace the side panel by following the instructions in Replacing the side panel on page 126 Replacing the hard drive To replace a hard drive 1 B...

Page 141: ...your notes from Step 5 10 Replace the metal reinforcing beam hard drive assembly being careful not to pinch the hard drive cables then replace the bezel 11 Replace the side panel by following the inst...

Page 142: ...back of the computer and remove it 6 Install the new power supply into the case then install the four screws to secure the power supply to the case 7 Reconnect the power supply cables using your notes...

Page 143: ...ide To avoid scratching the case place it on a towel or other non abrasive surface 4 Remove the fan assembly by squeezing it slightly top to bottom and pulling it away from the case 5 Lift the 5 25 in...

Page 144: ...n 11 Place the new heat sink on the processor making sure the Thermal Interface Material TIM is aligned between the heat sink and the processor then tighten the screws that secure the heat sink to the...

Page 145: ...nect any cables that are attached to any expansion cards noting their locations and orientation You will reconnect the cables after you reinstall the cards on the new board 5 Open the card retention l...

Page 146: ...eezing it top to bottom then pulling it away from the case 8 Disconnect the fan cable from the system board 9 Disconnect the cables from the 5 25 inch component noting their locations and orientation...

Page 147: ...bay from the chassis to remove it 12 Disconnect the power and data cables from the system board noting their locations and orientation You will reconnect the cables after you install the new board 13...

Page 148: ...ign the new system board on the screw holes in the case then secure it into the case with the screws 20 If your replacement system board does not include a processor go to Step 21 OR If your replaceme...

Page 149: ...erial TIM is aligned between the heat sink and the processor then tighten the screws that secure the heat sink to the system board 26 Reinstall the power supply into the case using the four screws you...

Page 150: ...31 Reconnect the component cables using your notes from Step 9 32 Reinstall the memory you removed previously 33 Reinstall any expansion cards you removed 34 Replace the metal reinforcing beam hard d...

Page 151: ...CHAPTER13 145 Troubleshooting Safety guidelines First steps Troubleshooting Telephone support...

Page 152: ...instruction If an error occurs in a program see the program s printed documentation or the online help Troubleshooting Troubleshooting topics are listed in alphabetical order Audio See Sound on page...

Page 153: ...ake sure that the mute controls are turned off For more information see Playing music and movies on page 56 Make sure that the speaker cables are connected correctly and securely Shut down and restart...

Page 154: ...e the write protection tab in the upper right corner of the diskette down unprotected The diskette may be full Delete unnecessary files on the diskette and try again Make sure that the diskette you ar...

Page 155: ...about opening your computer case see Opening the case on page 122 For more information about your Ethernet card see the documentation that came with your Ethernet card Your Ethernet network is runnin...

Page 156: ...r message Eject the diskette from the diskette drive then press ENTER Internet See also Modem dial up on page 153 You cannot connect to the Internet If you are using a dial up modem make sure that the...

Page 157: ...ion see the poster that came with your computer Remove all extension cables and switch boxes Clean the keyboard by using an aerosol can of air with a narrow straw like extension to remove dust and lin...

Page 158: ...a resolution and may shift scramble or scroll the picture For a better picture on a TV display you may need to lower the Media Center screen resolution to 800 600 or 640 480 For more information abou...

Page 159: ...rograms on your home DVD player Yes you can DVDs recorded with the Media Center can be played on a home DVD player You get a Download Error message when the Media Center tries to update the Program Gu...

Page 160: ...ne fax machine or printer that is on the same line as the modem Do not connect these devices to the same telephone line as the modem Make sure that you are not using a digital rollover or PBX line The...

Page 161: ...rograms 2 Click Start then click Control Panel The Control Panel window opens 3 Click Hardware and Sound then click Phone and Modem Options The Phone and Modem Options dialog box opens 4 Click the Mod...

Page 162: ...e way down from the upper screen edge and 1 3 of the way up from the lower screen edge to stabilize the internal aperture grille These wires are most obvious when the monitor displays a white backgrou...

Page 163: ...et plug a working device such as a lamp into the outlet and turn it on Make sure that the power cord is free from cuts or damage Replace any damaged cables Printer The printer will not turn on Make su...

Page 164: ...ntation for instructions for adding additional memory You see a Printer is out of paper error message After adding paper make sure that the printer is online Most printers have an online offline butto...

Page 165: ...nted documentation The Microsoft Windows documentation The software publisher s Web site See the troubleshooting section of this chapter Have your customer ID serial number and order number available...

Page 166: ...ng computer based training Resource Service description How to reach Answers by Gateway Get tutorial assistance for hardware and software issues www gateway com answers Gateway Customer Care Talk to a...

Page 167: ...al easy to use learning libraries www gateway com training Online Training from Learn With Gateway More than 450 online courses are available from Learn With Gateway All you have to do is go online an...

Page 168: ...CHAPTER 13 Troubleshooting 162...

Page 169: ...APPENDIXA 163 Legal Notices Important safety information Regulatory compliance statements Environmental information Notices...

Page 170: ...rddoesnotexceedtheextensioncordampererating IfyoursystemisfittedwithaTVTuner cable orsatellitereceivercard makesurethattheantennaorcablesystemiselectricallygroundedtoprovidesomeprotectionagainstvoltag...

Page 171: ...isrequiredforusewiththisdevice Themodemisdesignedtobeconnectedtothetelephonenetworkorpremiseswiringusingacompatible modularjackwhichisPart 68 compliant Seeinstallationinstructionsfordetails TheRingerE...

Page 172: ...devicessubjectonlytotherequirementthatthesumoftheRingerEquivalenceNumbersofallthedevicesdoesnotexceed 5 Laser safety statement AllGatewaysystemsequippedwithCDandDVDdrivescomplywiththeappropriatesafety...

Page 173: ...credittowardsthepurchaseofnewGatewayequipment CallGatewaytoseeifthisprogramisavailableinyourarea Ifyouneedfurtherassistanceinrecycling reusing ortradinginyour endoflife product youmaycontactusattheCus...

Page 174: ...roductdevelopment Gatewayreservestherighttomakeimprovementsinthismanualandtheproductsitdescribesatanytime withoutnoticesorobligation Trademark acknowledgments GatewayandtheBlack and WhiteSpotDesignare...

Page 175: ...ng memory card 50 removing memory card 50 replacing expansion 137 slots 50 troubleshooting add in card 144 troubleshooting memory card 151 types of memory cards supported 50 case closing 126 opening 1...

Page 176: ...ng 129 identifying 48 replacing 129 troubleshooting 146 using 48 display properties 51 53 troubleshooting 147 using screen saver 74 documentation Gateway Web site 2 help 3 Help and Support 3 online he...

Page 177: ...r errors 117 troubleshooting 148 headphone jack 9 10 heat sink replacing 134 help Media Center 3 online 4 using 3 Help and Support 3 searching 3 starting 3 Hibernate mode 8 hyperlinks 37 I i Link port...

Page 178: ...ort 10 screen resolution 52 77 troubleshooting 154 using screen saver 74 mouse buttons 18 changing settings 79 cleaning 112 clicking 19 double clicking 19 moving pointer 18 19 moving screen objects 19...

Page 179: ...ry 128 resetting computer 15 restarting computer 15 restoring files and folders 29 Resume mode 8 right clicking 19 router configuring 92 S safety avoiding repetitive strain 12 caring for notebook 110...

Page 180: ...54 mouse 154 network 155 passwords 155 power 155 printer 155 safety guidelines 144 screen 147 154 screen area 154 screen resolution 154 technical support 156 telephone support 156 Web site connection...

Page 181: ...1 Windows Update 106 114 wired Ethernet troubleshooting 147 WMA file creating 61 editing track information 62 playing 58 Wordpad 31 workgroup naming 91 working safely 11 World Wide Web WWW 37 download...

Page 182: ...Contents 176...

Page 183: ......

Page 184: ...MAN 3BAY MBTX PRO USR GDE V R0 12 06...

Reviews: