Gate Easy STD 56-272
Easy STD 56-273 Instructions For Use Manual Download Page 7

7

Bild från sidan med drivhjul och 
broms monterad

14

125 mm

15

16

17

1

2

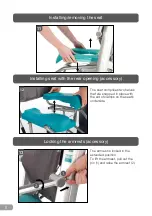
The wheel and hand rim kit consists of wheel attachments (two pairs) with a QR axle 
(one pair) and parking brakes with aluminium attachments (one pair) Tools required for 
installation (not included in the kit): Allen key (4 mm) and an adjustable wrench (10”).

Installation: 

1.  Install the attachments (both sides) as illustrated in figure 15. Note the distance  
  – 125 mm – shown in figure 15, item 1.
2.  Attach the wheels by snapping them into place with the QR axles; see figure 16.  
  Check that the wheels have no sideways play.
3.  Install the parking brakes on each side; see figure 17 (NOTE: right and left-hand versions).  
  Test the brakes so that the desired braking effect is achieved. Adjust brake position relative  
  to the wheel as necessary.
4.  Tip-over protection is provided by the permanent rear wheels. Lock the rear wheels in the  
  direction of travel; see item 2, figure 15.

We provide a two-year warranty against any manufacturing defects (does not apply to 
wear parts).

Wheel and hand rim 22” (accessory) 

Summary of Contents for Easy STD 56-272 Easy STD 56-273

Page 1: ...1 Instructions for use Easy STD Hygiene chair Easy STD 56 272 Easy STD Wheel and hand rim 56 273...

Page 2: ...siga delar omedelbart skall g ras av kunnig personal F r g bord med elst lldon anv nd ALDRIG g bordet under laddning Kontrollera att styrr r g r tdragna i verstativ 3 5 Safety Read these instructions...

Page 3: ...k nnas stabil Om g bordet lutar eller har missljud tillkalla servicepersonal Byt ut trasiga delar omedelbart skall g ras av kunnig personal F r g bord med elst lldon anv nd ALDRIG g bordet under ladd...

Page 4: ...o release it see arrow B Foot support heel restraint a The foot support can be adjusted in height by removing the clips see figure 6 and moving the foot support to the desired height make sure to repl...

Page 5: ...Make sure the sanitary pan is slid into position above the wire guides Also make sure that the pan is in the right position in relation to the seat cut out Fasten the back strap around the rear frame...

Page 6: ...in the extended position To lift the armrest pull out the pin 1 and raise the armrest 2 Installing removing the seat Installing seat with the rear opening accessory The seat comprises two halves that...

Page 7: ...m shown in figure 15 item 1 2 Attach the wheels by snapping them into place with the QR axles see figure 16 Check that the wheels have no sideways play 3 Install the parking brakes on each side see fi...

Page 8: ...toclave max 85 C Clean the back straps with cleaning agent non desiccant or machine wash them at 85 C see also back strap instructions Remove the seat and clean it separately or wash it in a washer au...

Reviews: