,7(0
3$571R
'(6&5,37,21
'HIDXOW
47<
6,=(
%5$&.(77+58:$//.,7
$
3$1(/,1),//)$6&,$
$
6&5(:7(.[6(/)7
:$6+(5)/$766[[
)$6&,$7+58:$//
$
+($76+,(/'7+528*+:$//
$
+($76+,(/'7+528*+:$//
$
+($76+,(/'7+528*+:$//
$
+($76+,(/'7+528*+:$//
$
),//3$1(/5+
$
),//3$1(//+
$
635,1*(;7PP[PP
&20%867,%/(:$//3$1(/
)5217
%
)$6&,$3$1(/-(:(/63(&75(
$
&20%867,%/(:$//),//3$1(/
)6
$
,1),//02817%5$&.(7
$
6&5(:67$3[*3+
6&5(:6(70[[3+7+(;
=3
1871</2&0
6&5(:&$30[%87+'
:$6+(5)/$70;=3
.12%32:(56:,7&+
$
6:,7&+326,7,2163'721
21
)$16:,7&+63(('527$5<
%/$1.,1*3$1(/,1%
$
187:+,=/2&.)/$1*(066
3$,17&$10(7%/$&.
0$7(5,$/
),1,6+
'5$:1
7,7/(
$33'
-,*
6+((7
2)
5(9 %< (&11R '$7(
5(9 %< (&11R '$7(
5(/($6('
'21276&$/(
$
6&$/(
3$571R
-(:(/63(&75()6
7+58:$//.,7&20%867,%/(:$//
77
(1*35
7+,6,1)250$7,21,6&21),'(17,$/$1'5(0$,167+(
3523(57<2)$)*$62137</7'81'(5&23<5,*+7/$:
$)*$62137</7',1&,19,&725,$
5(*,67(5('2)),&(
%/$.(675((7$5$5$7
9,&725,$
0$66NJ
7+,5'
$1*/(
352-(&7,21
67$1'$5'0(75,&72/(5$1&(681/(6663(&,),('27+(5:,6(
',0(16,2166+2:17+86RU
'5,//('+2/(6381&+('+2/(6$1*/(6
)25/$6(5&87&20321(176
)256+((7PP$1'81'(572/(5$1&(
)256+((7WRPP72/(5$1&(
)256+((7WRPP72/(5$1&(
77
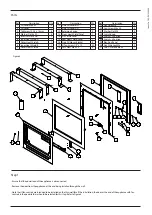
Parts
1
2
3
4
5
6
7
8
9
Fill Panel Mount
Fill Panel
Tek Screw 10-16 x 16mm
Washer Flat 8 x 20
Insert Fascia Panel
Inner Heat Shield A
Outer Heat Shield A
Inner Heat Shield B
Outer Heat Shield B
Ref. Description Qty.
2
1
6
4
1
1
1
1
1
10
11
12
13
14
15
16
17
18
Side Fill Panel R/H
Side Fill Panel L/H
Retaining Spring
Front Heat Shield Panel
F/S Fascia Panel
Rear Heat Shield Panel
Side Fill Mount Bracket
S/Tap Screw 1/2” x 10
Set Screw M6 x 20
Ref. Description Qty.
1
1
4
1
1
1
4
32
4
Ref. Description Qty.
Nut Nyloc M6
Cap Screw M8 x 20
Washer Flat M6
Switch Knob
Switch - 2 Position
Switch - 3 Position
Blanking Panel
Nut Whiz Lock M6
Paint - Metallic Black
4
4
8
1
1
1
1
2
1
19
20
21
22
23
24
25
26
27
Sheet 2 of 6 GPN 234969
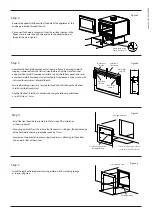
Step 1
• Ensure that the power lead of the appliance is disconnected.
• Remove the door from the appliance, at the end being installed through the wall.
• Note that if fan controls are intended to be installed on the thru-wall face if the installation, the door at the end of the appliance with fan
controls in the pedestal base should be selected for this step. Refer to figure 5.
Figure 4


