11
10
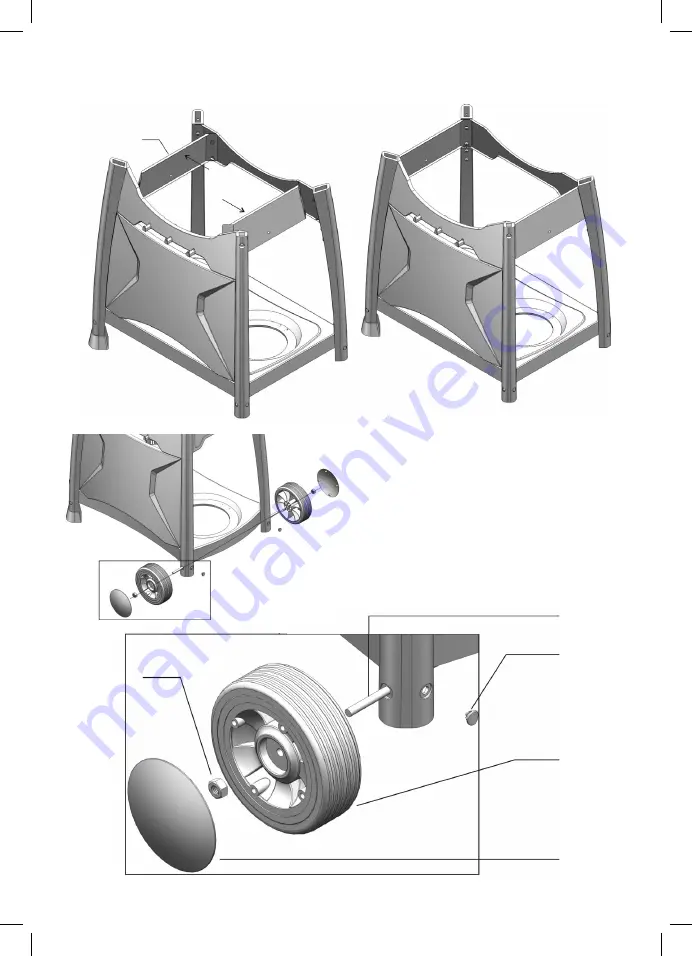
STEP 6
Locate the axle through the legs as shown, attach the wheels using the nuts then push on the hub caps. Plug the holes as shown
STEP 5
Position the side panels as shown, then tighten the fasteners on both legs.
H
DD x 2
N
Q
O
P
Page 1: ...grated temperature gauge a must when roasting Convenient side shelves for easier food preparation and cooking when not in use they can be dropped down High dome hood 24cm allows you to roast easily In...
Page 2: ...er ON by rotating the knob to open position Using a brush or spray bottle apply the soap solution to the gas line and each join in the gas line including the gas connection at the inlet of the BBQ all...
Page 3: ...assemblies must be those specified by the barbecue manufacturer When connecting the hose and regulator assembly to the gas cylinder take care to avoid unnecessary twisting of the flexible hose After...
Page 4: ...r light barbecue with hood closed or before checking to ensure the burner tubes are fully seated over gas valve orifices GENERAL INFORMATION Never lean over cooking surface when lighting Never alter o...
Page 5: ...ols You Will Need Adjustable spanner Philips head screwdriver For any queries or assistance call Customer Service Australia Only 1300 174 876 Hours of operation Monday to Friday 8am 5pm EST Do not ret...
Page 6: ...6 EXPLODED DIAGRAM...
Page 7: ...1 J Front Panel 1 K Front Skirt 1 L Leg 2 Part Description QTY M Wheel Leg 2 N Axle 1 O Wheel 2 P Hub Cap 2 Q Plugs 6 R Fat Tray Support 1 S Hot Plate 1 T Base 1 U Side Shelf 1 V Hood 1 W Hood Handle...
Page 8: ...with the fasteners on both legs as shown T L M STEP 1 Loosen the pre installed screws Position the legs as shown and secure with both of the fasteners Place the feet on the legs as shown and secure w...
Page 9: ...w 4 J STEP 3 Loosen the pre installed screws Position the front panel and secure with the fasteners as shown on both sides I Pre installed screw 4 STEP 4 Loosen the pre installed screws Position the b...
Page 10: ...the axle through the legs as shown attach the wheels using the nuts then push on the hub caps Plug the holes as shown STEP 5 Position the side panels as shown then tighten the fasteners on both legs...
Page 11: ...11 STEP 7 Attach the hood handle with the fasteners as shown AA x 2 BB x 2 CC x 2 V W STEP 8 Place the hood onto the body and secure it with the pins and clips as shown II x 2 JJ x 2...
Page 12: ...12 STEP 9 Attach the fat tray support as shown AA x4 R...
Page 13: ...rbecue body as shown and secure with the four fasteners Plug the holes as shown AA x 4 A STEP 11 Attach the front panel with the fasteners as shown CC x 1 BB x 1 AA x 1 E Plug is tapered ensure the lo...
Page 14: ...14 STEP 12 Position the heat shield tabs as shown into the slot on the fat tray support AA x 1 STEP 13 Secure the heat shield with the fasteners F...
Page 15: ...5 STEP 14 Position the folding side shelves with the short offset facing the front HH x 4 STEP 15 Secure with the fasteners as shown Note Ensure the side shelves are folded down when moving the BBQ U...
Page 16: ...16 B C S D STEP 16 Place the Glass Flame Tamer into the holder above the ceramic centre burner Position the cooking plate and grate as shown STEP 17 Slide the fat tray in from the rear...
Page 17: ...TE If for some reason ignitor fails to produce a spark at the electrode barbecue can be lit by a long barbecue match with hood open insert the match into a hole on the underside of the barbecue and tu...
Page 18: ...d re ignite the burner Cooking surface was not given enough time to warm up before the food was applied Remove the food and give the burner time to warm the cooking surface 5 10 mins There is too much...
Page 19: ...clean the burner tubes and burner ports Cleaning the Cooking Surface After cooking turn burner control to OFF and let barbecue cool before attempting to clean the grill plate or grate Before first us...
Page 20: ...that includes an overhead cover and no more than two walls Within a partial enclosure that includes an overhead cover and more than two walls the following will apply at least 25 of the total wall are...