9
8
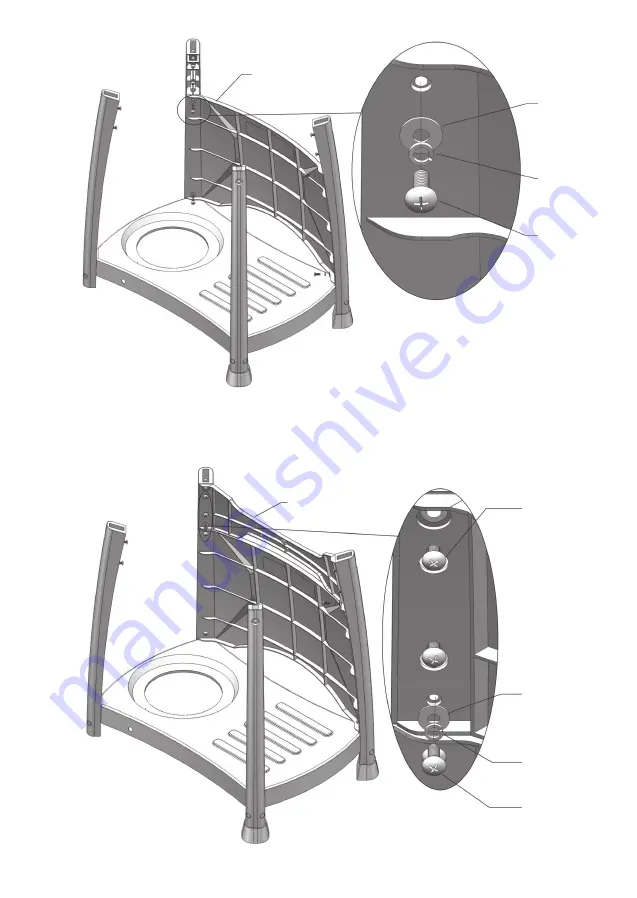
STEP 3
Attach the front skirt with the fasteners as shown.
STEP 4
Loosen the pre installed screws. Position the front panel and secure with the fasteners as shown.
K
CC x 4
BB x 4
AA x 4
CC x 2
BB x 2
AA x 2
Pre installed
screw (4)
J
Page 1: ...must when roasting Convenient side shelves for easy food preparation and cooking when not in use they can be dropped down High dome hood 21cm allows you to roast easily Integrated trolley features wh...
Page 2: ...er ON by rotating the knob to open position Using a brush or spray bottle apply the soap solution to the gas line and each join in the gas line including the gas connection at the inlet of the BBQ all...
Page 3: ...nufacturer When connecting the hose and regulator assembly to the gas cylinder take care to avoid unnecessary twisting of the flexible hose After the assembly has been secured turn on the gas and chec...
Page 4: ...r light barbecue with hood closed or before checking to ensure the burner tubes are fully seated over gas valve orifices GENERAL INFORMATION Never lean over cooking surface when lighting Never alter o...
Page 5: ...arbecue Always ensure that no sporting or physical activities are carried out in close proximity to the barbecue during use and while still hot Tools You Will Need Adjustable spanner Philips head scre...
Page 6: ...6 EXPLODED DIAGRAM...
Page 7: ...ont Panel 1 K Front Skirt 1 L Leg 4 Part Description QTY M Foot 2 N Base 1 O Axle 1 P Wheel 2 Q Hub Cap 2 R Plugs 6 S Fat Tray Support 1 T Upper Leg Plugs 4 U Knobs 2 V Hood 1 W Lid Handle 1 PARTS LIS...
Page 8: ...f tapping screw Plug the holes as shown ASSEMBLY INSTRUCTIONS N CC x 4 BB x 4 AA x 4 L Pre installed screw 4 STEP 1 Loosen the pre installed screws Position the legs as shown and secure with the faste...
Page 9: ...the front skirt with the fasteners as shown STEP 4 Loosen the pre installed screws Position the front panel and secure with the fasteners as shown K CC x 4 BB x 4 AA x 4 CC x 2 BB x 2 AA x 2 Pre inst...
Page 10: ...I Pre installed screw 4 STEP 5 Loosen the pre installed screws Position the back panel DO NOT retighten the fasteners STEP 6 Loosen the screws Position the side panels as shown then tighten the fasten...
Page 11: ...Attach the hood handle with the fasteners as shown CC BB AA STEP 7 Locate the axle through the legs as shown attach the wheels using the nuts then push on the hub caps Plug the holes as shown DD x 2 O...
Page 12: ...STEP 9 Align the D shape on the knob with the D shape on the spindle and push on the control knobs JJ x 2 STEP 10 Place the hood onto the body and secure it with the pins and clips as shown KK x 2 A...
Page 13: ...13 S STEP 11 Attach the fat tray support as shown STEP 12 Locate the barbecue body as shown and secure with the four fasteners Plug the holes as shown AA x 4 A AA x 2 T...
Page 14: ...14 STEP 13 Secure the front panel with the fastener as shown CC x 1 BB x 1 AA x 1 STEP 14 Position the heat shield tabs as shown F...
Page 15: ...15 G STEP 16 Position the folding side shelves EE x 1 STEP 15 Secure the heat shield with the fasteners FF x 1 GG x 1 X X...
Page 16: ...16 STEP 18 Position the cooking plate and grate as shown B C D STEP 17 Secure with the fasteners as shown HH x 4...
Page 17: ...17 STEP 19 Slide the fat tray in from the rear E...
Page 18: ...underside of the barbecue and turn gas control to high Check performance of burner prior to installing barbecue plates Do not smoke when attempting to ignite barbecue Never use volcanic rock heat bead...
Page 19: ...is not cooking or is taking too long Burner has gone out Check that the gas bottle is not empty and re ignite the burner Cooking surface was not given enough time to warm up before the food was appli...
Page 20: ...clean the burner tubes and burner ports Cleaning the Cooking Surface After cooking turn burner control to OFF and let barbecue cool before attempting to clean the grill plate or grate Before first us...
Page 21: ...that includes an overhead cover and no more than two walls Within a partial enclosure that includes an overhead cover and more than two walls the following will apply at least 25 of the total wall are...
Page 22: ...22 Do not return to place of purchase Keep your purchase receipt this will be required to make any claims under the 12 month warranty...