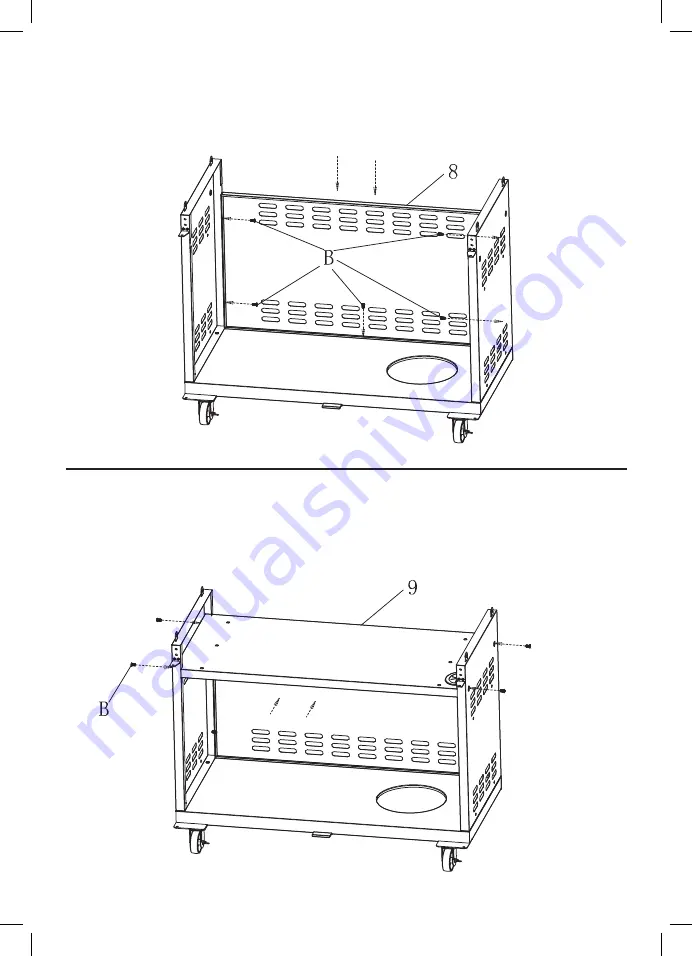
7
6
ASSEMBLY INSTRUCTIONS
STEP 3
Use 5x M6x12mm screws (B) to attach cabinet back panel (8).Note: DO NOT tighten the screws of this step now.
STEP 4
Use 4x M6x12mm screws (B) to attach cabinet horizontal shelf (9).
Page 1: ...h powder coated cabinet trolley Flush mounted side burner for greater cooking versatility Cast iron hotplates and grill with chrome warming rack Stainless steel tubular burners lit by electronic ignit...
Page 2: ...gas and contact the supplier immediately Always ensure the barbecue is kept away from flammable materials and the gas cylinder clear of any heat source When changing over from an empty gas cylinder t...
Page 3: ...cue with hood closed or before checking to ensure the burner tubes are fully seated over gas valve orifices Never lean over cooking surface when lighting Never alter or modify the regulator or gas sup...
Page 4: ...less drill and bits and Adjustable spanner open ended shifter or spanners Check Barbecue for any Damage Inspect barbecue parts as you proceed Contact your supplier for assistance regarding replacement...
Page 5: ...No Description QTY 13 Fat tray bracket 2 14 Fat tray 1 15 Fat tray front fascia 1 16 R H side shelf assembly 1 17 L H side burner assembly 1 18 Side burner grid 1 19 Flame tamer 4 20 Cooking grill 2...
Page 6: ...spring washers E to attach 2x swivel castors 3 and 2x locking swivel castors 4 to the base panel 2 STEP 2 Use 4x M6x12mm screw B to attach cabinet left side panel 5 and cabinet right side panel 6 to t...
Page 7: ...7 ASSEMBLY INSTRUCTIONS STEP 3 Use 5x M6x12mm screws B to attach cabinet back panel 8 Note DO NOT tighten the screws of this step now STEP 4 Use 4x M6x12mm screws B to attach cabinet horizontal shelf...
Page 8: ...Use 4x M6x12mm screws B to attach the door handle 12 to door 10 11 STEP 6 Attach doors 10 11 to completed cabinet by inserting the bottom door locator into holes then pressing down on the top locator...
Page 9: ...t 13 to main cabinet STEP 8 Attach hose and gas regulator assembly 23 to firebox assembly 1 Use 4x M6x12mm screws B to attach firebox to the cabinet making sure that the locators insert into the base...
Page 10: ...x M5x12mm screws C to attach the flat tray front fascia 15 to the flat tray 14 STEP 10 Use 4x M6x15mm screws A leaving a 5mm gap 1x M5x12mm screw C to attach the R H side shelf assembly 16 to the fire...
Page 11: ...STEP 11 Use 4x M6x15mm screws A leaving a 5mm gap 1x M5x12mm screw C to attach the L H side burner assembly 17 to the firebox Tighten both side shelves STEP 12 Attach the main gas line to side burner...
Page 12: ...12 12 ASSEMBLY INSTRUCTIONS STEP 13 Insert side burner grid 18 STEP 14 Insert 4x flame tamers 19...
Page 13: ...INSTRUCTIONS STEP 15 Insert the ignition wire into the end of the ignition pin Note Ensure that the side burner body is located over the injector STEP 16 Insert 2x cooking grills 20 and 1x hotplate 2...
Page 14: ...14 14 ASSEMBLY INSTRUCTIONS STEP 17 Insert warming rack 22 STEP 18 Insert AA battery into the ignition pack with battery facing the correct way facing out...
Page 15: ...py water dishwashing liquid and water is ne Brush it on or use a spray bottle as shown in the drawing Ensure the connections have a good coating Step 15a If the connection is leaking bubbles will star...
Page 16: ...onnect hose at the cylinder only DO NOT disconnect hose from appliance Regulator Safety Feature All QCC regulators the part that attaches to the gas cylinder to regulate the flow of gas have a safety...
Page 17: ...process 3 If the burner fails to light after several attempts turn the control knob to OFF and wait a few minutes before attempting re ignition Problem Possible Reason Solution Burner will not ignite...
Page 18: ...ch to your barbecue Remove the warming rack prior to using the rotisserie kit For best results always use meat that has been thawed overnight in the fridge or room temperature Secure meat to spit rod...
Page 19: ...on and cleaning of the burner tubes is necessary Cleaning the Cooking Surface After cooking turn burner control to OFF and let barbecue cool before attempting to clean your grill plates Before first u...
Page 20: ...C REPRESENTATIONS OF OUTDOOR AREAS The following figures are diagrammatic representations of outdoor areas Rectangular areas have been used in these figures the same principles apply to any other shap...
Page 21: ...21 This page has been left intentionaly blank...
Page 22: ...22 This page has been left intentionaly blank...
Page 23: ...23 This page has been left intentionaly blank...
Page 24: ...id if there is evidence of the product being tampered with by unauthorised persons If the product includes one or a number of accessories only the defective accessory or part will be replaced eg hose...