Gasmate Avenir BQ2026KIT Manual Download Page 4

5

4

GENERAL INFORMATION

Location of your Barbecue

DO NOT use your barbecue in garages, porches, 
breezeways, sheds or other enclosed areas. Your 
barbecue is to be used OUTDOORS. The barbecue is 
not intended to be installed in or on recreational vehicles 
and/or boats and should not be placed under any surface 
that will burn. Do not obstruct the flow of combustion 
and ventilation air around the barbecue housing.

Protect Children

Keep children away from barbecue during use and until 
barbecue has cooled after you have finished.Do not allow 
children to operate barbecue.
Always ensure that no sporting or physical activities are 
carried out in close proximity to the barbecue during use 
and while still hot.

General Assembly

Remove the barbecue and components from the packing 
carton. Check against parts list and lay components out 
within easy reach. Do not throw the carton away, unfold 
flat and use as a protective work surface. Contact your 
supplier for replacement parts if necessary.

Tools You Will Need

Standard Phillips-head screw driver (or cordless drill 
and bits) and Adjustable spanner (open ended shifter) or 
spanners.

Check Barbecue for any Damage

Inspect barbecue parts as you proceed. Contact your 
supplier for assistance regarding replacement of any 
damaged or missing parts. Do not assemble or operate a 
barbecue that appears damaged. Barbecues for use with 
gas cylinders are labelled ‘LPG/ULPG’. Check labelling at 
the gas connection on your barbecue.

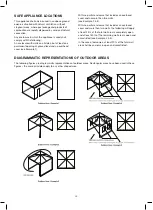
Kitchen/Module Installation

Modules can only be installed to the right hand side of 
the BBQ. The side burner MUST NOT be removed.
Leave at least 200mm of distance between the back 
of the unit and the wall for ventilation. All units must be 
undercover.

Nominal Hourly Gas Consumption

Gas Type

BBQ 

Burners

Injector 

Size

Gas Consumption 

Per Burner MJ/h

Total Gas Consumption 

Primary Burners MJ/h

Gas 

Pressure 

kPa

Propane

6

Ø

 1.0mm

13.5

81

2.75 kPa

ASSEMBLY INSTRUCTIONS

Before assembling the barbecue, read these Instructions 
carefully.
Assemble the barbecue on a flat, clean surface.
The barbecue is heavy.
NOTE: Do not fully tighten all the nuts during the initial 
stages of assembly.
Caution: Sheet metal can cause injury. Wear gloves 
when assembling the barbecue.

Summary of Contents for Avenir BQ2026KIT

Page 1: ...warming rack Stainless steel tubular burners lit by electronic ignition Complete with hose and regulator Total cooking area mm 960W x 460D Approved to Australian and New Zealand Standards Important R...

Page 2: ...gas and contact the supplier immediately Always ensure the barbecue is kept away from flammable materials and the gas cylinder clear of any heat source When changing over from an empty gas cylinder t...

Page 3: ...cue with hood closed or before checking to ensure the burner tubes are fully seated over gas valve orifices Never lean over cooking surface when lighting Never alter or modify the regulator or gas sup...

Page 4: ...andard Phillips head screw driver or cordless drill and bits and Adjustable spanner open ended shifter or spanners Check Barbecue for any Damage Inspect barbecue parts as you proceed Contact your supp...

Page 5: ...door assembly 1 11 Right door assembly 1 12 Door handle 2 No Description QTY 13 Fat tray bracket 2 14 Fat tray 1 15 Fat tray front fascia 1 16 Flame tamer 4 17 Cooking grill 2 18 Hotplate 1 19 Warmin...

Page 6: ...spring washers E to attach 2x swivel castors 3 and 2x locking swivel castors 4 to the base panel 2 STEP 2 Use 4x M6x12mm screw B to attach cabinet left side panel 5 and cabinet right side panel 6 to t...

Page 7: ...7 ASSEMBLY INSTRUCTIONS STEP 3 Use 5x M6x12mm screws B to attach cabinet back panel 8 Note DO NOT tighten the screws of this step now STEP 4 Use 4x M6x12mm screws B to attach cabinet horizontal shelf...

Page 8: ...Use 4x M6x12mm screws B to attach the door handle 12 to door 10 11 STEP 6 Attach doors 10 11 to completed cabinet by inserting the bottom door locator into holes then pressing down on the top locator...

Page 9: ...ch the flat tray bracket 13 to main cabinet STEP 8 Attach hose and gas regulator assembly 23 to firebox assembly 1 Use 4x M6x12mm screws B to attach firebox to the cabinet making sure that the locator...

Page 10: ...10 10 ASSEMBLY INSTRUCTIONS STEP 9 Use 3x M5x12mm screws C to attach the flat tray front fascia 15 to the flat tray 14 STEP 10 Insert 4x flame tamers 16...

Page 11: ...11 11 STEP 11 Insert 2x cooking grills 17 and 1x hotplate 18 into firebox STEP 12 Insert warming rack 19...

Page 12: ...sition 9kg propane gas cylinder into the BBQ trolley and screw in the BBQ gas regulator Step 12 Attach the regulator to your gas cylinder Step 14 Use a solution of soapy water dishwashing liquid and w...

Page 13: ...connection is leaking bubbles will start to grow in the soapy solution If this happens shut off the gas supply at the cylinder ent then Step 15c The connection is gas tight when no bubbles grow aroun...

Page 14: ...onnect hose at the cylinder only DO NOT disconnect hose from appliance Regulator Safety Feature All QCC regulators the part that attaches to the gas cylinder to regulate the flow of gas have a safety...

Page 15: ...Control knob is closed Turn knob to high when lighting Electronic igniter is faulty Use a long barbecue match Food is not cooking or is taking too long Burner has gone out Check that the gas bottle i...

Page 16: ...ry lean cuts such as fish These temperatures vary with outside temperature and the amount of wind When using the temperature gauge in the hood of your barbecue please note that it measures air tempera...

Page 17: ...on and cleaning of the burner tubes is necessary Cleaning the Cooking Surface After cooking turn burner control to OFF and let barbecue cool before attempting to clean your grill plates Before first u...

Page 18: ...stion air inlets then replace the Burner ensuring it is firmly secured Minimum Clearance for Ventilation Rear 50 mm Side 50 mm NOTE TO THE INSTALLER 1 The injector size is increased by removing the Pr...

Page 19: ...C REPRESENTATIONS OF OUTDOOR AREAS The following figures are diagrammatic representations of outdoor areas Rectangular areas have been used in these figures the same principles apply to any other shap...

Page 20: ...call Customer Service Australia Only 1300 174 876 Hours of operation Monday to Friday 8am 5pm EST Do not return to place of purchase Keep your purchase receipt this will be required to make any claim...

Reviews: