background image

your rounds of golf. To sign up for a free account, go to 

www.garminconnect.com/start

.

Store your activities

: After you complete and save an activity 

with your device, you can upload that activity to Garmin 

Connect and keep it as long as you want.

Analyze your data

: You can view more detailed information 

about your fitness and outdoor activities, including time, 

distance, heart rate, calories burned, cadence, an overhead 

map view, and pace and speed charts. You can view more 

detailed information about your golf games, including 

scorecards, statistics, and course information. You can also 

view customizable reports.

NOTE: 

Some data requires an optional accessory such as a 

heart rate monitor.

Track your progress

: You can track your daily steps, join a 

friendly competition with your connections, and meet your 

goals.

Share your activities

: You can connect with friends to follow 

each other's activities or post links to your activities on your 

favorite social networking sites.

Manage your settings

: You can customize your device and 

user settings on your Garmin Connect account.

Using Garmin Connect Mobile

You can upload all of your activity data to your Garmin Connect 

account for comprehensive analysis. With your Garmin Connect 

account, you can view a map of your activity, and share your 

activities with friends. You can turn on auto upload in the Garmin 

Connect Mobile app.

1

From the Garmin Connect Mobile app, select 

 > 

Devices

.

2

Select your vívoactive device, and select 

Device Settings

.

3

Select the toggle switch to turn on auto upload.

Using Garmin Connect on Your Computer

If you have not paired your vívoactive device with your 

smartphone, you can upload all of your activity data to your 

Garmin Connect account using your computer.

1

Connect the device to your computer using the USB cable.

2

Go to 

www.garminconnect.com/start

.

3

Follow the on-screen instructions.

ANT+ Sensors

Your device can be used with wireless ANT+ sensors. For more 

information about compatibility and purchasing optional sensors, 

go to 

http://buy.garmin.com

.

Pairing ANT+ Sensors

The first time you connect a sensor to your device using ANT+ 

wireless technology, you must pair the device and sensor. After 

they are paired, the device connects to the sensor automatically 

when you start an activity and the sensor is active and within 

range.

NOTE: 

If a heart rate monitor was bundled with your device, the 

included heart rate monitor is already paired with your device.

1

If you are pairing a heart rate monitor, put on the heart rate 

monitor (

Putting On the Heart Rate Monitor

).

The heart rate monitor does not send or receive data until 

you put it on.

2

Bring the device within 3 m (10 ft.) of the sensor.

NOTE: 

Stay 10 m (33 ft.) away from other ANT+ sensors 

while pairing.

3

Select the action key.

4

Select 

System

 > 

Sensors

 > 

Add New

.

5

Select an option:
• Select 

Search All

.

• Select your sensor type.
After the sensor is paired with your device, the sensor status 

changes from Searching to Connected. Sensor data appears 

in the data page loop or a custom data field.

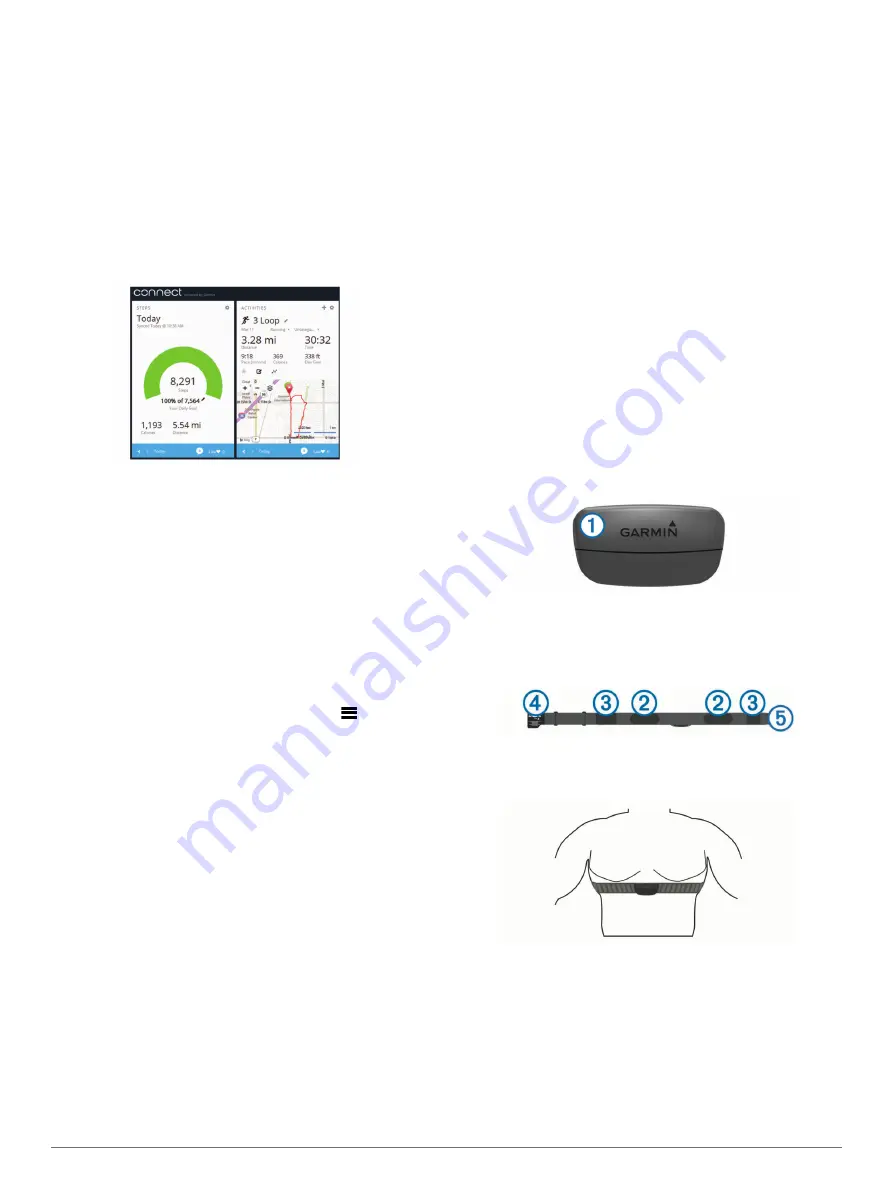
Putting On the Heart Rate Monitor

NOTE: 

If you do not have a heart rate monitor, you can skip this 

task.
You should wear the heart rate monitor directly on your skin, just 

below your sternum. It should be snug enough to stay in place 

during your activity.

1

Snap the heart rate monitor module 

À

 onto the strap.

The Garmin logos on the module and the strap should be 

right-side up.

2

Wet the electrodes 

Á

 and the contact patches 

Â

 on the back 

of the strap to create a strong connection between your chest 

and the transmitter.

3

Wrap the strap around your chest, and connect the strap 

hook 

Ã

 to the loop 

Ä

.

NOTE: 

The care tag should not fold over.

The Garmin logos should be right-side up.

4

Bring the device within 3 m (10 ft.) of the heart rate monitor.

After you put on the heart rate monitor, it is active and sending 

data.

TIP: 

If the heart rate data is erratic or does not appear, see the 

troubleshooting tips (

Tips for Erratic Heart Rate Data

).

Setting Your Heart Rate Zones

The device uses your user profile information from the initial 

setup to determine your default heart rate zones. The device 

has separate heart rate zones for running and cycling. For the 

6

ANT+ Sensors

Summary of Contents for vivoactive

Page 1: ...vívoactive Owner s Manual February 2015 Printed in Taiwan 190 01749 00_0A ...

Page 2: ...onnect IQ Garmin Connect Garmin Express tempe VIRB and vívoactive are trademarks of Garmin Ltd or its subsidiaries These trademarks may not be used without the express permission of Garmin Android is a trademark of Google Inc The Bluetooth word mark and logos are owned by the Bluetooth SIG Inc and any use of such marks by Garmin is under license iOS is a registered trademark of Cisco Systems Inc u...

Page 3: ...Tips for Erratic Heart Rate Data 7 Foot Pod 7 Calibrating Your Foot Pod 7 Using an Optional Bike Speed or Cadence Sensor 7 Calibrating Your Speed Sensor 7 tempe 7 Customizing Your Device 7 Changing the Watch Face 7 Setting Up Your User Profile 7 Activity Settings 8 Customizing the Data Screens 8 Alerts 8 Auto Lap 8 Using Auto Pause 8 Using Auto Scroll 8 Background Settings 9 Bluetooth Settings 9 S...

Page 4: ......

Page 5: ...product warnings and other important information The charging cradle contains a magnet Under certain circumstances magnets may cause interference with some medical devices including pacemakers and insulin pumps Keep the charging cradle away from such medical devices NOTICE The charging cradle contains a magnet Under certain circumstances magnets may cause damage to some electronic devices includin...

Page 6: ...o to www garminconnect com 3 From your devices widget select Connect IQ Store 4 Select a Connect IQ feature 5 Select Send to Device and follow the on screen instructions Widgets Your device comes preloaded with widgets that provide at a glance information Some widgets require a Bluetooth connection to a compatible smartphone Notifications Alerts you to incoming calls and texts according to your sm...

Page 7: ...vice Before you can use an ANT sensor for your ride you must pair the sensor with your device Pairing ANT Sensors 1 Pair your ANT sensors such as a heart rate monitor speed sensor or cadence sensor optional 2 Select the action key 3 Select Bike 4 When using optional ANT sensors wait while the device connects to the sensors 5 Go outside and wait while the device locates satellites 6 Select the acti...

Page 8: ...device Charging the Device 1 Select the action key 2 Select Golf 3 Go outside and wait while the device locates satellites 4 Select a course from the list of available courses 5 Swipe left or right to scroll through the data screens for each hole The device automatically transitions when you move to the next hole 6 After you complete your activity select End Round Save Hole Information Because pin...

Page 9: ...ing Activity to set preferences for notifications that appear when in watch mode 6 Select a notification preference 7 Select Notification Timeout 8 Select a timeout duration Viewing Notifications 1 From the watch face swipe left or right to view the notifications widget 2 Tap the touchscreen and swipe left or right to scroll through the notifications 3 Select a notification 4 If necessary select t...

Page 10: ...onal sensors go to http buy garmin com Pairing ANT Sensors The first time you connect a sensor to your device using ANT wireless technology you must pair the device and sensor After they are paired the device connects to the sensor automatically when you start an activity and the sensor is active and within range NOTE If a heart rate monitor was bundled with your device the included heart rate mon...

Page 11: ...g electromagnetic fields some 2 4 GHz wireless sensors high voltage power lines electric motors ovens microwave ovens 2 4 GHz cordless phones and wireless LAN access points Foot Pod Your device is compatible with the foot pod You can use the foot pod to record pace and distance instead of using GPS when you are training indoors or when your GPS signal is weak The foot pod is on standby and ready t...

Page 12: ...med walking breaks at regular intervals For example during a long training run you can set the device to alert you to run for 4 minutes and then walk for 1 minute and repeat Auto Lap functions as usual while you are using the run or walk alerts 1 Select the action key 2 Select an activity NOTE This feature is not available for all activities 3 Select Alerts Add New 4 Select Run Walk 5 Enter a time...

Page 13: ...ng the Time Manually By default the time is set automatically when the vívoactive device is paired with a mobile device 1 Select the action key 2 Select System System Clock Set Local Time Manual 3 Select Time and enter the time of day Setting the Alarm 1 Select the action key 2 Select System Alarm 3 Select the toggle switch to turn on the alarm 4 Select and enter a time Backlight Settings Select t...

Page 14: ...le 4 Press the Delete key on your keyboard Troubleshooting Resetting the Device If the device stops responding you may need to reset it NOTE Resetting the device may erase your data or settings 1 Hold for 15 seconds The device turns off 2 Hold for one second to turn on the device Restoring All Default Settings NOTE This deletes all user entered information and activity history You can reset all se...

Page 15: ...urrent activity Average Strokes Length The average number of strokes per length during the current activity Average SWOLF The average swolf score for the current activity Your swolf score is the sum of the time for one length plus the number of strokes for that length Swim Terminology Cadence Cycling The number of revolutions of the crank arm Your device must be connected to a cadence accessory fo...

Page 16: ...red breathing Anaerobic and muscular endurance increased power Wheel Size and Circumference The wheel size is marked on both sides of the tire This is not a comprehensive list You can also use one of the calculators available on the Internet Wheel Size L mm 12 1 75 935 14 1 5 1020 14 1 75 1055 16 1 5 1185 16 1 75 1195 18 1 5 1340 18 1 75 1350 20 1 75 1515 20 1 3 8 1615 22 1 3 8 1770 22 1 1 2 1785 ...

Page 17: ... not to export or re export the Software to any country in violation of the export control laws of the United States of America or the export control laws of any other applicable country Symbol Definitions These symbols may appear on the device or accessory labels WEEE disposal and recycling symbol The WEEE symbol is attached to the product in compliance with the EU directive 2002 96 EC on Waste E...

Page 18: ... 6 I icons 1 intervals 4 K keys 1 10 L layup 4 lengths 4 M maps updating 10 measuring a shot 5 menu 1 N navigation 3 stopping 3 notifications 5 O odometer 4 P pairing ANT sensors 6 smartphone 1 pool size custom 4 setting 4 product registration 10 profiles 3 user 7 R registering the device 10 replacing the battery 10 resetting the device 10 S satellite signals 1 10 saving activities 3 scorecard 4 s...

Page 19: ......

Page 20: ...7671 0800 0233937 47 815 69 555 00800 4412 454 44 2380 662 915 35 1214 447 460 386 4 27 92 500 0861 GARMIN 427 646 27 0 11 251 9999 34 93 275 44 97 46 7744 52020 886 2 2642 9199 ext 2 0808 238 0000 44 0 870 8501242 49 0 180 6 427646 20 ct Anruf a d deutschen Festnetz Mobilfunk max 60 ct Anruf 913 397 8200 1 800 800 1020 2015 Garmin Ltd or its subsidiaries TRA REGISTERED No ER35620 14 DEALER No DA0...

Reviews: