Saved networks appear at the top of the list, below the Auto-
Connect To heading.
2
Select
Forget
next to the network you want to remove from
your camera.
After you forget a network, the camera no longer connects to it
automatically.
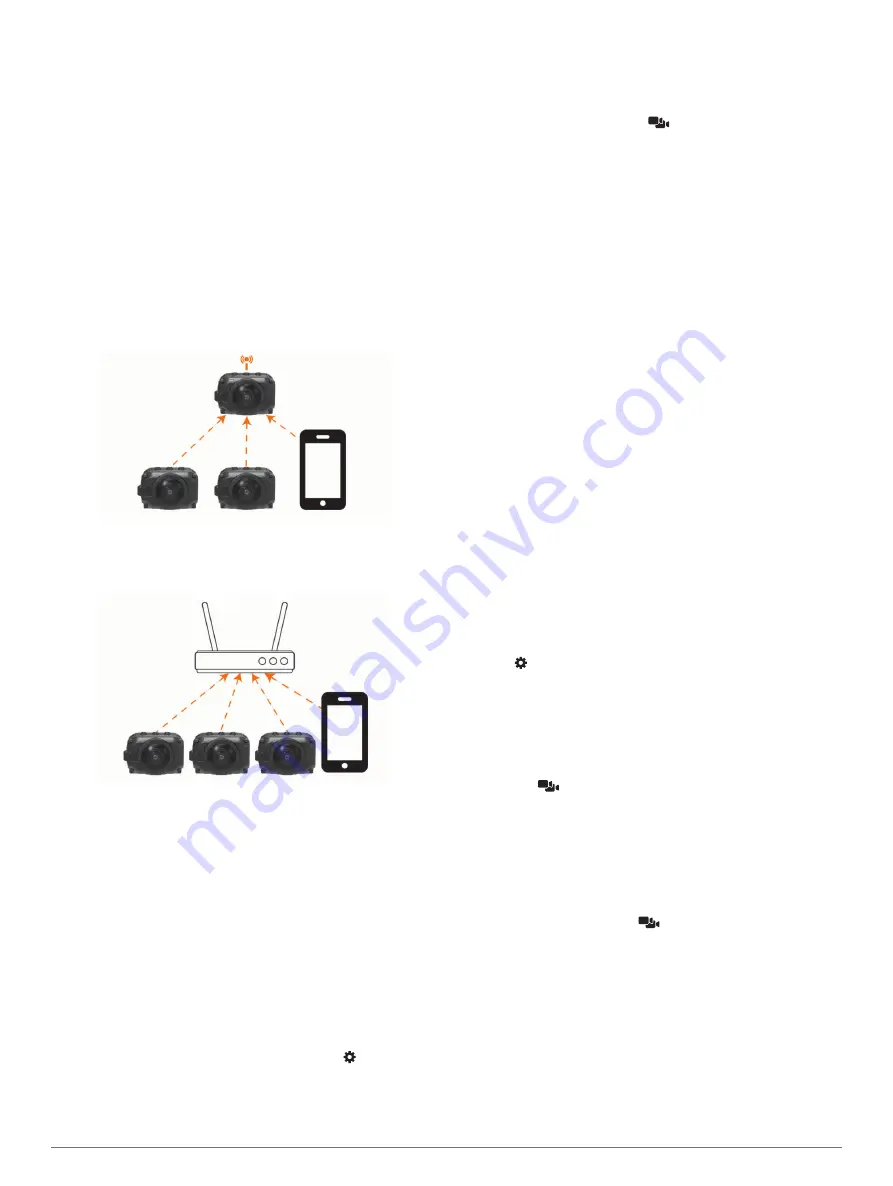
Multiple Camera Network
You can create a network of multiple VIRB cameras and control
all the cameras using the Garmin VIRB app. You can switch
between the connected cameras to view the viewfinder and
controls for each camera.
To connect multiple cameras, all the cameras and your mobile
device must be connected to the same wireless access point or
network.
You can set up the network using the access point feature of
one VIRB camera. The app and all your cameras connect to this
access point.
You can also set up a camera network using an existing Wi
‑
Fi
network. The app and all cameras connect to the Wi
‑
Fi network.
This option is useful when you want to provide internet access to
your mobile device while controlling your cameras.
Setting Up a Camera Network
You can set up a multiple-camera network using the access
point feature of one VIRB camera. This allows the VIRB app to
control all your cameras through this access point.
The first time you use multiple cameras with the Garmin VIRB
app, you must set up the camera access point and connect
another camera to it.
1
Turn on the first camera, and turn on the Wi
‑
Fi radio (
).
The camera broadcasts a Wi
‑
Fi access point. You should not
connect this camera to the app yet.
2
Turn on the second camera, and connect it to the app
(
Connecting to the Garmin VIRB App Using Wi
).
The camera connects to the app, and the viewfinder appears.
3
From the Garmin VIRB app viewfinder, select >
WiFi
Connections
.
A list of nearby Wi
‑
Fi access points appears.
4
Select the access point broadcast by the first camera, and
enter the password.
TIP:
The access point name and password appear on the
first camera's screen.
The app and the second camera connect to the access point.
The app communicates with both cameras through the
access point. You can select
in the viewfinder to switch
between your connected cameras (
).
The app and cameras save the Wi
‑
Fi network information. The
next time you turn on your cameras, you should turn on the
access point camera first, followed by the other cameras. The
cameras connect automatically.
If you have additional VIRB cameras, you can add them to the
camera network (
Adding a Camera to the Network
).
Adding a Camera to the Network
Before you can add a camera to a camera network, you must
complete one of these tasks:
• Set up a camera network using a VIRB camera access point
(
).
• Connect one or more cameras and the Garmin VIRB app to a
Wi
‑
Fi network (
).
If the Garmin VIRB app is connected to your cameras using a
network or access point, you can add cameras to the camera
network.
1
With the camera network turned on, turn on the new camera.
2
On the new camera, turn on the Wi
‑
Fi radio (
).
The new camera broadcasts a Wi
‑
Fi access point.
3
On your mobile device, go to the Wi
‑
Fi settings, and connect
to the access point broadcast by the new camera.
TIP:
The access point name and password appear on the
new camera's screen.
For more information about connecting your mobile device to
a Wi
‑
Fi network, see your mobile device owner's manual.
4
On your mobile device, start the Garmin VIRB app.
The viewfinder for the new camera appears.
5
Select >
WiFi Connections
.
A list of nearby Wi
‑
Fi access points appears.
6
Select the Wi
‑
Fi access point or network used by your
existing camera network, and enter the network password.
This could be a VIRB camera access point or a Wi
‑
Fi
network.
The app and the new camera connect to the network. You
can select
in the viewfinder to switch between your
connected cameras, including the new camera (
).
Switching Cameras
When multiple cameras are connected to the Garmin VIRB app,
you can switch between the cameras to control each camera.
While a connected camera is active, you can access the
viewfinder, camera controls, and settings for that camera.
1
From the viewfinder, select
.
2
Select a camera name.
The viewfinder for the selected camera appears.
Remote Control
You can remotely start recording, stop recording, and take
pictures on your VIRB camera using the VIRB Remote
accessory or a compatible Garmin device with the VIRB remote
feature, such as a watch, activity tracker, or navigation device.
You can also use one VIRB camera to control one or more other
VIRB cameras. For more information about VIRB remote
compatibility, see the owner's manual for your Garmin device.
Remote Control
11


