background image

Menu Page

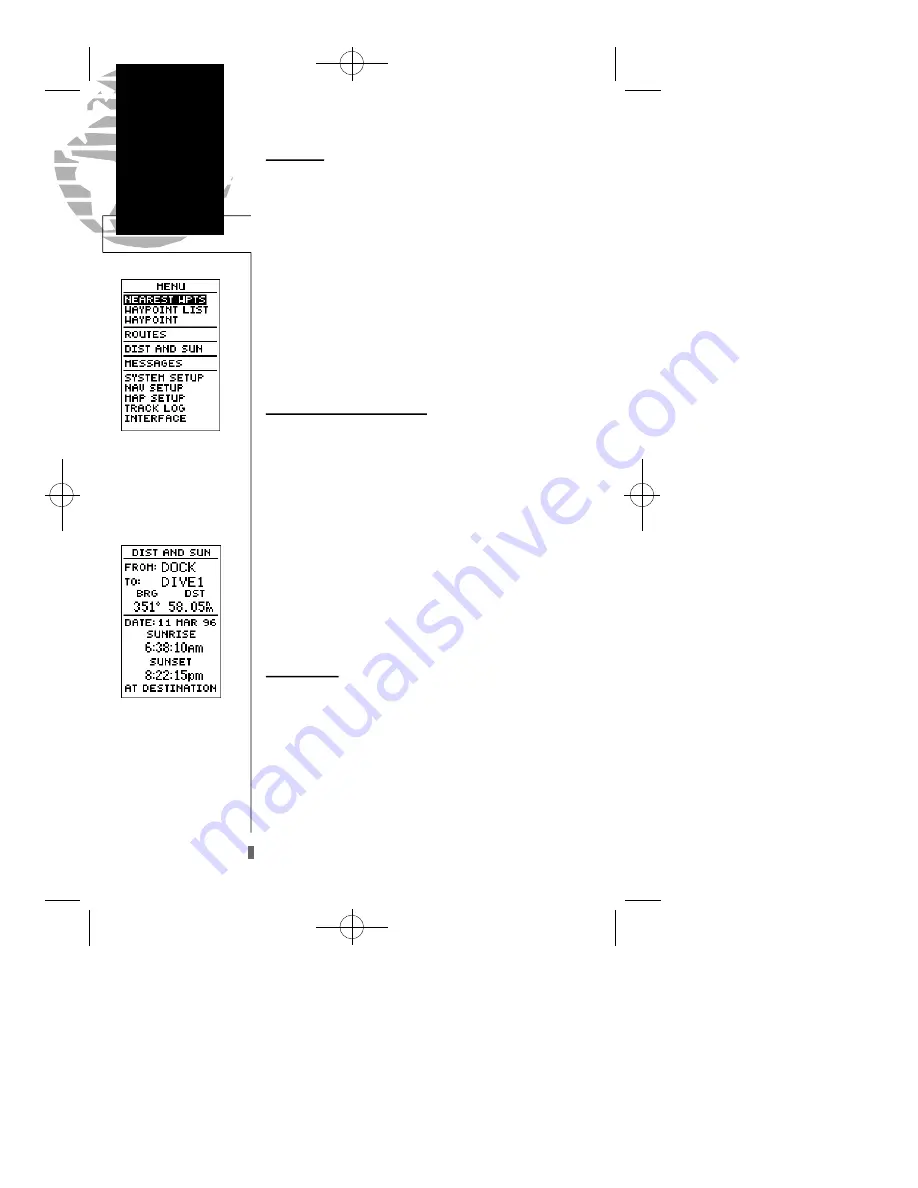
The GPS 45XL menu page provides access to submenu

pages that are used to select and customize operation and
navigation setup. The 11 submenus are divided into cate-
gories by function. The waypoint and route management
submenus are discussed in their own respective sections.
We’ll now address the rest of the submenus in the order
they appear on the menu page.

To select a submenu page from the menu page:

1. Highlight the submenu page you want to view.

2. Press the 

E

key to display the submenu page.

3. To return to the menu page, press the 

Q

key.

Distance and Sun Calculation

The distance and sun calculation page will give you the

distance and bearing between any two waypoints and will
calculate the sunrise and sunset (in local time) at a destina-
tion waypoint for a particular date.

To perform a distance and sun calculation:

1. Highlight the ‘from’ field and enter the desired waypoint.

Press 

E

to move to the next field.

2. Highlight the ‘to’ field and enter the destination waypoint.

Press the 

E

key to calculate the range and bearing to

the destination waypoint.

3. Highlight the ‘date’ field and enter the date for your desti-

nation. Press the 

E

key to display the sun information.

Message Page

The message page displays all current messages in the

GPS 45XL. There are two types of messages: temporary
alerts (eg., approaching a waypoint) and condition alerts
(eg., battery power is low). All messages are initially indi-
cated by a flashing on-screen box. After a temporary alert
has been viewed, it is cleared. Condition alerts are dis-
played on the message page until the condition is resolved.

To view the message page:

1. Highlight the ‘MESSAGES’ field and press 

E

.

See appendix A for a complete list of messages.

44

Reference

Menu Page

Menu Page

To select a submenu, use the
UP and Down keys to high-
light  a  menu  option  and
press ENTER.

Distance/Sun

Calculation

The GPS 45XL will calcu-
late the sunrise and sunset
times of any stored way-
point or your present posi-
tion. To calculate, enter the
date  and  year  and  pre s s
ENTER.

GPS 45XL Manual C  8/4/98 3:07 PM  Page 44

Summary of Contents for Personal Navigator GPS 45XL

Page 1: ...Owner s Manual Reference GPS45XL Personal NavigatorTM GPS 45XL Manual C 8 4 98 3 05 PM Page 1...

Page 2: ...hout the express written permission of GARMIN Information in this document is subject to change without notice GARMIN reserves the right to change or improve its products and to make changes in the co...

Page 3: ...s of the unit and provides a quick start orientation to the GPS 45XL This section has been designed to acquaint you with the unit and provide a basic working knowledge necessary to use the unit in typ...

Page 4: ...l necessary FCC standards This equipment gener ates uses and can radiate radio frequency energy and if not installed and used in accordance with the instructions may cause harmful interference to radi...

Page 5: ...ing the Track Log Power Off 16 SECTION THREE Reference Satellite Status Page 17 19 Position Page 20 Creating and Using Waypoints 21 27 GOTO and MOB Mode 28 TracBack Navigation 29 30 Creating and Using...

Page 6: ...nac data must be acquired before GPS navigation can begin Bearing The compass direction from your position to a destination Course Made Good CMG The bearing from the active from position your starting...

Page 7: ...rcle that passes through the north and south poles Navigation The process of travelling from one place to another and knowing where you are in relation to your desired course Position An exact unique...

Page 8: ...kwise direction from a north reference North is described as 000 east as 090 south as 180 and west as 270 The diagram and compass rose below provide a graphic illustration of the navigation terms used...

Page 9: ...ly see satellites above the horizon it needs to know what satellites to look for at any given time By using an almanac a timetable of satellite numbers and their orbits stored in the receiver s memory...

Page 10: ...ly use an alternate satellite to maintain the position fix Although a GPS receiver needs four satellites to provide a 3D fix the GPS 45XL can maintain a 2D fix with only three satellites Before You In...

Page 11: ...ighlighted press theD key repeatedly to move the field highlight to the country option 2 Press the E key 3 Use theD key to scroll through the list options until the country of your present position ap...

Page 12: ...s from the last calculated position with the receiver off Reinitialize the receiver selecting the country state region of your new location from the EZinit list External Antenna The GPS 45XL s antenna...

Page 13: ...45XL s satellite status page provides a visual reference of satellite acquisition and position As the receiv er locks onto satellites a signal strength bar will appear for each satellite in view with...

Page 14: ...icates your cardinal heading while you re mov ing with the track and speed indicated below The graphic compass display is designed to show your current track and does not serve as a true magnetic comp...

Page 15: ...ighlight to the next character space 5 Repeat steps 3 and 4 until the word HOME is displayed 6 Press E to complete entry of the name 7 Press the D key once to return the field highlight to the save fi...

Page 16: ...are continuously displayed in the middle of the page with the time of day displayed below Now let s change the display to the moving map page and watch the track log of our walk 1 Press the P key to c...

Page 17: ...tion with an emphasis on a straight line course to the desired waypoint and the dis tance and direction you are off course The bearing and dis tance to a waypoint along with your current track and spe...

Page 18: ...le navigating you may decide to view the compass page see picture above left instead of the highway page To select the compass page 1 While viewing the highway page press E twice The compass page will...

Page 19: ...n action by acquiring satellites marking a position and navigating to a destination The last page available from the main page sequence is the menu page which provides access to the GPS 45XL s waypoin...

Page 20: ...ess E to finish Turning the Receiver Off You ve now gone through the basic operation of your new GPS receiver and probably know a little more than you think about how it works We encourage you to expe...

Page 21: ...a particular satellite the corresponding signal strength bar will be blank and the sky view indicator will remain highlighted in reverse video Once the receiver has found the satellite a hollow signal...

Page 22: ...enough satellites for a 2D or 3D fix Not Usable the receiver is unusable possibly due to incorrect initialization or abnormal satellite conditions Turn the unit off and back on to reset Simulating Nav...

Page 23: ...in the event that the batteries are removed or totally discharged Screen Backlighting The GPS 45XL s automatic backlight feature illuminates the screen display for a user defined interval the default...

Page 24: ...ile navigating To reset the trip odometer 1 Press the D key until the trip field is highlighted 2 Press E followed by L 3 Press E to finish Altitude Display When the GPS 45XL is acquiring satellites o...

Page 25: ...e To change the default position name 1 Press the Ukey twice to move the field highlight from the save field to the name field 2 Press E to begin entry of the name Pressing the L key will clear any ex...

Page 26: ...u the closest points of safety in your area at a glance The nearest waypoints page will also let you retrieve a waypoint definition page or GOTO a selected waypoint right from the list To review the w...

Page 27: ...waypoint as a destination press the G key 3 Once the GOTOwaypoint page appears press the E key to confirm the selected waypoint as your destination To delete all user defined waypoints 1 Use the U or...

Page 28: ...ceiver s last known position shown if one exists 5 Press E to begin entry of the position 6 Use the U and D keys to enter your position and use the L and R keys to move to each character field 7 Press...

Page 29: ...new waypoint from the reference waypoint Remember to use the E key to begin entry and confirm each field The coordinates will be calculated and saved for your new waypoint 10 Press the E key with the...

Page 30: ...creation To change or add a comment 1 Use the U and D keys to highlight the comment field 2 Press E to begin entry of your comment 3 Enter the comment and press the E key to confirm Renaming and Dele...

Page 31: ...s from a waypoint field 1 Highlight the waypoint name field and press E 2 Press the L key to clear the name field 3 Use the U and D keys to scroll through waypoints 4 If you have more than one waypoin...

Page 32: ...page 36 To cancel an active GOTO 1 Press the G key 2 Use the arrow keypad to move the field highlight to the CANCELGOTO prompt at the bottom of the page and press E Man Overboard Function The GPS 45XL...

Page 33: ...e U key to highlight the CLEARLOG option 4 Press E The clear log confirmation page will appear 5 Use L to highlight the Yes prompt and press E To activate a TracBack route 1 From the menu page highlig...

Page 34: ...eiver is turned off or you lose satellite cover age during your trip the TracBack route will simply draw a straight line between any point where cover age was lost and where it resumed If the changes...

Page 35: ...ler seg ments called legs The waypoint you are going to in a leg is called the active to waypoint and the waypoint immedi ately behind you is called the active from waypoint The line between the activ...

Page 36: ...distance of the route is indicated below the waypoint list The bottom of the route definition page features several function fields which let you copy clear invert or activate the displayed route Rout...

Page 37: ...hanges to the active or TracBack route and want to save the route for future use To copy a route 1 Highlight the route number field and press E 2 Enter the route number to be copied and press E 3 High...

Page 38: ...hat you may edit during navigation and save as an entirely new route from the original You will have to copy the active route to an unused storage route to save it since new route or TracBack activati...

Page 39: ...nvert the active route without using the route definition page To invert a route from the active route page 1 Press the Ukey once to move the field highlight to the INVERT prompt 2 Press the E key to...

Page 40: ...te will be overwritten by a new route activation If you add delete or change the first or last waypoint of a route the default comment first and last waypoint will automatically be updated after your...

Page 41: ...e compass page is ideal for activities like trawling or entering a harbor and pro vides better steering guidance for slow speed e g walking travel with many directional changes Both pages provide a di...

Page 42: ...oving arrow just below the course deviation scale always points to your selected waypoint relative to the direction you are moving Your present position is represented by the diamond in the center of...

Page 43: ...le the d bar the moving vertical line on the scale indicates the direction and distance you are off the desired straight line course To stay on course steer toward the d bar until it is cen tered on t...

Page 44: ...corners of the map page are used to display various navigation data including the bearing and distance to a destination waypoint and your current track and speed over the ground The two fields at the...

Page 45: ...ection As you begin to move the map a crosshair will appear This crosshair will now serve as a target marker for the moving map The distance and bearing to destination will now be replaced by the dist...

Page 46: ...e zoom or pan function field Once a waypoint has been selected in the map field its distance and bearing from your present position will be dis played at the top corners of the map page You can also r...

Page 47: ...target crosshair as an instant GOTO destination Similar to the MOB mode this function will mark and instantly set a course for a new waypoint called MAP To GOTO the target crosshair 1 Press the G key...

Page 48: ...2 Highlight the to field and enter the destination waypoint Press the E key to calculate the range and bearing to the destination waypoint 3 Highlight the date field and enter the date for your desti...

Page 49: ...waypoints and routes while at home To select an operating mode 1 Highlight the MODE field and press E 2 Use the arrow keypad to select a mode and press E Date and Time Setup The date and time field is...

Page 50: ...0 setting will keep backlighting on continuously Whenever backlighting is on a bulb icon will appear on the status page To set the backlight timer 1 Highlight the LIGHT field and press the E key 2 Use...

Page 51: ...listing in appendix B you should only change the datum if you are using maps or charts that spec ify a different datum than WGS 84 To select a map datum 1 Highlight the MAPDATUM field and press E 2 U...

Page 52: ...he USER MAG option and press E 2 Use the U and D keys to enter the degrees and direction of magnetic variation 3 Press the E key to confirm the magnetic variation value Map Setup and Orientation The m...

Page 53: ...o display on the map page The default setting of 250 points provides good resolution with minimal screen clutter The maximum setting is 768 points Once you ve reached the maximum number of track point...

Page 54: ...n hours minutes and seconds and press the E key Managing and Clearing the Track Log The rest of the track log setup page displays the per centage of available memory currently used to store track log...

Page 55: ...y select the None NMEA setting Once a NMEA output setting has been selected with or without RTCM input the NMEA field will become highlighted NMEA formats 0180 0182 or 0183 1 5 or 2 0 are available To...

Page 56: ...he bottom of the beacon receiver field a status message will keep you informed of DGPS activity A tuning message will be displayed while a beacon signal is being tuned Once the beacon signal has been...

Page 57: ...sire only from the position page To enter track speed and position 1 Highlight the TRACK field and press the E key 2 Enter a track heading and press E 3 Highlight the SPEED field and press E 4 Enter a...

Page 58: ...MIN dealer for repairs Received an Invalid WPT A waypoint was received during upload transfer that has an invalid identifier Receiver has Failed A failure in receiver hardware has been detected If thi...

Page 59: ...ry is Full You have used all 250 waypoints in the GPS 45XL Delete unwanted waypoints to make room for new entries Time Offset Chart The table below gives approximate UTC time offset for various longit...

Page 60: ...er Isld 67 Easter Island 1967 European 1950 European 1950 Austria Belgium Denmark Finland France Germany Gibraltar Greece Italy Luxembourg Netherlands Norway Portugal Spain Sweden Switzerland European...

Page 61: ...Value Oman Oman Oman Ord Srvy GB Old Survey Grt Britn England Isle of Man Scotland Shetland Isl Wales Pico De Las Nv Canary Islands Ptcairn Ast 67 Pitcairn Astro 67 Pitcairn Isl Prov S Am 56 Prov So A...

Page 62: ...20 seconds warm start Approx 2 minutes cold start Approx 7 5 minutes AutoLocateTM Update Rate 1 second continuous Position Accuracy 5 10 meters 16 33 ft with DGPS corrections 15 meters 49 ft RMS Veloc...

Page 63: ...format The GARMIN GBR 21 is the recommended beacon receiver for use with the GPS 45XL Other receivers with the correct RTCM format may be used but may not correctly display status or allow tuning cont...

Page 64: ...00 Subtotal Shipping Ground Handling 5 00 US 35 International CA FL KS NJ add Sales Tax Total Due Name Address City State Zip Country Daytime Phone Method of Payment Visa MC AMEX Discover Account Expi...

Page 65: ...ition Error EPE 18 Estimated Time of Arrival ETA 2 35 Estimated Time Enroute ETE 2 35 External Antenna 8 EZinit 7 8 G GOTO Function 13 28 GPSDefinitions 2 3 Ground Speed 3 H Heading Selection 48 Highw...

Page 66: ...iting Routes 35 36 On Route GOTOs 36 S Satellite Status Page 9 10 17 19 Screen Backlighting 19 Screen Contrast 46 Setup Pages 45 52 Simulator Mode 53 Sky View Display 6 10 Steering Guidance 13 14 Sun...

Page 67: ...ged with the tracking number clearly marked on the outside of the package and sent freight prepaid and insured to a GARMIN warranty service station A copy of the original sales receipt is required as...

Page 68: ...Corporation 1200 E 151st Street Olathe KS USA 66062 GARMIN Europe LTD Unit 5 The Quadrangle Abbey Park Industrial Estate Romsey UK SO51 9AQ Part Number 190 00123 00 Rev C GPS 45XL Manual C 8 4 98 3 08...

Reviews: