Garmin NUVIFONE A10 Quick Start Manual Download Page 5

nüvifone A10 Quick Start Manual 

Mounting Your Device

 Warning

This product contains a lithium‑ion battery. 

To prevent the possibility of personal 

injury or product damage caused by battery 

exposure to extreme heat, remove the 

device from the vehicle when exiting,  

or store it out of direct sunlight.
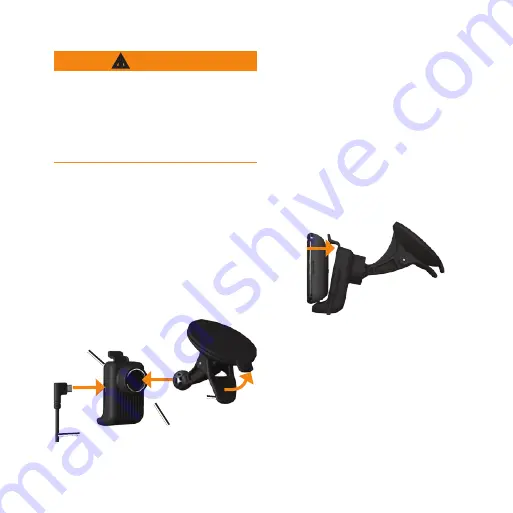
1.  Plug the vehicle power cable into the 

power connector on the side of the 

cradle.

2.  Remove the clear plastic from the 

suction cup. 

3.  Clean and dry your windscreen and the 

suction cup with a lint‑free cloth.

4.  Place the suction cup on the 

windscreen.

Lever

Suction 

cup arm

Cradle

Vehicle power cable

5.  Flip the lever back, towards the 

windscreen.

6.  Snap the cradle onto the suction cup 

arm.

7.  Fit the gold contacts on the left side of 

the device into the cradle.

8.  Tilt the device back until it snaps into 

the cradle.

9.  Plug the other end of the vehicle power 

cable into a power outlet in your 

vehicle. 

Completing the Setup

Complete the following optional tasks to 

finish setting up your device: 

Set up voice mail (

page 8

).

Set up an e‑mail account.
Synchronise the device with your 

computer.


Summary of Contents for NUVIFONE A10

Page 1: ...A10 quick start manual...

Page 2: ...ct warnings and other important information Notice It is strongly recommended that you obtain a data plan for this phone Download the latest quick start manual at www garminasus com Device Features Vo...

Page 3: ...t your fingernail in the notch 4 Pry the cover up 5 Remove the cover from the device Battery cover Battery cover notch Installing the SIM Card 1 Slide the SIM card holder towards the top edge of the d...

Page 4: ...ps into place Charging the Battery Notice Your device will not charge if the temperature has exceeded 140 F 60 C If the device is mounted on the windscreen remove it from the mount and place it somewh...

Page 5: ...dry your windscreen and the suction cup with a lint free cloth 4 Place the suction cup on the windscreen Lever Suction cup arm Cradle Vehicle power cable 5 Flip the lever back towards the windscreen...

Page 6: ...ack to the previous screen or to exit the current application Touch to view a menu of options for the current screen or application Volume up and down Press to increase or decrease the audio level Usi...

Page 7: ...ouch and drag the application tray towards the opposite side of the screen The application tray expands and a second section of shortcuts appears Using the Phone Dialling a Number 1 From the Home Scre...

Page 8: ...call is placed on hold Touch Switch to change between the current call and the call on hold if you are on call waiting Touch Merge to create a conference call Touch Hold to place the current call on h...

Page 9: ...oint of Interest 1 From the Home screen touch Where To Points of Interest 2 Touch a category 3 Touch a subcategory if necessary 4 Touch an item Touch to view the other locations in the search results...

Page 10: ...ashboard Do not mount where the driver s field of vision is blocked Do not mount in front of an airbag field of deployment The windscreen mount may not stay attached to the windscreen in all circumsta...

Page 11: ...pan or may present a risk of damage to the GPS device fire chemical burn electrolyte leak and or injury Do not leave the device exposed to a heat source or in a high temperature location such as in th...

Page 12: ...t pocket Use the ear farthest from the pacemaker in order to minimise any potential for interference If you think that interference may be occurring turn off the device immediately For other medical d...

Page 13: ...ansmitters is currently restricted in certain European countries due to specific radio frequency legislation You must check the local regulations in all European countries in which you intend to use t...

Page 14: ...s its antenna to send and receive low levels of radio frequency RF energy for voice and data communications The cellular antenna is located along the bottom edge of the rear of the phone The Wi Fi and...

Page 15: ...Band Position SAR 10g W kg GSM850 Head 0 864 Body 0 601 GSM900 Head 0 73 Body 0 542 GSM1800 Head 0 673 Body 0 474 GSM1900 Head 0 599 Body 0 407 Band Position SAR 10g W kg WCDMA Band I Head 0 678 Body...

Page 16: ...ecomes your property and the replaced item becomes Garmin s or Asus property as the case may be Exclusions and Limitations This Limited Warranty applies only to the hardware product manufactured by or...

Page 17: ...vinces or countries do not allow the exclusion of incidental or consequential damages so the above limitations may not apply to you This warranty gives you specific legal rights and you may also have...

Page 18: ...to the country in which Garmin Asus or its authorised dealers originally sold the product An original or copy of the product sales receipt from the original retailer is required to obtain warranty se...

Page 19: ...n vifone A10 Quick Start Manual 19...

Page 20: ...nd other countries n vifone is a trademark of Garmin Ltd or its subsidiaries These trademarks may not be used without the express permission of Garmin microSD is a trademark of SanDisk or its subsidia...

Reviews: