background image

• GPI custom POI files from Garmin POI Loader (

Installing POI 

Loader

).

About Memory Cards

You can purchase memory cards from an electronics supplier, 

or purchase pre-loaded Garmin mapping software 

(

www.garmin.com

). In addition to map and data storage, the 

memory card can be used to store files such as maps, images, 

geocaches, routes, waypoints, and custom POIs.

Installing a Memory Card

The device supports microSD

 and microSDHC memory cards.

1

Insert a memory card into the slot on the device.

2

Press it in until it clicks.

Connecting the Device to Your Computer

You can connect the device to your computer using a USB 

cable.

1

Plug the small end of the USB cable into the port on the 

device.

2

Plug the larger end of the USB cable into a port on your 

computer.
A picture of your device connected to a computer appears on 

the device screen.
Depending on your computer operating system, the device 

appears as either a portable device, a removable drive, or a 

removable volume.

Transferring Data From Your Computer

1

Connect the device to your computer (

Connecting the Device 

to Your Computer

).

Depending on your computer operating system, the device 

appears as either a portable device, a removable drive, or a 

removable volume.

2

On your computer, open the file browser.

3

Select a file.

4

Select 

Edit

 > 

Copy

.

5

Browse to a folder on the device.

NOTE: 

For a removable drive or volume, you should not 

place files in the Garmin folder.

6

Select 

Edit

 > 

Paste

.

Disconnecting the USB Cable

If your device is connected to your computer as a removable 

drive or volume, you must safely disconnect your device from 

your computer to avoid data loss. If your device is connected to 

your Windows computer as a portable device, it is not necessary 

to safely disconnect.

1

Complete an action:
• For Windows computers, select the 

Safely Remove 

Hardware

 icon in the system tray, and select your device.

• For Mac computers, drag the volume icon to the trash.

2

Disconnect the cable from your computer.

Viewing GPS Signal Status

Hold 

 for three seconds.

Power Cables

Your device can be powered various ways.
• Vehicle power cable
• USB cable
• AC adapter (optional accessory)

Charging the Device

NOTE: 

This Class III product shall be powered by an LPS power 

supply.

You can charge the battery in the device using any of these 

methods.
• Connect the device to the vehicle power cable.
• Connect the device to a computer using a USB cable.

The device may charge slowly when connected to a 

computer. Some portable computers may not charge the 

device.

• Connect the device to an optional power adapter accessory, 

such as a wall power adapter.
You can purchase an approved Garmin AC-DC adapter 

suitable for home or office use from a Garmin dealer or 

www.garmin.com

.

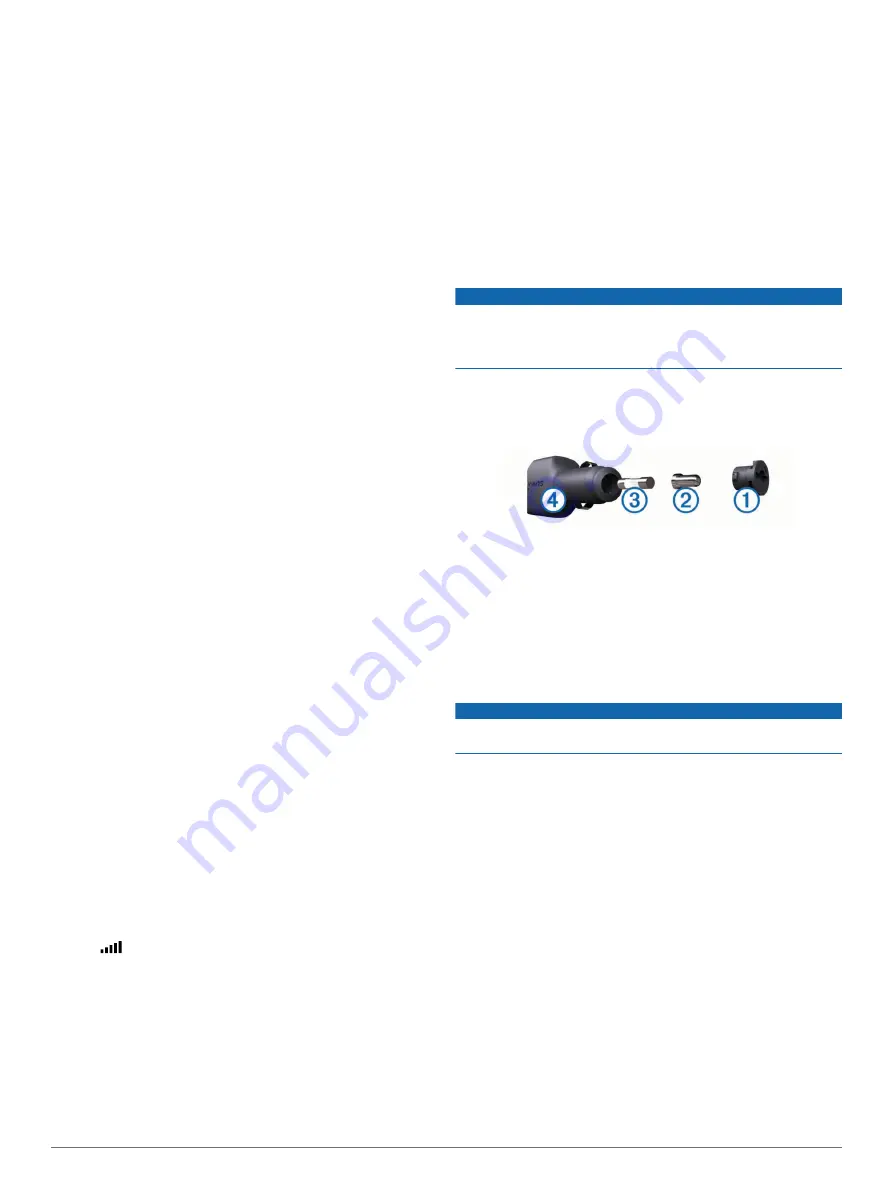
Changing the Fuse in the Vehicle Power Cable

NOTICE

When replacing the fuse, do not lose any of the small pieces 

and make sure they are put back in the proper position. The 

vehicle power cable does not work unless it is assembled 

correctly.

If your device does not charge in your vehicle, you may need to 

replace the fuse located at the tip of the vehicle adapter.

1

Rotate the end piece 

À

 90 degrees counter clockwise to 

unlock it.

TIP: 

You may need to use a coin to remove the end piece.

2

Remove the end piece, the silver tip 

Á

, and the fuse 

Â

.

3

Insert a new fast-blow fuse that has the same current, such 

as 1 A or 2 A.

4

Place the silver tip in the end piece.

5

Push in the end piece and rotate it 90 degrees clockwise to 

lock it back into the vehicle power cable 

Ã

.

Mounting on Your Dashboard

NOTICE

The permanent mounting adhesive is extremely difficult to 

remove after it is installed.

You can use an optional mounting disk to mount your device to 

the dashboard and comply with certain state regulations. See 

www.garmin.com

 for more information.

1

Clean and dry the dashboard where you are placing the disk.

2

Remove the backing from the adhesive on the bottom of the 

disk.

3

Place the disk on the dashboard.

4

Remove the clear plastic cover from the top of the disk.

5

Place the suction cup mount on top of the disk.

6

Flip the lever down (toward the disk).

Removing the Device, Mount, and Suction 

Cup

Removing the Device from the Mount

1

Press the release tab or button on the mount.

2

Tilt the device forward.

Removing the Mount from the Suction Cup

1

Turn the device mount to the right or left.

2

Apply pressure until the socket on the mount releases the 

ball on the suction cup.

Appendix

17

Summary of Contents for nuvi 660

Page 1: ...RV 660 Owner s Manual May 2015 Printed in Taiwan 190 01915 10_0A ...

Page 2: ...min myTrends trafficTrends nüMaps Guarantee and nüMaps Lifetime are trademarks of Garmin Ltd or its subsidiaries These trademarks may not be used without the express permission of Garmin The Bluetooth word mark and logos are owned by the Bluetooth SIG Inc and any use of such name by Garmin is under license microSD and the microSDHC logo are trademarks of SD 3C LLC Windows Windows Vista and Windows...

Page 3: ...nates 7 Finding Recently Found Destinations 7 Clearing the List of Recently Found Locations 7 Finding Your Last Parking Spot 7 Viewing Current Location Information 7 Finding Emergency Services and Fuel 7 Getting Directions to Your Current Location 7 Adding a Shortcut 7 Removing a Shortcut 7 Saving Locations 7 Saving a Location 7 Saving Your Current Location 7 Saving a Home Location 7 Editing a Sav...

Page 4: ...tings 15 Device and Privacy Settings 15 Restoring Settings 15 Device Information 15 Device Care 15 Cleaning the Outer Casing 15 Cleaning the Touchscreen 15 Avoiding Theft 15 Resetting the Device 15 Specifications 15 Appendix 16 Support and Updates 16 Setting Up Garmin Express 16 nüMaps Guarantee 16 Lifetime Subscriptions 16 Updating Maps and Software with Garmin Express 16 Data Management 16 File ...

Page 5: ... locates satellites 3 If necessary go outdoors to an open area away from tall buildings and trees Status Bar Icons The status bar is located at the top of the main menu The status bar icons display information about features on the device You can select some icons to change settings or view additional information GPS signal status Bluetooth technology status appears when Bluetooth is enabled Vehic...

Page 6: ...route is a path from your current location to a destination A route may include multiple locations or stops on the way to the destination Adding a Location to Your Route The device calculates the route to your destination based on the preferences you select in the navigation settings such as the route calculation mode Changing the Route Calculation Mode and avoidances Avoiding Delays Fees and Area...

Page 7: ...oute shaping mode 3 Select a location on the map TIP You can select to zoom in on the map and select a more precise location The device recalculates the route to travel through the selected location 4 If necessary select an option To add more shaping points to the route select additional locations on the map To remove a shaping point select 5 When you are finished shaping the route select Go Takin...

Page 8: ...ner 2 Select a saved trip 3 Select one or more options To change the vehicle profile for the trip select the vehicle profile icon Vehicle Profiles To add shaping points to your trip select Trip Settings Shape Route and follow the on screen instructions Shaping Your Route To change the calculation mode for the trip select Trip Settings Route Preference Changing the Route Calculation Mode Scheduling...

Page 9: ...6 Select Done Disabling a Custom Avoidance You can disable a custom avoidance without deleting it 1 Select Settings Navigation Custom Avoidances 2 Select an avoidance 3 Select Disable Deleting Custom Avoidances 1 Select Settings Navigation Custom Avoidances 2 Select an option To delete all custom avoidances select To delete one custom avoidance select the avoidance and select Delete Navigating Off...

Page 10: ...inding RV Services NOTE This feature is not available in all areas You can find nearby locations that offer repair towing and other services for RVs Select Where To RV Services Finding RV Parks NOTE This feature is not available in all areas You can search for RV parks based on the amenities available 1 Select Where To RV Parks 2 If necessary select Filter by Amenities select one or more amenities...

Page 11: ...ently Found Destinations Your device stores the last 50 destinations you have found 1 Select Where To Recent 2 Select a location Clearing the List of Recently Found Locations Select Where To Recent Clear Yes Finding Your Last Parking Spot When you disconnect the device from vehicle power while the device is on your current location is saved as a parking spot Select Apps Last Spot Viewing Current L...

Page 12: ...sing the Map Map Tools Map tools provide quick access to information and device functions while you are viewing the map For example you can view traffic information take a detour or adjust the screen brightness without leaving the map When you activate a map tool it appears in a panel at the edge of the map Viewing a Map Tool 1 From the map select 2 Select a map tool The map tool appears in a pane...

Page 13: ...Steep grades  are highlighted red on the chart 3 Select an option Select or to change the distance range of the chart Select the arrows to scroll the chart Safety Cameras NOTICE Garmin is not responsible for the accuracy of or the consequences of using a custom point of interest or a safety camera database NOTE This feature is not available for all regions or product models Information about safe...

Page 14: ...a renewal if your subscription expires Go to http www garmin com traffic Subscription Activation You do not need to activate the subscription included with your FM traffic receiver The subscription activates automatically after your device acquires satellite signals while receiving traffic signals from the pay service provider Viewing Traffic Subscriptions Select Settings Traffic Subscriptions Add...

Page 15: ...ble Bluetooth wireless technology and set the phone to be discoverable 3 On your RV 660 device select Settings Bluetooth 4 Follow the on screen instructions on your phone and your RV 660 device Enabling Bluetooth Wireless Technology 1 Select Settings Bluetooth 2 Select Bluetooth Tips After Pairing the Devices After the initial pairing the two devices can connect automatically each time you turn th...

Page 16: ...your device to confirm the pairing request appears in the status bar on your device when Smartphone Link is connected Sending a Location from Your Phone to Your Device Smartphone Link is registered as a navigation application on your phone 1 From your phone select the button to start navigating to a location see the owner s manual for your phone 2 From the application menu select Smartphone Link T...

Page 17: ...ect Reset Viewing Fuel Economy Information 1 Select Apps ecoRoute Fuel Economy 2 Select a section of the graph to zoom in Mileage Reports Mileage reports provide the distance the time the average fuel economy and the fuel cost of navigating to a destination A mileage report is created for every route that you drive If you stop a route on your device a mileage report is created for the distance you...

Page 18: ...d maps the device uses Enabling Maps You can enable map products installed on your device TIP To purchase additional map products go to http buy garmin com 1 Select Settings Map Vehicle myMaps 2 Select a map Navigation Settings To open the Navigation settings page from the main menu select Settings Navigation Calculation Mode Sets the route calculation method Avoidances Sets road features to avoid...

Page 19: ...er and information on several other software features EULAs Displays the end user license agreements NOTE You need this information when you update the system software or purchase additional map data Position Reporting Shares your position information with Garmin to improve content Travel History Allows the device to record information for the myTrends Where I ve Been and Trip Log features Clear T...

Page 20: ...seful life and for other important terms and conditions go to www garmin com numapslifetime 1 Go to www garmin com express 2 Follow the on screen instructions NOTE If you register the device you can receive e mail notifications when a map update is available Updating Maps and Software with Garmin Express You can use Garmin Express software to download and install the latest map and software update...

Page 21: ...dapter optional accessory Charging the Device NOTE This Class III product shall be powered by an LPS power supply You can charge the battery in the device using any of these methods Connect the device to the vehicle power cable Connect the device to a computer using a USB cable The device may charge slowly when connected to a computer Some portable computers may not charge the device Connect the d...

Page 22: ...n sleep mode when not in use Entering and Exiting Sleep Mode Keep your device away from extreme temperatures Do not leave your device in direct sunlight My device does not appear as a removable drive on my computer On most Windows computers the device connects using Media Transfer Protocol MTP In MTP mode the device appears as a portable device and not as a removable drive MTP mode is supported by...

Page 23: ...ing the device 16 updating software 16 Garmin Live Services 12 subscribing to 12 geocaching 7 going home 2 8 GPS 1 17 H help 12 See also product support home calling 12 editing location 2 8 going 2 8 phone number 12 setting locations 7 I icons status bar 1 vehicle 9 ID number 15 intersections finding 7 K keyboard language 15 layout 15 L language keyboard 15 voice 15 latitude and longitude 7 lifeti...

Page 24: ...raffic 16 suction cup 18 T theft avoiding 15 time settings 15 tolls avoiding 4 tools map 8 traffic 9 10 15 activating a subscription 10 adding subscriptions 10 alternate route 4 cameras 12 13 incidents 9 lifetime subscriptions 16 map 9 receiver 10 searching for delays 9 traffic cameras 12 viewing 13 travel history 15 trip information 8 resetting 9 viewing 9 trip log viewing 9 trip planner 3 4 edit...

Page 25: ......

Page 26: ... 39 02 36 699699 52 001 855 792 7671 0800 0233937 47 815 69 555 00800 4412 454 44 2380 662 915 35 1214 447 460 386 4 27 92 500 0861 GARMIN 427 646 27 0 11 251 9999 34 93 275 44 97 46 7744 52020 886 2 2642 9199 ext 2 0808 238 0000 44 0 870 8501242 49 0 180 6 427646 20 ct Anruf a d deutschen Festnetz Mobilfunk max 60 ct Anruf 913 397 8200 1 800 800 1020 2015 Garmin Ltd or its subsidiaries ...

Reviews: