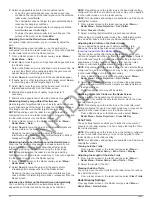


Controlling a Video Camera Using Gestures
When a networked video camera supports gesture responses,
you can control pan-tilt-zoom cameras using gestures directly on
the chartplotter screen. Check your camera user manual for a
list of available features.
TIP:
Using gestures allows video control without displaying the
video controls.
1
From a video screen, touch the screen.
2
Select an option:
• To zoom in and out with the camera, use pinch and zoom
gestures.
• To pan or tilt the camera, swipe the screen in the desired
direction.
Creating a Combination with Video
Functions
You can include up to four video functions in a custom
combination screen.
If your device has multiple built-in video connections, you can
use one built-in source for one function within each combination.
NOTE:
The video source displays all connected, supported
video devices. You can select Show All to see a list of all
possible video inputs or video encoder channels that are not
connected to a video input source.
1
Select
Combos
>
Menu
>
Add Combo
.
2
Select
Functions
, and select a number.
3
Select an area to assign a function to, select
Video
, and
select a video source.
4
Repeat step 3 for all video functions in the combination
screen.
5
If necessary, customize the combination screen (
Configuring the Video Appearance
NOTE:
Not all options are available on all camera models and
chartplotter models.
1
From the video screen, select
Menu
>
Video Setup
.
2
Select an option:
• To show the video using a stretched aspect ratio, select
Aspect
>
Stretch
. The video cannot be stretched beyond
the dimensions provided by the connected video device,
and it may not fill the entire screen.
• To show the video using a standard aspect ratio, select
Aspect
>
Standard
.
• To adjust the brightness, select
Brightness
, and select
Up
,
Down
, or
Auto
.
• To adjust the color saturation, select
Saturation
, and
select
Up
,
Down
, or
Auto
.
• To adjust the contrast, select
Contrast
, and select
Up
,
Down
, or
Auto
.
• To allow the chartplotter to automatically select the source
format, select
Standard
>
Auto
.
Configuring the PC Display
Before you can configure the PC display mode, you must set the
video source to analog or digital PC.
1
When in PC display mode, select anywhere on the screen.
2
Select an option:
• To adjust the screen brightness, select the brightness
arrows.
• To adjust the screen contrast, select the contrast arrows.
Exiting PC Display Mode
1
When in PC display mode, select anywhere on the screen.
2
Select the display mode icon in the upper-left corner.
The video source changes to Video 1.
Device Configuration
Turning On the Chartplotter Automatically
You can set the chartplotter to turn on automatically when the
power is applied. Otherwise, you must turn on the chartplotter by
pressing .
Select
Settings
>
System
>
Auto Power Up
.
NOTE:
When Auto Power Up is On, and the chartplotter is
turned off using , and power is removed and reapplied
within less than two minutes, you may need to press to
restart the chartplotter.
System Settings
Select
Settings
>
System
.
Simulator
: Turns the simulator on or off and allows you to set
the time, date, speed, and simulated location.
Beeper and Display
: Adjusts the display and sound settings.
GPS
: Provides information about the GPS satellites and
settings.
System Information
: Provides information about the devices on
the network and the software version.
Station Information
: Adjusts the setup of the station.
Auto Power Up
: Turns the device on automatically when power
is applied.
Station Settings
Select
Settings
>
System
>
Station Information
.
Change Station
: Sets the entire station to a new set of defaults
based on the location of this station. You can also select to
use this display as a stand-alone, individual display, instead
of grouping it with other displays to make a station.
GRID™ Pairing
: Allows you to pair a GRID
™
remote input device
with this station.
Display Order
: Sets the order of the displays, which is
important when using a GRID remote input device.
Reset Stations
: Restores the factory default layouts for all
displays in the station.
Viewing System Software Information
You can view the software version, the basemap version, any
supplemental map information (if applicable), the software
version for an optional Garmin radar (if applicable), and the unit
ID number. You may need this information to update the system
software or to purchase additional map data information.
Select
Settings
>
System
>
System Information
.
Viewing the Event Log
The event log shows a list of system events.
Select
Settings
>
System
>
System Information
>
Event
Log
.
Preferences Settings
Select
Settings
>
Preferences
.
Units
: Sets units of measure.
Language
: Sets the on-screen text language.
Navigation
: Sets navigation preferences.
Keyboard Layout
: Arranges the keys on the on-screen
keyboard.
34
Device Configuration
CONFIDENTIAL