


Introduction
WARNING
See the
Important Safety and Product Information
guide in the
product box for product warnings and other important
information.
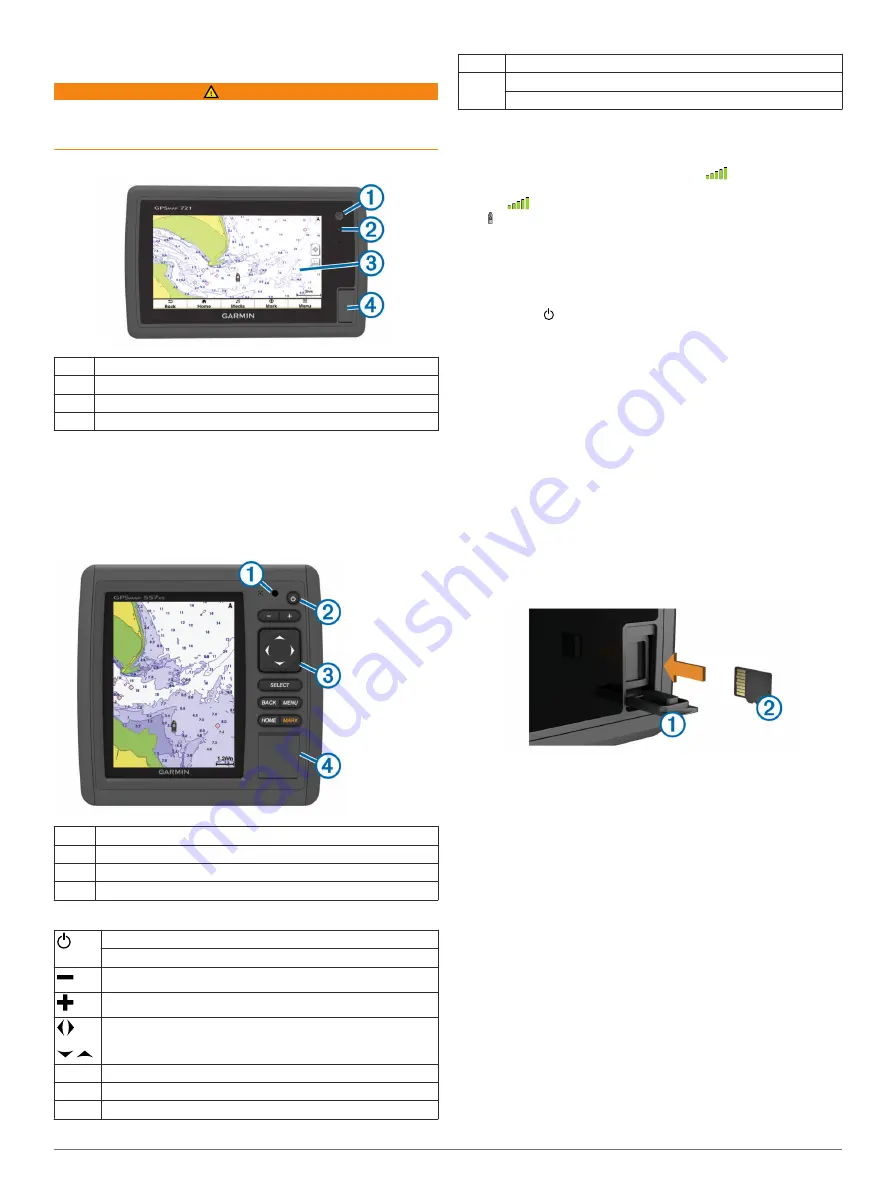
echoMAP 70 Series and GPSMAP 700 Series
À
Power key
Á
Automatic backlight sensor
Â
Touchscreen
Ã
microSD™ memory card slot
Using the Touchscreen
• Tap the screen to select an item.
• Drag or swipe your finger across the screen to pan or scroll.
• Pinch two fingers together to zoom out.
• Spread two fingers apart to zoom in.
echoMAP 50 Series and GPSMAP 500 Series
À
Automatic backlight sensor
Á
Power key
Â
Device keys
Ã
microSD memory card slot
Device Keys
Turns on and off the device when held.
Adjusts the backlight and color mode.
Zooms out of a chart or view.
Zooms in to a chart or view.
Scrolls, highlights options, and moves the cursor.
Select
Acknowledges messages and selects options.
Back
Returns to the previous screen.
Mark
Saves the present location as a waypoint.
Home
Returns to the Home screen.
Menu
Opens a menu of options for the page, when applicable.
Closes a menu, when applicable.
GPS Satellite Signals
When you turn on the chartplotter, the GPS receiver must
collect satellite data and establish the current location. When
the chartplotter acquires satellite signals,
appears at the top
of the Home screen. When the chartplotter loses satellite
signals,
disappears and a flashing question mark appears
over on the chart.
For more information about GPS, go to
.
Adjusting the Backlight
1
Select
Settings
>
System
>
Display
>
Backlight
.
TIP:
Press from any screen to access the backlight
settings.
2
Select an option:
• Adjust the backlight level.
• Select
Enable Auto Backlight
or
Auto
.
Adjusting the Color Mode
1
Select
Settings
>
System
>
Display
>
Color Mode
.
2
Select an option.
Inserting Memory Cards
You can use optional memory cards in the chartplotter. Map
cards allow you to view high-resolution satellite imagery and
aerial reference photos of ports, harbors, marinas, and other
points of interest. You can use blank memory cards to transfer
data such as waypoints, routes, and tracks to another
compatible Garmin chartplotter or a computer.
1
Open the access door
À
on the front of the chartplotter.
2
Insert the memory card
Á
with the label facing to the right.
3
Press the card in until it clicks.
4
Close the door.
Waypoints
Waypoints are locations you record and store in the device.
Marking Your Present Location as a Waypoint
From any screen, select
Mark
.
Creating a Waypoint at a Different Location
1
Select
Nav Info
>
Waypoints
>
Create Waypoint
.
2
Select an option:
• To create the waypoint by entering position coordinates,
select
Enter Coordinates
, and enter the coordinates.
• To create the waypoint using a chart, select
Use Chart
,
select the location, and select
Move Waypoint
.
Marking and Navigating to an MOB Location
When you mark a waypoint, you can designate it as a man
overboard (MOB) location.
2