background image

Interfacing

The following formats are supported for connection of external 

devices: GARMIN proprietary Differential GPS (DGPS), NMEA 

0180, 0182, 0183 (versions 1.5, 2.0, 2.3, 3.01), ASCII Text Output, 

and RTCM SC-104 input (version 2.0). 
The following are the Approved Sentences for NMEA 0183, 

version 3.01 output: GPRMC, GPGGA, GPGSA, GPGSV, GPGLL, 

GPBOD, GPRTE, and GPWPL. The following are the Proprietary 

Sentences for NMEA 0183, version 3.01 output: PGRME, PGRMZ, 

and PGRMM. 
The GPSMAP 276C also includes NMEA input with support for 

the BWC, DBT, DPT, DSC, DSE, MTW, VHW, VTG, and XTE 

sentences. 
Garmin’s proprietary communication protocol is available from the 

Web site at 

www.garmin.com

.

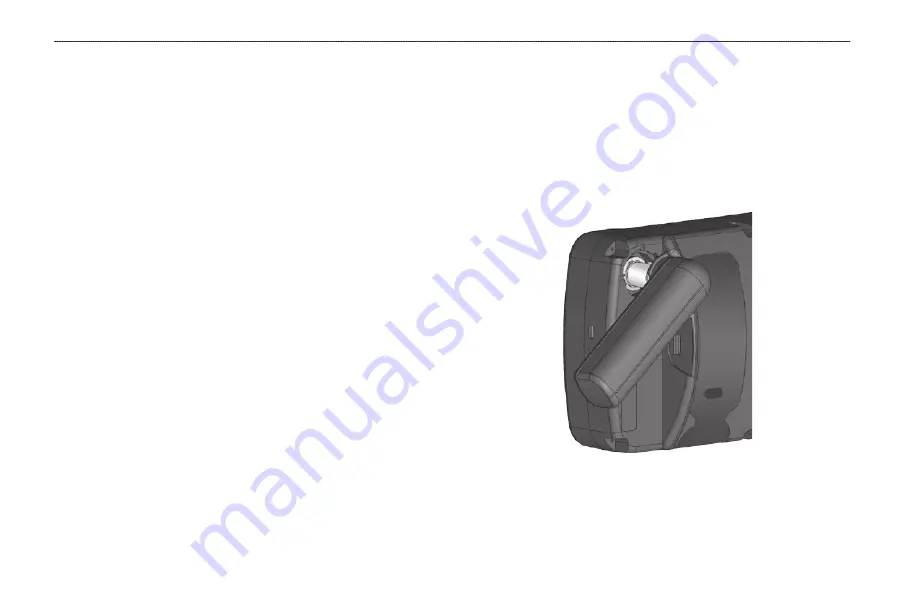
Removing the GPS Antenna

You can remove the GPS antenna to use an external antenna. After 

the antenna is removed, the BNC connector is exposed and ready 

for use with an external antenna. For information on connecting 

an external antenna to the GPSMAP 276C, refer to the installation 

instructions that came with the antenna.

To remove the GPS antenna:

1.  Remove the external power cable from the connector on the 

back of the GPSMAP 276C.

2.  Rotate the antenna to approximately a seven o’clock 

position. The alignment notches in the casing must line up 

with the notches on the antenna.

3.  Pull the antenna away from the GPSMAP 276C unit.

Removing the GPS Antenna

106 

GPSMAP 276C Owner’s Manual

A

PPendIx

 > 

I

nstAllAtIon

 I

nforMAtIon

Summary of Contents for GPSMAP 276C

Page 1: ...GPSMAP 276C chartplotting receiver owner s manual ...

Page 2: ...d and to print one copy of this manual or of any revision hereto provided that such electronic or printed copy of this manual must contain the complete text of this copyright notice and provided further that any unauthorized commercial distribution of this manual or any revision hereto is strictly prohibited Information in this document is subject to change without notice Garmin reserves the right...

Page 3: ...rview of the unit how to turn the unit on and how to simulate navigation The Marine Mode section provides you with information about navigating with the GPSMAP 276C in Marine Mode The Marine Mode Pages section reviews the main pages in Marine Mode The Automotive Mode section provides you with information about navigating with the GPSMAP 276C in Automotive Mode The Automotive Mode Pages section rev...

Page 4: ...a Destination 14 Finding an Item 17 Creating and Using Routes 20 Creating and Using Waypoints 24 Managing Your Tracks 34 Marine Mode Pages 38 Compass Page 45 Highway Page 48 Active Route Page 50 Position Data Page 51 Automotive Mode 52 Automotive Mode Pages 52 Navigating to a Destination 53 Editing Your Route 56 Following an Automotive Route 59 Automotive Mode Pages 60 Current Route Page 61 Trip C...

Page 5: ...ications 101 Optional Accessories 102 Installation Information 103 Satellite Information 107 What is Differential GPS DGPS 107 LORAN TD Setup 109 Map Datums and Location Formats 111 Digital Selective Calling DSC 112 Messages 114 Data Field Options 116 Software License Agreement 118 Product Registration 118 Limited Warranty 119 FCC Compliance 120 Declaration of Conformity DoC 120 Index 121 GPSMAP 2...

Page 6: ...e screen with the moistened cloth Storage Do not store the GPSMAP 276C where prolonged exposure to temperature extremes might occur such as in the trunk of a car as permanent damage could result User information such as waypoints and routes are retained in the unit s memory without the need for external power It is always a good practice to back up important user data by manually recording it or d...

Page 7: ... time spent viewing the unit s screen while driving and use voice prompts when possible Do not input destinations change settings or access any functions requiring prolonged use of the unit s controls while driving Pull over in a safe and legal manner before attempting such operations This unit is designed to provide route suggestions It is not designed to replace the need for driver attentiveness...

Page 8: ...f these guidelines are not followed the internal lithium ion battery may experience a shortened life span or may present a risk of damage to the GPS unit fire chemical burn electrolyte leak and or injury Do not leave the unit exposed to a heat source or in a high temperature location such as in the sun in an unattended vehicle To prevent damage remove the unit from the vehicle or store it out of d...

Page 9: ...rections External power connector under weather cap USB connector under weather cap Slot for optional data card Battery pack Press tab down to remove battery pack for replacement if necessary Backlit keypad for easy nighttime operation GPS antenna 256 color TFT display with backlighting Detachable antenna collapses for storage Be sure the antenna is up as shown here to receive satellite signals Se...

Page 10: ...the GPSMAP 276C the power source indicator on the GPS tab shows the unit is operating off battery power that the unit is charging or that an external power source is in use Using Charge Mode If you want to charge the battery when you are not using the unit you can put the unit into Charge Mode To put the GPSMAP 276C in Charge Mode 1 Connect the GPSMAP 276C to an external power supply 2 Press and h...

Page 11: ...arning and then press Enter to continue 3 To turn off the GPSMAP 276C press and hold the POWER key again Adjusting the Backlight and Volume You can adjust the backlight to see the screen better If you are using the external speaker with the 12 24 Volt adapter cable with the GPSMAP 276C you can adjust the volume level of the audio output To adjust the backlight level or volume 1 Press and quickly r...

Page 12: ...ether they are being tracked As the receiver locks onto satellites a signal strength bar appears for each satellite in view with the appropriate satellite number underneath each bar The numbers below each bar represent the particular satellite that is being received Numbers above 33 indicate WAAS satellites The sky view shows a bird s eye view of the position of each satellite relative to the rece...

Page 13: ...s looking for and collecting data from satellites visible at its last known or initialized location but has not acquired a fix 2D GPS Location At least three satellites were acquired and a two dimensional position fix was calculated 2D Differential appears when you are receiving DGPS corrections in 2D mode and a D appears on the strength bar of satellites being corrected 3D GPS Location At least f...

Page 14: ...llows you to enter a new location automatically or using the map GPS Tips While the receiver is gathering information your location on the map might appear different from where you actually are located As soon as the receiver gathers enough satellite information your proper location appears on the map Any time you have traveled more than 600 miles with the GPS receiver turned off the receiver migh...

Page 15: ...ypoint NAV MOB Key Press to open the Navigate Menu In Marine Mode press and hold to start the MOB function In Automotive Mode press and hold to show the Next Turn Page and announce the next turn when using the external speaker MENU Key Press to open the options menu for the current page Press twice to open the Main Menu POWER Key Press and hold to turn the unit on or off Press and release to adjus...

Page 16: ...in entering data or selecting options On screen button use the ROCKER to highlight a button and press Enter to select the button Scroll bar when viewing a list of items too long to appear on the screen a scroll bar appears along the right side of the list To scroll through a list press up or down on the ROCKER Default the factory setting saved in the unit s memory You can change the settings but y...

Page 17: ...setting Press Quit The Quit key moves backward through your steps Press Quit repeatedly to return to the starting page To select an on screen button On a page with on screen buttons use the ROCKER to highlight an on screen button and press Enter On screen button To mark your current location as a waypoint press and hold Enter Mark until the New Waypoint Page opens To enter data in a data field 1 U...

Page 18: ...tings You can restore factory defaults for the following Main Menu tabs Track Alarms Display Sound and Setup For more information about the Main Menu see the Main Menu section beginning on page 63 To restore default settings 1 Press Menu twice to open the Main Menu 2 Use the ROCKER to highlight a tab and then press MENU to open the options menu Setup Tab Options Menu 3 Highlight Restore Default an...

Page 19: ...R to highlight a tab The information for the highlighted tab automatically appears on the right To highlight a sub tab press left or right on the ROCKER and then press up or down to select individual fields By default the Main Menu tabs are shown as icons along the left side of the screen You can change the Main Menu to show tabs in a text only format To view the Main Menu icons in text only forma...

Page 20: ...ignals To turn on Simulator Mode 1 Highlight the GPS tab on the Main Menu 2 Press Menu to open the GPS tab options menu 3 Highlight Start Simulator and press Enter GPS tab Starting Simulator Mode from the GPS tab Entering a New Location Use the GPS options menu to enter a new location from which to simulate To enter a New Location using the map 1 Highlight the GPS tab on the Main Menu 2 Press Menu...

Page 21: ...s 2 Select Automotive or Marine and press Enter Marine Mode Pages Marine Mode has five main pages Map Compass Highway Active Route and Position Data If you have a Garmin GSD 20 or GSD 21 Sonar Module connected to the GPSMAP 276C a Sonar Page is available Map Page Compass Page Highway Page Position Data Page Active Route Page Sonar Page Optional GPSMAP 276C Owner s Manual 13 Marine Mode Marine Mode...

Page 22: ...and Automotive Mode are similar Most of the features discussed here also apply to Automotive Mode Navigate Options Menu Press NAV to open the Navigate options menu Navigate Menu in Marine Mode Go To Point allows you to select a waypoint or point of interest from the Find Menu to which to navigate Navigate Route allows you to select a route to navigate You can also start a saved route through the R...

Page 23: ...e Navigation and press ENTER to resume navigation To start a new route using the Find Menu 1 Press the Nav key to open the Navigate Menu 2 Highlight Go To Point or New Route when in Automotive Mode and press Enter to open the Find Menu 3 From the Find Menu highlight Waypoints and press Enter 4 Select a waypoint from the list and press Enter to open the Waypoint Review Page Waypoint Review Page 5 W...

Page 24: ...e Finding an Item section on page 17 Man OverBoard MOB Use the MOB function to simultaneously mark your current location and create a direct route back to that location for quick response to emergency situations To start the MOB function 1 Press and hold the Nav Mob key or press the Nav Mob key twice 2 Press Enter to confirm and begin navigating to the MOB location When a MOB is activated a MOB wa...

Page 25: ...t found For example you search for Entertainment and the search shows a Chili s search result If you press Find again you see From Chili s as the new search from point You can also use the Find feature to center your search from any waypoint route list entry map item or tide station To find an item from another location on the map 1 Open the Map Page Use the ROCKER to pan the arrow pointer to the ...

Page 26: ...ess Find The Find Menu opens again with items near the previously selected item Search for the item you want Viewing Recently Found Items The Recently Found Page shows a list of the items you have searched for or gone to recently To view recently found items 1 Press Find The Find Menu appears 2 Highlight Recently Found and press Enter to open the list of recently found items 3 Press MENU to show t...

Page 27: ...r Find Menu Options To view additional Find Menu options press Find and then press Menu The following options are available Enable Auto Arrange automatically arranges the Find Menu When selected Disable Auto Arrange and Restore Default options are available Near Other select a new location from which to compile the Find items lists Using the ROCKER move the map arrow to the location you want and p...

Page 28: ...oint 6 Repeat steps 4 and 5 to define additional route points To create a route using the map 1 Highlight the Route tab on the Main Menu 2 Press MENU to open the Route options menu 3 Highlight New Route and press ENTER Creating a new route on Route Review Page 4 Highlight Edit on Map and press ENTER 5 Highlight a location on the map and press ENTER 6 Repeat step 5 to define additional route points...

Page 29: ...r you create a route use the Route Review Page to edit change the name and review route points of a selected route To change the name of the route 1 Highlight the Route tab on the Main Menu 2 Highlight the name of the route and press Enter 3 With the Route Review Page open highlight the route name field at the top of the page and press Enter Route Review Page Enter a new route name here 4 Use the ...

Page 30: ...ng on page 24 for details When you return to the Route Review Page the next point in the route is automatically highlighted You can review each point on the route by pressing Enter repeatedly To add points to the route 1 Select the Route tab on the Main Menu 2 Highlight a route and press Enter 3 Highlight the spot in the route that you want to add the new point The new point is added before the hi...

Page 31: ... estimate information about your trip To plan your route 1 Open the Route Review Page options menu 2 Highlight Plan Route and press Enter Entering Speed and Fuel Flow for trip planning 3 Enter the data for Speed and Fuel Flow You also can enter the date and time of your departure Press Quit to return to the Route Review Page NOTE Fuel flow rates are measured in units per hour System setting change...

Page 32: ...eating and Using Waypoints Waypoints are locations or landmarks you record and store in your GPS They are locations you might want to return to later such as checkpoints on a route or significant ground features You can add waypoints to routes and even create a Go To directly to the selected waypoint The GPSMAP 276C stores up to 3 000 alphanumeric waypoints with a user defined icon comment elevati...

Page 33: ...w over a map item you see a highlighted description of that item The GPSMAP 276C uses the map item text shown on the map as the default name and symbol for the new waypoint To create a new waypoint using the Map Page 1 Press page until the Map Page appears 2 Use the ROCKER to move the arrow to the map location or map feature you want 3 Press and quickly release Enter Mark to capture the arrow loca...

Page 34: ...inates and press ENTER when finished To change any of the other information on the New Map Waypoint Page highlight the appropriate field and press Enter After entering your changes highlight OK and press Enter Reviewing a Waypoint After you create and store a waypoint you can modify review rename move or delete it at any time using the Waypoint Review and Waypoint Edit Pages To access the Waypoint...

Page 35: ...ected waypoint to the end of a route This option is available only when you are not navigating When you are navigating to a destination Add to Current Route opens The selected waypoint is added to the current route before the route destination To add a waypoint to the end of the route 1 Open the Waypoint Edit Page and press Menu to open the options menu Waypoint Options Menu 2 Select Append To Rou...

Page 36: ...ecting a Waypoint You can also create a new waypoint by projecting the distance and bearing from a specific location to a new location To create a new waypoint by projecting its location 1 Create a waypoint The new waypoint uses the next available waypoint number and the receiver s last known location as the default location 2 Highlight the Points tab on the Main Menu and then select a waypoint Pr...

Page 37: ...Points tab on the Main Menu The User sub tab on the Points tab shows a master list of all waypoints stored in memory From the User list you can review edit rename or delete individual waypoints or delete all user waypoints The number of stored and available waypoints is shown at the bottom of the User sub tab Stored waypoints are arranged in alphanumeric order User Sub Tab To navigate Go To a wayp...

Page 38: ...l the waypoints in that category You can create up to 15 categories To create a waypoint category 1 From any of the waypoint pages or the Points tab press Menu to open the options menu 2 Select Edit Categories and press Enter 3 Highlight Add and press Enter Adding a new category 4 Use the ROCKER to enter a name for the category 5 Highlight Save and press Enter To assign a category to a waypoint 1 ...

Page 39: ...age To delete a waypoint from the Waypoint Page use the ROCKER to highlight the on screen Delete button and press Enter Note When you delete a waypoint from the list it cannot be recovered from the unit Backup important waypoints to a computer using the optional PC cable and interface software such as MapSource or write them down by hand To delete a waypoint from the User Points tab 1 From the Poi...

Page 40: ...select a location and press Enter When OK is highlighted press Enter 5 Highlight Delete and press Enter to delete all waypoints within the set location Choose Cancel or press Quit to exit without deleting the waypoints Proximity Points Use the Proximity sub tab to define an alarm circle around a stored waypoint location The alarm circle can help you avoid reefs rocks or restricted waters Up to 100...

Page 41: ...lighted Press ENTER to begin entering the proximity radius 4 Use the ROCKER to enter a distance value up to 99 99 units and press Enter To clear one or all proximity waypoints from the list 1 Highlight the Points tab on the Main Menu and then select the Proximity sub tab 2 Highlight the proximity waypoint to clear and press Menu Proximity Points Tab Options Menu 3 To clear a single alarm highlight...

Page 42: ... 99 mark Setting Up and Saving Your Tracks You must save the track log before you can use the Navigate Track feature The Save feature allows you to store up to 15 track logs from certain times and dates To access the Track tab 1 Press Menu twice to open the Main Menu 2 Highlight the Track tab Track Tab Record Mode Wrap records over the oldest tracks when the track log reaches 100 Fill records a tr...

Page 43: ...nter A message appears asking if you want to save the entire track 3 Highlight Yes and press Enter To save a portion of the track log 1 Highlight the Track tab on the Main Menu and then highlight the Active sub tab 2 Select Save and press Enter 3 Highlight No and press Enter when a message appears 4 Select a beginning point and press Enter Saving a portion of the track log 5 Select an ending point...

Page 44: ... Highlight the Track tab on the Main Menu and then select the Saved sub tab 2 Select a track to edit and press Enter Track Review Page 3 Highlight the Name field and press Enter Use the ROCKER to change the name and press Enter 4 Select a different display color to show the track on the map 5 Highlight the box next to Show on Map and press Enter to show the track on the map 6 To begin a TracBack h...

Page 45: ...rk the most significant features of the track in order to duplicate your exact path as closely as possible To get the most out of the TracBack feature remember these tips Always clear the track log at the point that which you want to go back such as a dock or campsite The Record Mode option on the Active Track tab must be set to Fill or Wrap If the track log Interval option on the Active tab is se...

Page 46: ...y area The position marker shows your travel on the Map Page The GPSMAP 276C always turns on in position mode with the last known location centered on the map When you press the ROCKER the GPSMAP 276C enters pan mode which moves the map to keep the white arrow map pointer within the display area The system has a built in worldwide database with more detailed coverage available through the use of t...

Page 47: ...u to open the options menu 2 Highlight Set Up Page Layout and press Enter Selecting the page layout 3 Select a page layout option and press Enter To change a data field 1 Press Menu to open the options menu 2 Highlight Change Data Fields and press Enter 3 Highlight the data field to change and press Enter 4 Highlight the type of data you want to show and press Enter Changing a data field GPSMAP 27...

Page 48: ...ata card To review change map information 1 On the Map Page press Menu 2 Highlight Map Information and press Enter The first page shows the map families stored on the data card and unit and whether they are shown on the Map Page Map Family highlighted Press ENTER to view the individual maps in the family 3 To change the setting for a map family highlight the box next to the map family name and pre...

Page 49: ...n using Track Up or Course Up the North arrow indicates the orientation To change the map orientation press MENU to open the Map Page Press MENU again Select Set Up Map and press ENTER See page 40 for additional information Zooming In and Out of the Map The map display has 28 available map zoom ranges ranging from 20 ft to 800 nm 20 ft to 800 mi or 5 m to 1200 km The map zoom range is controlled b...

Page 50: ... panning arrow to pan the map to view other map areas As you pan past the edge of the current map display the screen moves to provide continuous map coverage The position icon stays in your present location and might not be visible on the screen when you pan the map To pan the map Press up down right or left on the ROCKER The panning arrow moves the map so you can view different parts of the map M...

Page 51: ...earing from your current location as shown in the image to the left 2 Press Enter to view more information about the point The information and on screen buttons shown vary depending on the type of item selected In some cases additional information tabs appear at the top of the information page or Waypoint Page 3 Use the ROCKER to highlight the extra tabs and view the information 4 Select an on scr...

Page 52: ...below it 3 Move the arrow to the reference point the starting point that you want to measure from and press Enter A push pin icon marks the starting point 4 Move the arrow to the point of which you want to measure The bearing and distance from the reference point and arrow coordinates appear in the data window at the top of the screen Measure Distance End point of measurement labeled ENT REF Push ...

Page 53: ...the middle of the compass ring and a course to steer bug on the outside of the compass ring The course to steer represents the direction to steer to get back to the course line If the arrow points up you are going directly to the waypoint If the arrow points any direction other than up turn toward the arrow until it points up and then continue in that direction Note You must be moving for the comp...

Page 54: ... fields For definitions of data field options see page 116 Using the Marine Timer The Marine Timer specifically designed for sail boat racing allows you to easily count up or down by specified time increments As is common in sail boat racing there is often a 5 minute warning countdown followed by a 4 minute preparation countdown and finally a 1 minute final countdown Then during the race mariners ...

Page 55: ...usly the timer is set to count down five minutes If you want to change the length of time and the behavior of the timer open the Timers Setup tab on the Main Menu note You can set the timer countdown for up to 60 minutes To set the Marine Timer 1 Highlight the Setup tab on the Main Menu and then select the Timers sub tab 2 Highlight Stop to change the timer s behavior 3 To enter a new time highlig...

Page 56: ...he line down the center of the highway represents your preferred track line To hide or show the Highway Page 1 Highlight the Display tab on the Main Menu 2 Highlight the Highway Page field and press Enter 3 Select Off to hide or On to show and press Enter Using the Highway Page As you head toward your destination the highway perspective moves to indicate your progress to the waypoint and which dir...

Page 57: ...an option and press Enter Highway Page Options Menu The following options are available from the Highway Page options menu Set Up Page Layout selects the page layout Change Data Fields changes on screen data fields Set Up Highway shows an options menu with two sub tabs Line and Waypoint Each tab has on off settings for options including enabling the line for the Active Leg and Track Log Set Up Hig...

Page 58: ...tures and options Active Route Page Active Route Page Options Press MENU to open the Active Route Page options menu Active Route Page Options Menu Deactivate stops route navigation Edit on Map edits the route on the map Add Waypoint inserts a point before the highlighted waypoint or add a point to the end of the route Remove Waypoint deletes a highlighted waypoint from the route Invert reverses th...

Page 59: ...il it is aligned with the red bar Position Data Page Your present location is 5 6 nm west of Coronado CA Position Data Page Options Press Menu to open the Position Data Page options menu Change Nearest Type specifies the type of item used as the nearest item shown in the lower left data field The choices change based on the current usage mode Reset Trip clears trip information except the maximum s...

Page 60: ...either Automotive or Marine and press Enter Automotive Mode Pages Automotive Mode features two main pages Map and Trip Computer Optional Highway and Compass Pages can be turned on in Automotive Mode Two additional pages appear during active navigation while in Automotive Mode a Current Route Page appears if you are navigating a turn by turn route and an Active Route Page appears if you are navigat...

Page 61: ...Nav key Press the Nav key to navigate a new route using the Find Menu or start a saved route or track Press the Find key to search for a particular item and create a route to it Navigate Options Menu Press NAV to open the Navigate options menu Navigate Menu Go To Point selects a waypoint or another point from the Find Menu to which to navigate New Route creates a new route Custom Avoids sets up ro...

Page 62: ...ation When navigating to a point you can stop navigation For example if you are on a long car trip but you want to stop for dinner you can stop navigation and resume after dinner To stop navigation 1 While navigating to a point press NAV 2 Highlight Stop Navigation and press ENTER 3 To resume highlight Resume Navigation and press ENTER 54 GPSMAP 276C Owner s Manual Automotive Mode Navigating to a ...

Page 63: ... press Enter to begin navigation To go to a destination using the Find Menu 1 Press Find to open the Find Menu 2 Highlight a category and press Enter 3 Press Enter and use the ROCKER to begin entering the letters contained in the item name The list begins to sort by the items which contain the letters you are entering Press Enter when finished 4 Highlight the item you want from the list and press ...

Page 64: ...u 5 Highlight Follow Roads and press Enter to create a turn by turn route which appears on the Current Route Page You can also initiate a saved route from the Route tab on the Main Menu Editing Your Route When you are navigating a route you can edit that route You can add areas and roads to avoid as well as temporary detours to your current route You can also add stops along your trip called Via P...

Page 65: ...idance area Press Enter to select the first point 6 Move the arrow to the end point and press Enter During route calculation and navigation the GPSMAP 276C avoids the area within the box or the selected area of the road 7 When finished highlight the OK button and press Enter Creating a Detour If there is road construction or some other form of a detour while navigating a route you can have your GP...

Page 66: ...r Use Map or Use Find Menu and press Enter 5 If you selected Use Map use the ROCKER to select an item on the map and press Enter If you selected Use Find Menu select an item from the Find Menu as discussed in the Finding an Item beginning on page 17 Remember you can press Menu while the Find Menu is open to find an item near another location such as the destination The new point is added to the ro...

Page 67: ...top bar on the Map Page Map Page showing your route Next turn Watch Your Trip Data Use the Trip Computer Page to view your trip data You can track your speed here as well as other information related to your trip See Your Next Turn With the Current Route Page Whenever you have initiated a turn by turn route in the GPSMAP 276C set in Automotive Mode the Current Route Page shows each turn of the act...

Page 68: ...gured to show any one of the possible data options You can also add data fields to the page or select a full screen map without data fields The top of the screen shows the GPS status or the route leg Map Page Data fields Map zoom range Current location Press the zoom keys In and Out to change the map zoom range Some items on the map appear only if the map is zoomed in to a certain level Press Ente...

Page 69: ...own using the ROCKER Highlight any of the turns on the list and press Enter to view the Next Turn Page for that turn The Current Route and Next Turn Pages show similar information using a different layout The Next Turn Page shows your next turn on a map Next Turn Page Saving the Current Route You can save the current route from the Current Route Page Press Menu then press Enter when Save Route is ...

Page 70: ...enu to open the options menu Highlight an option and press Enter Trip Computer Page Options Menu Set Up Page Layout choose the layout and number of data fields Change Nearest Type allows you to specify the type of item to be used as the nearest item shown in the lower left data field of the Position Data 2 Columns layout The choices change based on the current Usage Mode Reset Trip Max Speed Odome...

Page 71: ...n to select individual fields Main Menu Tabs GPS view satellite information Route create and navigate routes Points view stored waypoints Track record and save tracks DSC set up digital select calling features Sonar configure sonar options Alarms define alarm settings Calendar view sun moon and hunting fishing information for a specific day Celestial view tide hunting fishing and sun moon informat...

Page 72: ...more information about GPS see pages 4 6 Main Menu GPS Tab Route Tab The Route tab shows all the routes currently stored in memory along with a descriptive name for each route Use the Route tab to create and store up to 50 reversible routes with up to 300 points each See the Creating and Using Routes section beginning on page 20 for more information about routes Main Menu Route Tab 64 GPSMAP 276C ...

Page 73: ...ity sub tab to define an alarm circle around a stored waypoint location Track Tab Use the Track tab to specify whether or not to record a track log define how it is recorded or save the track log data for future use The Track tab is divided into two sub tabs Active and Saved For more information about tracks see the Managing Your Tracks section beginning on page 34 Main Menu Track Tab Active Sub T...

Page 74: ...tress call position reports do not sound the alarm Distress calls are broadcast to all DSC users in radio range and appear with a blue and white checkered icon on the DSC Call List and Log tabs You can enter a caller s name if it is known The caller s name replaces the MMSI number as a reference after it is entered Understanding Position Reports The Position Report operates similarly to the distre...

Page 75: ...Review Page DSC Entry Review Page DSC Call List The Call List sub tab shows the 50 most recent calls even if the unit is left unattended The Call List only shows the most recent call from a vessel If a second call is received it replaces the first call in the Call List Press Menu to sort the list and delete entries DSC Call List DSC Log When DSC calls are received they are automatically stored in ...

Page 76: ...ctory is like a phone book and can hold up to 50 entries DSC Directory list DSC directory entries Press ENTER to open the Entry Review Page Blank entry Press ENTER to add a DSC directory entry To add a new directory entry 1 Open the DSC Directory on the Main Menu 2 Highlight the first blank space in the directory list and press Enter OR Press Menu highlight New Item and press Enter 3 Enter the MMS...

Page 77: ...ess Call To make a Distress Call press the MayDay button on your VHF radio The call transmits on an emergency channel with the MMSI number attached to the call if you have DSC support Any DSC equipped mariner on sea or land within range can receive the call Setting Up DSC Use the Setup sub tab to turn DSC on and off If you have more than one chartplotter and only want DSC to show on another chartp...

Page 78: ...b Use the Alarms tab to define alarm settings When an alarm goes off the alarm message appears on the GPSMAP 276C and the unit emits five 5 beeps Main Menu Alarms tab To set an alarm 1 Highlight the Alarms tab on the Main Menu 2 Select the alarm to set and press Enter 3 Change the setting to On and press Enter If necessary highlight the next field to the right and press Enter Enter the settings yo...

Page 79: ...elect Auto for the unit to provide an Arrival alarm at its discretion Off Course sets an alarm to sound when off course Select On then enter a distance Anchor Drag sets an alarm to sound when you exceed a specified drift distance Select On and then enter a distance System Alarms Clock sets an alarm based on the unit s clock Select On and then enter a specific time that you want the alarm to sound ...

Page 80: ...s an alarm to sound when you exceed a specified drift distance Select On and then enter a specific distance Fish sets an alarm to sound when fish are detected with sonar Calendar Tab Use the Calendar tab to plan trips as well as view sun and moon and hunting and fishing information for the day Calendar Tab in Day View Highlight an arrow and press ENTER to change the date in view Sunrise and sunset...

Page 81: ...d in green Icons for the points and routes assigned to the date are shown along the bottom of the screen Month View Sub Tab The Month View sub tab provides the same elements as Day View but the entire month is visible Days with added points or routes are shown highlighted in green Icons for the points and routes assigned to the date are shown along the bottom of the screen Celestial Tab The Celest...

Page 82: ...tide chart for a different tide station 1 From the Tide sub tab highlight the At field and press Enter The Find Menu opens showing the tide stations 2 Press Menu and select Near Current Location Near Current Route Near Other select another location using the map or Near Destination The list is updated with your search requirements 3 Select a tide station from the list and press Enter The Tide Stat...

Page 83: ...s You can view Sun Moon information for any date or location You can also use the play fast forward and stop buttons to view an animation of the Sun Moon sub tab To view sun and moon information for a different date 1 Highlight the Date field and press Enter 2 Use the ROCKER to change the digits of the date to the date you want You can also use the zoom In and Out keys to view information for anot...

Page 84: ...Tab The Hunt Fish sub tab provides you with predictions of the best times to hunt and fish in a selected location on a specific date To show the Hunt Fish information 1 Highlight the Celestial tab on the Main Menu 2 Select the Hunt Fish sub tab Hunt Fish Sub Tab To view hunt and fish information for a different date 1 Highlight the Date field and press Enter 2 Use the ROCKER to change the digits o...

Page 85: ...e selected location To use the current location 1 Highlight the From field and press Enter 2 Highlight Current Location and press Enter Message Tab The Message tab shows a list of messages generated by the GPSMAP 276C Use the ROCKER to scroll through the list of messages on the Log sub tab Use the Log Filter sub tab to show only the message types that you want to view Main Menu Message Tab To view...

Page 86: ... message and press Enter to show it again Display Tab Use the Display tab to set display features such as pages to show in the main page sequence and how long the backlight stays on Main Menu Display Tab Main Menu indicates whether the Main Menu tabs contain text and icons default or text tabs only Color Mode sets the display to Day Night or Auto color mode Select Auto to automatically switch from...

Page 87: ...ge sequence Backlight Intensity turns the backlight up or down Press right on the ROCKER to increase the intensity or left to decrease Sound Tab Use the Sound tab to customize the sounds made by your GPSMAP 276C Main Menu Sound Tab Beeper sets the beeper to chime during keypresses and alarms Key and Alarm or on Alarms Only Attention Tone turns on and off the attention tone that sounds before the v...

Page 88: ...de sets the unit to operate in Marine default or Automotive Mode Speed Filter allows the unit to average speed readings Choose from Off Auto automatically controls filtering or On allows you to enter a value in seconds Text Language sets the unit s on screen language WAAS allows you to enable or disable WAAS External Power Off indicates whether the GPSMAP 276C remains on Stay On or the unit turns ...

Page 89: ...alculates the route the quickest but it might not produce the best route Quick Calculation takes a bit more time to calculate but generates a better quality route Better Route generates an even better quality route but uses a longer calculation time Best Route generates the most optimal route but takes the longest time to calculate Calculate Routes for sets route calculation for the particular veh...

Page 90: ...t Turn pop up window Off or opens the window when you press Nav Held Nav Key Only opens automatically Automatically Only or Both Timers Sub Tab Use the Timers sub tab to set timers and view information about how long the unit has been on To access the Timers sub tab 1 Highlight the Setup tab on the Main Menu 2 Select the Timers sub tab Timers Sub Tab User allows you to set the timer to Count Up or...

Page 91: ...ation when gathering satellite data to show the correct date Units Sub Tab Use the Units sub tab to customize measurement units To access the Units sub tab 1 Highlight the Setup tab on the Main Menu 2 Select the Units sub tab Distance and Speed select the unit of measure to show your speed and distance traveled Direction Display select the unit of measure to show your direction Mils is a unit of a...

Page 92: ...atum depending on your chosen location format WARNING Selecting the wrong map datum can result in substantial position errors When in doubt use the default WGS 84 datum for best overall performance Selecting a Different Heading Reference You can select from Auto Mag Var True Grid and User Mag Var Auto Mag Var provides magnetic north heading references that are automatically determined from your cu...

Page 93: ... in the fields You do not need to enter information in every field When finished press ENTER again 3 To show the welcome message when you turn on your GPSMAP 276C highlight the Show at Power up check box and press Enter to select it To hide the welcome information at start up clear the check mark Com 1 and Com 2 Sub Tabs Use the Com 1 and Com 2 sub tabs to change the data format and control the in...

Page 94: ...ntial GPS DGPS input using a standard RTCM format and also outputs simple text data that includes data time location and velocity Text Out allows the unit to output simple text data that includes data time location and velocity The Baud can be set to 1200 2400 4800 or 9600 None provides no interfacing capabilities If you select GARMIN DGPS or RTCM In NMEA Out format you can control a differential ...

Page 95: ...d press Enter 2 Highlight User and press Enter 3 Highlight the Frequency or Bit Rate field and press Enter 4 Enter a frequency or bit rate Press Enter when finished When the unit is receiving a DGPS signal the Signal to Noise Ratio SNR and Distance fields show data The SNR range is 0 dB to 30 dB with 30 being the best The Distance field might or might not show data depending on the signal being br...

Page 96: ...n Menu 2 Select the COM 1 or COM 2 sub tab 3 Highlight the Serial Data Format field and press Enter 4 Select NMEA In NMEA Out and press Enter 5 Press Menu to open the options menu Select Advanced NMEA Setup and press Enter Advanced NMEA Output Setup Use the Advanced NMEA Output Setup Page to set the output rate change the precision of the Lat Lon minutes set Waypoint IDs to names or numbers and tu...

Page 97: ...to show a split screen to show the sonar on the Map Page You must be in Marine Mode to use sonar To show the Sonar Page on the Map Page 1 Press and hold Page 2 Highlight Marine and press Enter 3 Press Page or Quit to open the Map Page 4 Press Menu Highlight Set Up Page Layout and press Enter 5 Highlight Map With Sonar and press Enter Map Page with Split Screen To resize the Map Page sonar split sc...

Page 98: ...Sonar Page The sonar returns show as red strongest then orange strong yellow medium green weaker and blue weakest The Fish Symbols option allows you to view the actual sonar data a fish symbol or a combination of both When the unit is set to Dual the appearance of the fish symbols changes Fish symbols from the center of the beam 200 kHz are solid or narrow arches but the returns from the edges of ...

Page 99: ...ange to commonly used settings and values Press Enter to accept the new setting or press Quit to cancel and return to the Sonar Page Sonar Adjustment Options Scroll adjusts the rate that the sonar display scrolls from right to left If you are sitting still or the sonar display is moving too fast slow the scroll rate or pause the scrolling Range sets the display depth range used for viewing The uni...

Page 100: ...t a lower gain Target Level adjusts colors used to show sonar information A Color Bar appears on the right side of the screen as you adjust this setting A higher percentage results in more strong signaled colors shown on the sonar display A lower percentage results in more weaker signaled colors shown on the sonar display This setting does not increase or decrease the unit Gain Whiteline controls ...

Page 101: ...future fishing location When using this feature the Sonar Page pauses The depth continues to update while the display is paused but the unit does not show any new sonar data until the Sonar Page resumes scrolling You might see a discontinuity from where the sonar information stops and where it starts again To mark an underwater waypoint 1 From the Sonar Page press Menu highlight Show Pointer and p...

Page 102: ...ate and is best used if you travel a wide variety of depths If the unit is unable to track the bottom for any reason the digits in the depth window flash on and off to alert you that the unit is not tracking the bottom Map Split Sonar Detail select how much detail appears on the Map Page with the sonar shown Full Range shows data using the Range setting of the Sonar Page regardless of Zoom or Bott...

Page 103: ...ion window Note your top speed then stop the boat and press Enter NOTE You must have a transducer with a built in speed sensor or a separate compatible speed sensor Calibrating the Water Speed 3 By default the top ground speed is automatically shown If a ground speed is not available the top uncalibrated water speed is used instead If the new speed is correct highlight OK and press Enter If you wa...

Page 104: ... to show a graphic flasher representation on the far right side of the sonar display This graphic flasher shows structure and bottom returns much the same as a true flasher You might find this feature useful when using fish symbols Temperature Graph select On to show a temperature graph along the bottom of the Sonar Page Background Color select the color for the Sonar Page and the sonar on the Map...

Page 105: ...the Temperature Display The graph adjusts and shows the temperature changes according to the Temperature Scale and Time Duration settings Temperature Scale select a degree span from the list Select Auto to have the unit automatically determine the best range or select a span of 2 4 6 8 or 10 degrees Time Duration set how fast or slow the temperature log scrolls a shorter time duration means a fast...

Page 106: ... the detailed data Stronger returns show in darker colors with red being the strongest Understanding the Sonar Display One of the first things to understand about sonar is that the transducer sends a beam down to the bottom of the water much like the beam of a flashlight The beam starts small near your vessel and expands as it gets to the bottom See Transducer Coverage for more detailed informatio...

Page 107: ...t diameter circle at a 30 foot depth The narrow cone angles 10 associated with high frequencies 200 kHz provide better bottom resolution and crisper detail but cannot show a large coverage area for finding fish The 10 cone angle provides a coverage width that is approximately 2 10 of the water depth As shown in the drawing on the far right the 10 cone angle produces a coverage area of approximatel...

Page 108: ...on easier to distinguish Whiteline Off Whiteline On Thick Whiteline Hard bottom Thermoclines A rough definition of a thermocline is a break in water where the water temperature changes faster than the water above it Thermoclines are shown as the weakest colors One of the unique features offered by Garmin is See Thru technology which allows the GPSMAP 276C to hear both weak and strong signals simul...

Page 109: ...Life 5 to 15 hours depending on the backlight setting Source 11 35 VDC Fuse 3AG 1 5 Amp Performance Receiver Differential ready 12 parallel channel receiver Acquisition Times Approximately 15 seconds warm start Approximately 45 seconds cold start Approximately 5 minutes First Time AutoLocate Update Rate 1 second continuous Accuracy GPS 15 meters 49 feet RMS 95 typical DGPS USCG 3 5 meters 10 16 ft...

Page 110: ...rom the vehicle s power system through the cigarette lighter adapter Provides a speaker for vocal prompts PC Interface Cable Connects the unit to a serial port on your computer Power Data Cable Allows you to connect the unit to the electrical system using bare wires Programmable Data Cards Blank data cards available in various sizes Download detailed map data from MapSource CD ROMs to a data card ...

Page 111: ...onnections Replacement fuse is a 3AG 1 5 Amp fuse Power Data Connector on the GPSMAP 276C Unit Data Out 1 Blue Ground Black Voice Orange Data In 2 Green Alarm White Power Red Voice Brown Data In 1 Yellow Data Out 2 Violet Power Data Connector on the Cable Data Out 1 Blue Ground Black Voice Orange Data In 2 Green Alarm White Power Red Voice Brown Data In 1 Yellow Data Out 2 Violet Yellow Data In Bl...

Page 112: ...able connect the larger end of the cable to an available USB data port see the illustration on the left When using a computer Interface Cable connect the larger end of the cable to a serial communications port on your computer see illustration on the bottom left Information About USB Drivers The USB drivers should have been automatically installed when you installed the MapSource program that came...

Page 113: ...ta cards are not waterproof should not be exposed to moisture or excessive static charges and should be stored in the case supplied with the card To install a data card 1 Insert the card into the slot on the bottom of the unit Be sure the label is facing the front of the unit 2 Firmly push the card into the unit It is not necessary to force the card The handle is still exposed when it is properly ...

Page 114: ...communication protocol is available from the Web site at www garmin com Removing the GPS Antenna You can remove the GPS antenna to use an external antenna After the antenna is removed the BNC connector is exposed and ready for use with an external antenna For information on connecting an external antenna to the GPSMAP 276C refer to the installation instructions that came with the antenna To remove...

Page 115: ...fferential corrections WAAS or DGPS are being applied to that satellite Date Time and Current Location The unit gets date and time information from the satellite s on board atomic clock When the unit has achieved a 2 D or 3 D GPS location the current location is shown in the location format you have selected What is Differential GPS DGPS The United States and Canadian governments among others have...

Page 116: ...ding to the FAA s Web site testing in September 2002 of WAAS confirmed an accuracy performance of 1 2 meters horizontal and 2 3 meters vertical throughout the majority of the continental United States and portions of Alaska WAAS is just one service provider that adheres to the MOPS Minimum Operational Performance Standard for global Satellite Based Augmentation Systems SBAS Eventually there are se...

Page 117: ...mat mode it simulates the operation of a LORAN receiver Position coordinates might be shown as TDs and all navigation functions might be used as if the unit was actually receiving LORAN signals Using the LORAN TD Format When creating new waypoints using LORAN TD coordinates you must set the correct LORAN chain number and secondary stations in the Setup TD field before storing the waypoint After th...

Page 118: ...ive GRI Chain secondary stations or offsets were changed since the waypoint was created the waypoint now references the active GRI chain and secondary stations and adjust the TD coordinates accordingly Remember that the GPS is not relying on the LORAN signal for navigation and actually converts the TD coordinate to a useful latitude and longitude coordinate before storing the waypoint to memory or...

Page 119: ...on What is a Location Format Your current location can be viewed on the GPS in the form of coordinates Because different maps and charts use different location formats Garmin GPS units allow you to choose the correct coordinate system for the type of map you are using The most common format is latitude and longitude which is used by all Garmin units You can choose to change the location format to ...

Page 120: ...receives the call they can immediately access the caller s information such as who they are and the type of vessel in their database while they are in transit to the caller s location Any time a vessel receives a DSC call they can store that location and quickly navigate to that position using a Go To This makes DSC a time saver especially in an emergency situation In order to use DSC users must f...

Page 121: ...e procedures are currently under review by the National Telecommunications and Information Administration NTIA Users Outside the United States Users can obtain an MMSI assignment from their telecommunications authority or ship registry often by obtaining or amending their ship station license Users In Canada Industry Canada is responsible for assigning MMSI numbers to commercial and recreational v...

Page 122: ...ort automatic route calculation Distress Call a DSC distress call was received Take appropriate action Dragging Anchor the distance set in the Anchor Drag Alarm was exceeded Drift Alarm the water depth has changed by the amount entered in the Drift Alarm setup Fish Alarm a suspended target was detected The unit shows an icon and beeps if enabled This alarm does not show a message banner Lost Satel...

Page 123: ...roduct Support to have the unit serviced Sunrise Switching to Day Mode the unit is switching to Day Mode Sunset Switching to Night Mode the unit is switching to Night Mode Track Already Exists a saved track with the same name already exists Track Log Full the track log is full and track recording was turned off To record more track points you need to clear the track log and turn track recording on...

Page 124: ...ch your destination ETA Next Estimated Time of Arrival The estimated time you will reach the next point on your route ETE Destination Estimated Time Enroute The estimated time required to reach your destination ETE Next Estimated Time Enroute The estimated time required to reach the next point on your route Elevation the altitude height above or below mean sea level MSL GPS Status the current stat...

Page 125: ...rip Timer Total the total time the unit has been tracking since the trip computer was reset Ttl Avg Spd see Trip Avg Speed Total Turn the distance between Bearing BRG and Track TRG L indicates you should turn left R indicates you should turn right The degrees indicates the difference angle and the number of degrees you should turn User Timer the timer you set on the Main Menu Velocity Made Good th...

Page 126: ...able form the Software or any part thereof or create any derivative works based on the Software You agree not to export or re export the Software to any country in violation of the export control laws of the United States of America Product Registration Help us better support you by completing our online registration today Go to http my garmin com Keep the original sales receipt or a photocopy in ...

Page 127: ...SIVE REMEDY FOR ANY BREACH OF WARRANTY To obtain warranty service contact your local Garmin authorized dealer or call Garmin Product Support for shipping instructions and an RMA tracking number Securely pack the unit and a copy of the original sales receipt which is required as the proof of purchase for warranty repairs Write the tracking number clearly on the outside of the package Send the unit ...

Page 128: ... reception which can be determined by turning the equipment off and on the user is encouraged to try to correct the interference by one of the following measures Reorient or relocate the receiving antenna Increase the separation between the equipment and the receiver Connect the equipment into an outlet that is on a different circuit from the GPS unit Consult the dealer or an experienced radio TV ...

Page 129: ... 95 categories Find Menu 17 Waypoint 30 31 CDI See Course Deviation Indicator Celestial Tab 73 Hunt Fish sub tab 76 Sun Moon sub tab 75 Tide sub tab 73 chain number 109 charging 2 check beacon wiring 108 cigarette lighter adapter 2 cleaning iv clear Track Log 35 clock alarm 71 color mode 78 Compass Page 45 79 marine timer 46 options menu 46 showing hiding 45 connecting the power cable 2 103 count ...

Page 130: ...ish Sub Tab 76 I icons 78 identifier 112 Information Page 19 43 installation 103 interval 37 invert 50 item details 19 L language 79 80 legs track 37 limited warranty 119 local time 83 location 6 26 location format 84 111 log filter 78 longitude 116 LORAN TD Setup 109 lost satellite reception 5 M magnetic variation 84 main menu 63 88 Alarms tab 70 Calendar tab 72 Celestial tab 73 Display tab 78 DS...

Page 131: ... receiver not usable 5 receiver status 5 receiving a DSC call 68 record tracks 34 37 reference position 18 reset timer 82 reset trip data 51 62 review route 21 Road Routing Tab 81 route 22 73 add points 22 27 create 20 23 edit 21 23 leg transition 24 preference 81 Route Tab 64 RTCM 86 87 S sail boat racing timer 46 satellite acquisition 5 satellite location 107 satellite signals 4 satellite sky vi...

Page 132: ... 65 track up 6 41 transducer 94 99 Trip Computer Page 51 62 options menu 62 page layout 62 trip planning 23 72 tuning beacon 108 turn by turn route 56 59 turn off recalculation 82 turn unit on and off 3 U underwater waypoints 93 unit overview 1 usage mode 80 USB 86 connector 1 104 data cable 104 drivers 104 User Points Tab 29 UTC 83 UTM UPS 111 V VHF 66 112 via points 58 view details 43 voice lang...

Page 133: ......

Page 134: ... 2009 Garmin Ltd or its subsidiaries Garmin International Inc 1200 East 151st Street Olathe Kansas 66062 USA Garmin Europe Ltd Liberty House Hounsdown Business Park Southampton Hampshire SO40 9RB UK Garmin Corporation No 68 Jangshu 2nd Road Shijr Taipei County Taiwan www garmin com January 2009 Part Number 190 00335 00 Rev E Printed in Taiwan ...

Reviews: