background image

GPS 400 Quick Reference

190-00140-61  Rev. E

MAP PAGE

12

maP PaGe

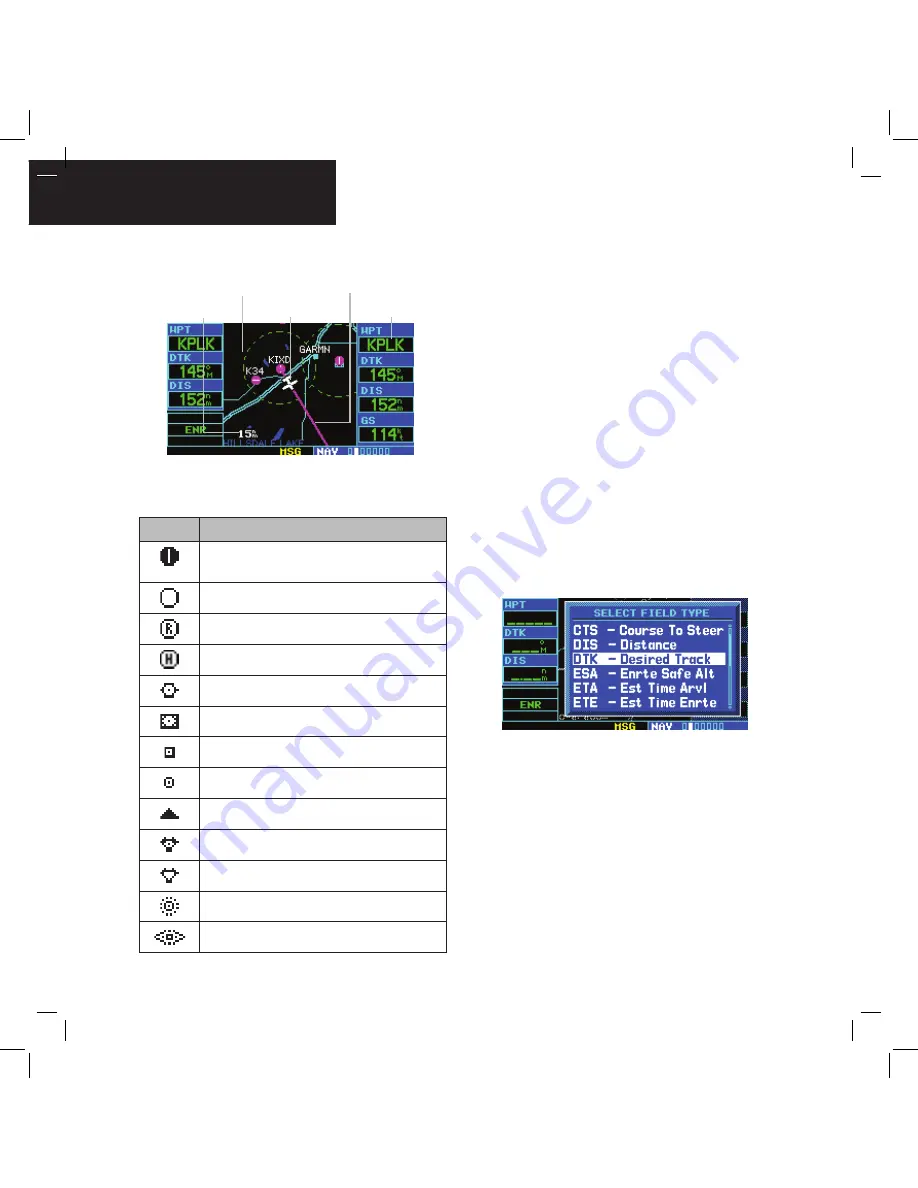
Present Position

Desired Track

Data Fields

Map Range

Map Display

The following symbols are used to depict the various 

airports and NAVAIDs on the Map Page:

Symbol

Description

Airport with hard surface runway(s); (primary 
runway shown)
Airport with soft surface runway(s) only

Private Airfield

Heliport

VOR

VOR/DME

DME

Localizer

Intersection

VORTAC

TACAN

NDB

Locator Outer Marker

Selecting a map range:

1)  Press the up arrow of the 

RNG

 Key to zoom 

out to a larger map area.

2)  Press the down arrow of the 

RNG

 Key to zoom 

in to a smaller map area and more detail.

Selecting a different data item for any data 
field:

1)  With Map Page displayed, press the 

MENU


Key to display an options menu.

2)  Turn the large 

right

 knob to highlight ‘Change 

Fields?’ and press the 

ENT

 Key.

3)  Turn the large 

right

 knob to highlight the data 

field to be changed.

4)  Turn the small 

right

 knob to select the desired  

type of data for this field and press the 

ENT


Key.

5)  Press  the  small 

right

  knob  to  remove  the 

cursor.

Summary of Contents for GPS 400

Page 1: ...GPS 400 Quick Reference...

Page 2: ...the unit on Right hand Keys and Knobs The RNG Key allows the pilot to select the desired map range Press the up arrow to zoom out to a larger area or the down arrow to zoom in to a smaller area The D...

Page 3: ...lockwise or down counterclockwise when the map panning function is active Bottom Row Keys The NRST Key displays the Nearest Airports Page Then turning the small right knob steps through the NRST pages...

Page 4: ...age are sequentially displayed 3 Once the self test concludes the Database Versions Page appears which shows the current database information on the NavData Card and Terrain Data cards Press the ENT K...

Page 5: ...Pages are typically selected using the small and large right knobs with the cursor removed from the GPS Window See pages 6 and 7 for details on arrangement of the GPS 400 s main pages CURSORS The GPS...

Page 6: ...s which page group is currently being displayed e g NAV WPT AUX orNRST thenumberofscreensavailablewithinthat group indicated by the square icons and the placement of the current screen within that gro...

Page 7: ...NRST Intersection NRST NDB NRST VOR NRST User NRST Center NRST Flight Service NRST Airspace NOTE The NRST Pages can be selected by pressing the NRST Key or by using the large right knob Selecting a d...

Page 8: ...ecting a direct to destination by facility name or city 1 Press the Direct to Key The Select Direct to Waypoint Page appears with the waypoint identifier field highlighted 2 Turn the large right knob...

Page 9: ...ion Viewing airport information 1 Turn the large right knob to select the WPT Page Group WPT appears in the lower right corner of the screen 2 Turn the small right knob to select the desired WPT page...

Page 10: ...point 5 Once the identifier is entered the information for that airport appears on the page Press the ENT Key to accept the selected identifier 6 To view the other airport information pages press the...

Page 11: ...ault NAV Page Menu 2 The Change Fields option is already highlighted so press the ENT Key to select this option 3 Use the large right knob to highlight the data field to be changed 4 Turn the small ri...

Page 12: ...ocator Outer Marker Selecting a map range 1 Press the up arrow of the RNG Key to zoom out to a larger map area 2 Press the down arrow of the RNG Key to zoom in to a smaller map area and more detail Se...

Page 13: ...en as needed to select the desired amount of map detail The declutter level appears adjacent to the map range Map Detail Level Inhibiting TERRAIN 1 Select theTERRAIN Page and press the MENU Key Inhibi...

Page 14: ...ing through the list of frequencies 1 Activate the cursor if not already active by pressing the small right knob 2 Turn the large right knob to move the cursor through the list of frequencies If there...

Page 15: ...s the small right knob Viewing additional information for a nearby airport 1 Highlight the identifier of the desired airport by scrolling through the list as described in the preceding procedure 2 Pre...

Page 16: ...t Press the ENT Key again with Activate highlighted to activate the direct to function Creating a new flight plan 1 Press the FPL Key and turn the small right knob to display the Flight Plan Catalog P...

Page 17: ...iting a flight plan 1 Press the FPL Key and turn the small right knob to display the Flight Plan Catalog Page 2 Press the small right knob to activate the cursor 3 Turn the large right knob to highlig...

Page 18: ...rs to the final course segment of the approach and will provide navigation guidance relative to the final approach course 5 Turn the large right knob to highlight Load or Activate and press the ENT Ke...

Page 19: ...aticCDIscalingtransition as the approach progresses In many cases it may be easiest to Load the full approach while still some distance away enroute to the destination airport Later if vectored to fin...

Page 20: ...corner of the display see page 14 if protection limits cannot be maintained If this occurs the GPS receiver should not be used for primary navigation guidance Revert to an alternate navigation source...

Page 21: ...ocedures as published on the approach plate for proper climb and heading instructions 3 An alert message in the lower right hand corner of the screen recommends entry procedures for the holding patter...

Page 22: ...U S A p 503 391 3411 f 503 364 2138 Garmin Europe Ltd Liberty House Bulls Copse Road Hounsdown Business Park Southampton SO40 9RB U K p 44 0 870 8501241 f 44 0 870 8501251 Garmin Corporation No 68 Ja...

Reviews: