background image

Editing Routes

A route can be edited anytime after its creation.

To edit a route from the active route page or
the route definition page:

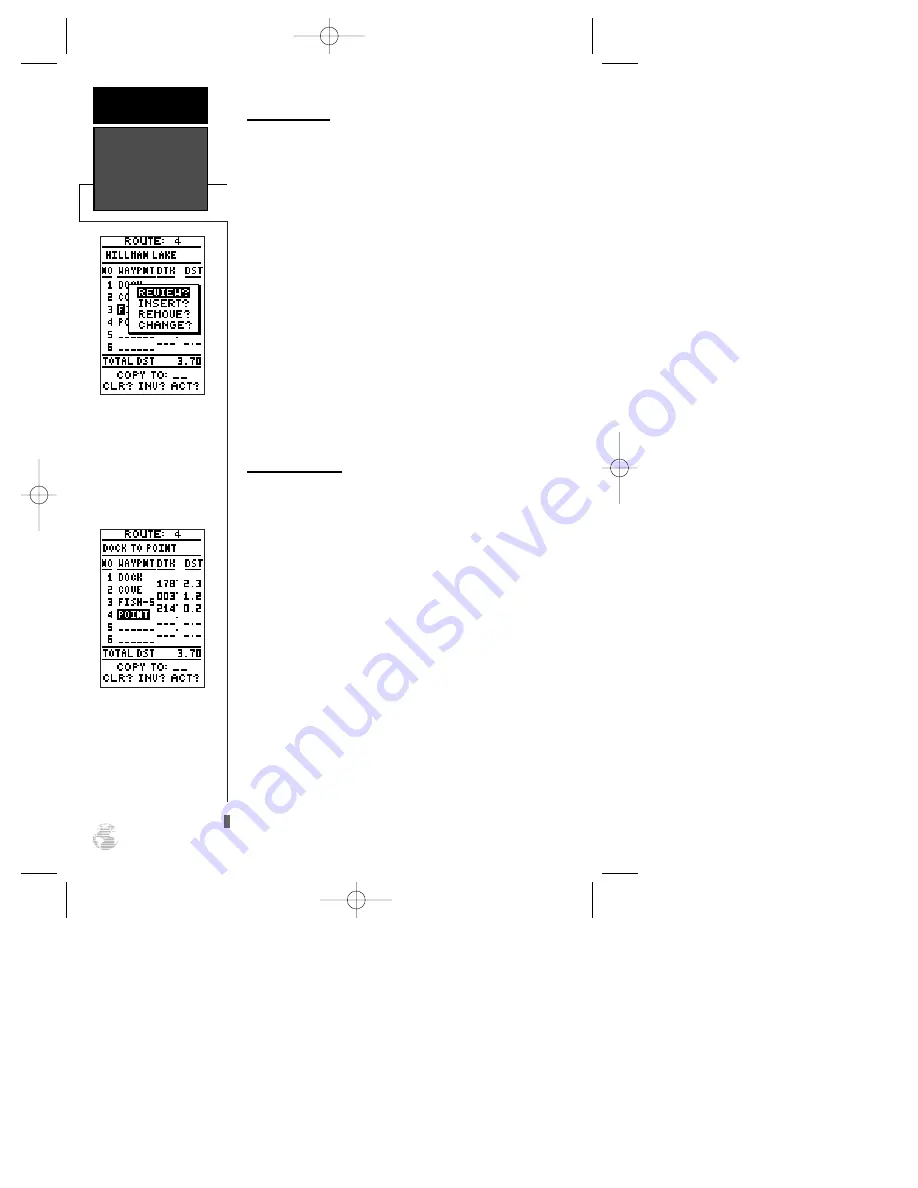
1. Select the waypoint you want to edit, and press 

F

.

An on-screen menu of editing choices will appear,

with options for reviewing, inserting, deleting, or
changing the waypoint field highlighted. This field con-
tains the following options:

• Review?—

reviews the waypoint’s definition page

• Insert?—

adds a new waypoint that precedes the

selected waypoint

• Remove?—

deletes a selected waypoint

• Change?—

replaces the selected waypoint with a

new waypoint

You may delete a waypoint from a route, but only if

the route is not active. Note: Editing the original storage
route will not affect route 0. If you want to save an edit-
ed version of route 0, save it to an open storage route.

On-Route GOTO

At the beginning of this section, we mentioned that

the GPS 126/128 will automatically select the route leg
closest to your position as the active leg. This may mean
that you are not navigating to the first waypoint in the
active route. If you want to select a route waypoint with
which to begin navigation or you prefer to navigate a
route out of sequence, you can perform an ‘on-route
GOTO’ from the active route page.

To perform an ‘on-route GOTO’ from the active

route page:

1. Highlight the desired route waypoint, and press 

G

.

2. Once the GOTO waypoint page appears with the way-

point highlighted, press 

F

.

Note that after you reach the on-route GOTO way-

point, the GPS 126/128 will automatically resume navi-
gating the rest of the route in sequence.

Editing Routes

& On-Route

GOTO’s

REFERENCE

32

Use the on-screen menu to
select the desired editing
function.

To edit or review a route
waypoint from the active
route page, highlight the
desired waypoint and
press ENTER.

126/128 Manual (new)  6/15/98 9:51 AM  Page 32

Summary of Contents for GPS 128

Page 1: ...GPS 126 128 Marine Navigator ZOOM O w n e r s M a n u a l R e f e r e n c e GPS 126 shown 126 128 Manual new 6 15 98 9 50 AM Page 1...

Page 2: ...nual may be reproduced or transmitted in any form or by any means electronic or manual including photocopying and recording for any purpose without the express written permission of GARMIN Information...

Page 3: ...it in typical conditions Reference provides detailed explanations of advanced features and oper ations in a topical format This allows you to concentrate on a specific topic quickly without reading th...

Page 4: ...ecessary FCC standards This equipment generates uses and can radiate radio frequency energy and if not installed and used in accor dance with the instructions may cause harmful interference to radio c...

Page 5: ...lectable Fields 16 Marking a Position Position Averaging Function 18 19 Waypoint Pages Managing Waypoints 19 TracBack Navigation 26 Creating and Using Routes 30 Using the Compass Highway Pages 33 Map...

Page 6: ...ac data must be acquired before GPS navigation can begin Bearing The compass direction from your position to a destination Course Made Good CMG The bearing from the active from position your starting...

Page 7: ...that passes through the north and south poles Navigation The process of traveling from one place to another and knowing where you are in relation to your desired course Position An exact unique locat...

Page 8: ...d navi gation information using degrees a measurement measured in a clockwise direction from a north reference North is described as 000 east as 090 south as 180 and west as 270 The diagram and compas...

Page 9: ...data field s previous value B Marks your present GPS posi tion and instantly sets a return course while providing steer ing guidance I Decreases the scale of the moving map H Increases the scale of t...

Page 10: ...contains a row of signal strength bars corresponding to each satellite being used Position Page The Position Page shows you where you are what direction you re heading and how fast you re going The t...

Page 11: ...o your desired course The upper section shows bearing and distance to the way point and your current track and speed The middle portion contains the actual highway The highway indi cates the crosstrac...

Page 12: ...use the simulator see page 51 Marking a Position To begin the tour let s take the position you have acquired either by just initializing the unit or by hav ing turned the unit on and mark it as a wayp...

Page 13: ...k position page will now be replaced by the Position Page or whatever page was displayed prior to pressing the M key The DOCK waypoint is now stored in the GPS 126 128 s memory and will remain there u...

Page 14: ...low the dia mond represents the position you created with the line between the two showing your track 1 Once you have reached an area that allows for gener al changes in direction without interfering...

Page 15: ...oints in memory in alphabetical order 3 Use U or D to highlight the CHANNL waypoint 4 Press the F key to confirm that you want to navi gate to the displayed waypoint 5 Press the J key to view the Grap...

Page 16: ...position diamond on the CDI scale To stay on course simply steer toward the center of the highway While navigating you may decide to use the Compass Page see picture above left instead of the Highway...

Page 17: ...the Satellite Page and also from the Menu Page see page 47 To adjust the contrast from the Satellite Page 1 Press the J or Q key until the Satellite Page appears 2 Press the arrow keypad left or right...

Page 18: ...ion by changing the orientation option on the Map Page See pg 41 for Map Setup instructions When the receiver is looking for a particular satel lite the corresponding signal strength bar will be blank...

Page 19: ...de 3D Diff will appear when you are receiving DGPS corrections in 3D mode Poor GPS Coverage the receiver isn t tracking enough satellites for a 2D or 3D fix Not Usable the receiver is unusable possibl...

Page 20: ...2 While holding down the M key press the P key to turn the unit on After the unit turns on release the keys A warning message will appear with Yes highlighted and ask you to confirm your selection 3 I...

Page 21: ...es since last reset Average Speed AVSPD average speed traveled Maximum Speed MXSPD maximum speed traveled since last reset Altitude ALT vertical distance above sea level To change the user selectable...

Page 22: ...s a 12 or 24 hour clock see system setup page 46 Marking A Position The GPS 126 128 allows you to mark and store up to 500 positions as waypoints A waypoint can be entered by taking an instant electro...

Page 23: ...ese pages nearest waypoints waypoint list and waypoint definition can be accessed through the Menu Page To select a waypoint page 1 Access the Menu Page and highlight a waypoint page option 2 Press F...

Page 24: ...waypoints delete way points by symbol review a waypoint or GOTO to a selected waypoint To delete all user defined waypoints 1 Highlight DELETE WPTS and press F An options page will appear asking if yo...

Page 25: ...ypoint field and press F 3 Use the arrow keypad to scan through stored way points until desired waypoint appears see page 24 4 Press F The distance DST field will be automat ically highlighted 5 Press...

Page 26: ...s you ll need to enter its bearing and distance from an existing waypoint or your present position To create a new waypoint by referencing a stored waypoint 1 From the waypoint definition page highlig...

Page 27: ...on will be dis played on the map 4 Press F and select one of the following display options name with symbol symbol only or com ment with symbol 5 Press F to confirm your selection and F again to confi...

Page 28: ...al or alphabetical match of the character you have entered If you have more than one waypoint that begins with the same letter or number move to the next character postion and continue enter ing the w...

Page 29: ...el an active GOTO 1 Press the G key 2 Highlight CANCEL GOTO and press F Man Overboard Function The GPS 126 128 s man overboard function MOB lets you simultaneously mark and set a course to a position...

Page 30: ...Up to 30 temporary waypoints will be created to mark the most significant features of the track log in order to duplicate your exact path as closely as possible These points will be indicated by waypo...

Page 31: ...ct path The receiver will then assign the 30 waypoints to the most significant points of your track and simplify segments with fewer changes in direction To save a TracBack route copy route 0 to an op...

Page 32: ...n down and navigated in smaller segments called legs The waypoint you are going to in a leg is called the active to waypoint and the way point immediately behind you is called the active from waypoint...

Page 33: ...at the top of the page with a 16 character user comment field to the right If no user comment is entered the field dis plays the first and last waypoint in the route The way point list on the left sid...

Page 34: ...e The process of activating or inverting a stored route takes a storage route routes 1 19 and copies it into the active route route 0 for navigation The stor age route is then no longer needed and wil...

Page 35: ...g and Clearing Routes The route definition page is also used to copy a route to another route number This feature is useful when you make changes to the active or TracBack route and want to save the r...

Page 36: ...GOTO At the beginning of this section we mentioned that the GPS 126 128 will automatically select the route leg closest to your position as the active leg This may mean that you are not navigating to...

Page 37: ...Page provides a directional point er to the destination with a rotating compass dis play to show your direction of travel The Compass Page provides better steering guidance at slow speeds with many c...

Page 38: ...ed on current ground speed and track Course to Steer CTS the bearing which will give you the most efficient way to stay on course to your destination Crosstrack Error XTK the distance you are off the...

Page 39: ...until the highway leads straight up the page Below the graphic highway is the pointer The pointer shows the direction of the waypoint relative to the direction you are moving Below the pointer are two...

Page 40: ...you are moving For instance if the arrow points up you are going directly to the waypoint If the arrow points any direction left right down etc turn toward the arrow until it points up and then contin...

Page 41: ...information The four corners of the Map Page are used to dis play various navigation data including the bearing and distance to a destination waypoint and your current track and speed over the ground...

Page 42: ...d bearing from your present position to the target crosshair will appear in the upper corners of the map If you are conducting a GOTO at the time you activate the panning function the crosshair bearin...

Page 43: ...2 Select MAP POSITION and press F 3 Enter a new name symbol etc and press F You can also use the target crosshair as an instant GOTO destination This function will mark and instantly set a course for...

Page 44: ...prompt 5 Press F again on the waypoint definition page to return to the Map Page The last function you can perform with a waypoint highlighted on the Map Page is to perform a GOTO directly to the way...

Page 45: ...displays all route waypoint names Nearest shows the nine nearest waypoints to your position black diamond on the map Names displays the waypoint name for the nine nearest waypoints Track Log displays...

Page 46: ...ng in mem ory The track log will still be stored in memory as long as the record setting is WRAP or FILL When set to on the display uses 1024 points Managing and Clearing the Track Log The rest of the...

Page 47: ...ter the des tination waypoint and press F 3 The date field will become highlighted Press F to enter the date you ll arrive at your destination and press F If you haven t marked your present position a...

Page 48: ...output NMEA data without any differential input capability select None NMEA DGPS Interface The last two format settings allow the differential ready GPS 126 128 to accept RTCM DGPS corrections in RTCM...

Page 49: ...ing message will be displayed If a beacon signal is tuned and no corrections are being received a No Data message will be dis played If a beacon signal cannot be tuned a No Status message will be disp...

Page 50: ...n time you will need to enter a time offset to dis play the correct local time for your area To determine the time offset for your area note your position and refer to the chart in Appendix D To enter...

Page 51: ...ss F 3 To turn lighting on and off press the P briefly Navigation Setup The navigation setup submenu page is used to select units of measurement for position formats map datums CDI scale units and hea...

Page 52: ...DX DY DZ DA and DF using the rocker keypad and press F 4 Highlight SAVE and press F The setup menu will reappear CDI Scale Settings The course deviation indicator CDI field lets you select the range...

Page 53: ...econds 5 Press the F key to confirm the selection Magnetic Heading Reference The GPS 126 128 s heading information can be dis played referencing magnetic north automatic or user defined true north or...

Page 54: ...9 99 distance units To set the alarms 1 Move the highlight to ALARMS SETUP and press F 2 Select the desired alarm distance field and press F 3 Enter the distance for the alarm and press F 4 If you wou...

Page 55: ...se the Position Compass or Highway Page to set your speed and track by highlighting the appropriate field entering the desired value and pressing F You may also enter a new position if you desire from...

Page 56: ...replaced by the Satellite Page with the EZinit prompt ready for you to select one of two initialization methods Select Country allows you to initialize the receiver by selecting your present position...

Page 57: ...corner of the Satellite Page Initialization Troubleshooting If you have trouble initializing the receiver or acquiring a position check the following Does the unit have a clear view of the sky If ther...

Page 58: ...hould be rigid enough to support the unit and protect it from excessive vibration and shock The built in antenna has an unobstructed view of the sky To surface mount the GPS 126 1 Place the mounting b...

Page 59: ...a cable The mounting surface should be rigid enough to support the unit and protect it from excessive vibration and shock To surface mount the GPS 128 1 Place the mounting bracket in the desired locat...

Page 60: ...3 From the back side of the panel loosely attach the bracket such that the slot in the ratchet area points away from the mounting panel 4 Rotate the bracket downward until the panel is pinched tightl...

Page 61: ...screws directly onto any stan dard 1 x 14 thread antenna mount If you need to raise the antenna to avoid shading try using a 1 x 14 thread extension mast available at most marine dealers To install t...

Page 62: ...opean Community Specification 529 IPX7 for protection against immer sion for 30 minutes at a depth of 1 meter With optional GARMIN GBR 21 Beacon Receiver Input Subject to accuracy degradation to 100m...

Page 63: ...i ate harness connections To connect the GPS 126 128 to a power source 1 Connect the RED harness lead to the positive side of a 10 40 volt DC power source Make sure the power lead has an in line 1 amp...

Page 64: ...acquire the necessary number of satellites to compute a position Try another location with a clearer view of the sky Power Down and Re init The GPS 126 128 is not able to calculate a position due to a...

Page 65: ...e offset for various longitudi nal zones If you are in daylight savings time add one hour to the offset Longitudinal Zone Offset Longitudinal Zone Offset W180 0 to W172 5 12 E007 5 to E022 5 1 W172 5...

Page 66: ...H 1903 Switzerland Chatham 1971 Chatham 1971 Chatham Island New Zealand Chua Astro Chua Astro Paraguay Corrego Alegr Corrego Alegre Brazil Djakarta Djakarta Batavia Sumatra Island Indonesia Dos 1968 D...

Page 67: ...ian Mean Value Oman Oman Oman Ord Srvy GB Old Survey Grt Britn England Isle of Man Scotland Shetland Isl Wales Pico De Las Nv Canary Islands Potsdam Potsdam Germany Ptcairn Ast 67 Pitcairn Astro 67 Pi...

Page 68: ...viation indicator 35 Course to Steer CTS 34 Creating Routes 30 Crosstrack Error XTK 34 D DGPS Interface 45 Date and Time 46 Deleting Waypoints 24 Distance Sun Calculations 43 E EPE 15 EZinit 16 52 Edi...

Page 69: ...s 47 Position Page 6 16 Primary Pages 6 Proximity Waypoints 21 R Receiver Status 15 Reference Waypoints 22 Renaming Waypoints 24 Repairs 58 Route Definition Page 29 Route Navigation 28 S Satellite Pag...

Page 70: ...Keypad 5 Using the Position Page 9 V Velocity Made Good VMG 3 W Warranty 67 Waypoint Comments 23 Waypoint Definition 22 Waypoint List 20 Waypoint Pages 19 Waypoint Symbols 23 39 Web Site Address i Z Z...

Page 71: ...ained herein are exclusive and in lieu of all other warranties expressed or implied including any lia bility arising under warranty of merchantability or fitness for a par ticular purpose statutory or...

Page 72: ...NOTES 126 128 Manual new 6 15 98 9 52 AM Page 68...

Page 73: ...126 128 Manual new 6 15 98 9 52 AM Page 69...

Page 74: ...e KS USA 66062 GARMIN Europe Ltd Unit 5 The Quadrangle Abbey Park Romsey UK SO51 9AQ GARMIN Asia Corp 4th Fl No 1 Lane 45 Pao Hsing Road Hsin Tein Taiwan R O C Part Number 190 00151 00 Rev A Printed i...

Reviews: