background image

GHP 20 Installation Instructions 

13

2.  Turn the boat in one direction using the autopilot and observe the 

behavior. 
The boat should turn smoothly, not too quickly or too slowly.
When you turn the boat using the autopilot, the boat should 

approach and settle on the desired heading with minimal overshoot 

and oscillation.

3.  Select an option:

•  If the boat turns too quickly or too sluggishly, adjust the 

autopilot acceleration limiter (

page 13

).

•  If the heading hold oscillates significantly or the boat does not 

correct when turning, adjust the autopilot gain (

page 13

). 

•  If the boat turns smoothly, the heading hold oscillates only 

slightly or not at all, and the boat adjusts the heading correctly, 

proceed to step 5.

4.  Repeat steps 2 and 3 until the boat turns smoothly the heading hold 

oscillates only slightly or not at all, and the boat adjusts the heading 

correctly.

5.  For planing vessels, repeat steps 1–4 at faster speeds (

page 13

).

adjusting the acceleration Limiter Settings

NOTE:

 When you manually adjust the acceleration limiter, make 

relatively small adjustments. Test the change before making additional 

adjustments.
1.  Turn on the GHP 20 using the advanced configuration procedure 

(

page 13

).

2.  On the GHC 10, select 

Menu

 > 

Setup

 > 

Dealer Autopilot 

Configuration

 > 

Autopilot Tuning

 > 

Acceleration Limiter

.

3.  Select an option:

•  Increase the setting if the autopilot turns too quickly, 
•  Decrease the setting if the autopilot turns too slowly.

4.  Test the autopilot configuration.
5.  Repeat steps 2 and 3 until the GHP 20 performance is satisfactory.

adjusting the autopilot Gain Settings

NOTE:

 When you manually adjust the rudder gain (or counter gain), 

make relatively small adjustments, and adjust only one value at a time. 

Test the change before making additional adjustments.
1.  Enable the advanced configuration procedure (

page 13

).

2.  On the GHC 10, select 

Menu

 > 

Setup

 > 

Dealer Autopilot 

Configuration

 > 

Autopilot Tuning 

Rudder Gains

.

3.  Select an option:

•  Select 

Low Speed

 or 

High Speed

 and use the arrows on the 

GHC 10 to adjust how tightly the rudder holds the heading and 

makes turns at low speed or high speed.
If you set this value too high, the autopilot may be overactive, 

attempting to constantly adjust the heading at the slightest 

deviation. An overactive autopilot can cause excess wear and 

tear on the drive unit, and drains the battery at a faster-than-

normal rate.

•  Select 

Low Speed Counter

 or 

High Speed Counter

 to adjust 

how tightly the rudder corrects the turn overshoot. If you set this 

value too high, the autopilot can overshoot the turn again when 

attempting to counter the original turn.

4.  Test the autopilot configuration.
5.  Repeat steps 2 and 3 until the GHP 20 performance is satisfactory.

advanced Configuration Procedure

Advanced configuration options are not available on the GHC 10 under 

normal conditions. To access the advanced configuration settings of the 

GHP 20, enable the advanced configuration procedure.

Enabling the advanced Configuration Procedure

1.  From the heading screen, select 

Menu

 > 

Setup

 > 

System

 > 

System 

Information

.

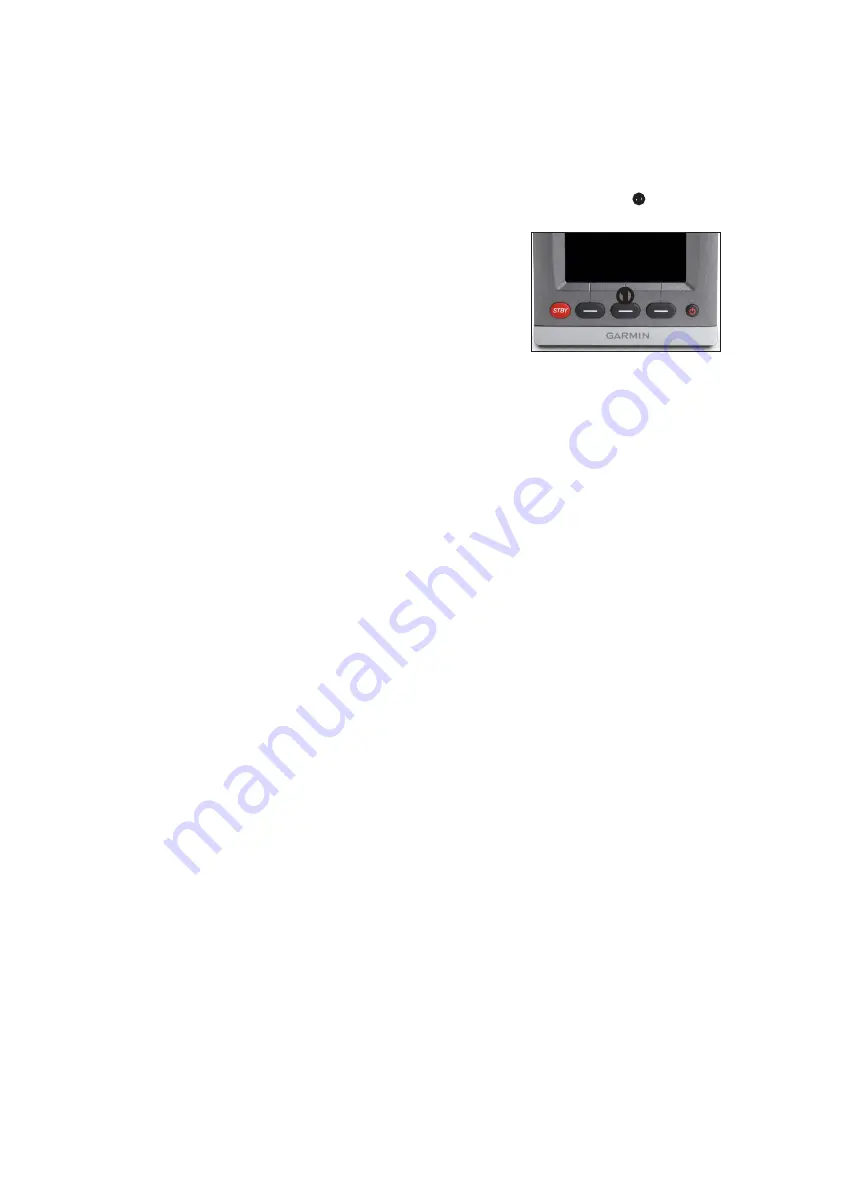
2.  Press and hold the center soft key 

 for 5 seconds.

Dealer Mode appears.

3.  Press 

Back

 > 

Back

.

If the option for Dealer Autopilot Configuration is available on the 

Setup screen, the advanced configuration procedure is enabled.

advanced Configuration Settings

You can run the Autotune automated configuration process, calibrate the 

compass, and define north on the GHP 20 through the GHC 10 without 

running the wizards. You can also define most settings individually, 

without running the configuration processes.

Manually Running the automated Configuration 

Procedures

1.  Enable the advanced configuration procedure (

page 13

).

2.  From the Heading screen, select 

Menu

 > 

Setup

 > 

Dealer Autopilot 

Configuration

 > 

Automated Setup

.

3.  Select 

Autotune

Calibrate Compass

, or 

Set North

.

4.  Follow the on-screen instructions.

Manually Running the Sea trial Wizard

The Sea Trial Wizard allows you to quickly define all of the important 

configuration settings on the GHP 20. After running the wizard, if 

you do not feel the GHP 20 is working correctly, you can run the 

wizard again at any time. To access the wizard, enable the advanced 

configuration procedure (

page 13

).

Manually Defining Individual Configuration Settings

1.  Enable the advanced configuration procedure (

page 13

).

2.  From the Heading screen, select 

Menu

 > 

Setup

 > 

Dealer Autopilot 

Configuration

.

3.  Select the setting category.
4.  Select a setting to configure.
  Descriptions of each setting are available in the appendix (

page 16

).

5.  Configure the value of the setting.

NOTE

: Configuring certain settings in the dealer autopilot 

configuration procedure may require you to modify other settings. 

Review the GHP 20 Configurations Settings section (

page 16

) prior to 

modifying any settings.

Summary of Contents for GHP 20

Page 1: ...mbers are located on a sticker on each component Contacting Garmin Product Support Go to www garmin com support and click Contact Support for in country support information In the USA call 913 397 8200 or 800 800 1020 In the UK call 0808 2380000 In Europe call 44 0 870 8501241 Important Safety Information Warnings You are responsible for the safe and prudent operation of your vessel The GHP 20 is ...

Page 2: ... 2000 Network for the GHC 10 and the CCU 10 Connecting Optional Devices to the GHP 20 Autopilot System 10 NMEA 0183 Connection Considerations 10 Connecting an Optional NMEA 0183 compatible Device to the GHC 10 10 Configuring the GHP 20 11 About the Dockside Wizard 11 Performing the Dockside Wizard 11 Starting the Dockside Wizard 11 Testing the Steering Direction 11 Selecting the Speed Source 11 Ve...

Page 3: ...th the CCU The GHC 10 also connects with optional NMEA 2000 compatible devices such as a GPS device to use advanced features of the GHP 20 If NMEA 2000 compatible devices are not available you can connect the GHC 10 to optional NMEA 0183 compatible devices instead Serial Number Cables and Connectors The GHP 20 autopilot system includes multiple cables These cables connect the components to power t...

Page 4: ...eded Safety glasses Drill and drill bits 3 1 2 in 90 mm hole saw Wire cutters strippers Phillips and flat screwdrivers Cable ties Waterproof wire connectors wire nuts or heat shrink tubing and a heat gun Marine sealant Portable or handheld compass to test for magnetic interference when determining the best location to install the CCU Anti seize lubricant optional Note Mounting screws are provided ...

Page 5: ...s NOTICE Do not connect the steering controller cable to a NMEA 2000 network The GHP 20 requires a powered CAN bus to communicate with the steering controller Ensure that the steering controller CAN bus is properly powered and terminated Consult the boat manufacturer if needed The steering controller cable connects the CCU to the steering controller of the boat and provides 9 5 ft 3 m of cable bet...

Page 6: ...ne using the supplied cables and connectors page 10 NMEA 2000 power cable This cable should be installed only if you are building a NMEA 2000 network Do not install this cable if there is an existing NMEA 2000 network on your boat page 10 The NMEA 2000 power cable must be connected to a 9 16 Vdc power source CCU Mount the CCU with the cables pointing straight down page 7 Steering controller cable ...

Page 7: ...y in the bracket Do not overtighten the thumbscrew Connecting the CCU 1 Route the five pin connector end of the steering controller cable to the steering system access location on your boat page 7 2 Route the orange and blue wires to the location where you plan to install the alarm page 7 If the cable is not long enough extend the appropriate wires with 28 AWG 08 mm2 wire Alarm Installation The al...

Page 8: ...Using the jigsaw or the 3 5in 90 mm hole saw cut the mounting surface along the inside of the dashed line indicated on the flush mount template 5 If necessary use a file and sandpaper to refine the size of the hole 6 Place the GHC 10 into the cutout to confirm that the four mounting holes are correct 7 Select an option If the mounting holes are correct proceed to step 8 If the mounting holes are n...

Page 9: ...ble up to 20 ft 6 m long not included 6 Connect the drop cable to the to the GHC 10 7 Connect the drop cable to the T connector you added in step 3 and to the GHC 10 Connecting the CCU to an Existing NMEA 2000 Network 1 Determine where to connect the CCU to your existing NMEA 2000 backbone page 5 2 Disconnect one side of a NMEA 2000 T connector from the network 3 If necessary to extend the NMEA 20...

Page 10: ...optional NMEA 2000 compatible or NMEA 0183 compatible GPS device can be connected to the NMEA 2000 network or to the GHC 10 through NMEA 0183 NMEA 0183 Connection Considerations To identify the Transfer Tx A and B wires for your NMEA 0183 compatible device consult the installation instructions for your device When connecting NMEA 0183 devices with two transmitting and two receiving lines it is not...

Page 11: ...it does not appear on the GHC 10 proceed to the next step 1 Use the arrows on the GHC 10 to test the steering direction When you select the right arrow the rudder should turn so that the boat would steer to the right and when you select the left arrow the rudder should turn so that the boat would steer to the left 2 Select Continue 3 Select an option If the steering test turns the boat in the corr...

Page 12: ...eps 1 3 Performing the Autotune Procedure Before you can perform the autotune procedure you must have a large stretch of open water available 1 Adjust the throttle so the boat travels below planing speed 2 Select Begin The boat performs a number of zigzag motions while the Autotuning is in progress The GHC 10 displays a completion message 3 Select an option If the autotune completed successfully s...

Page 13: ...ear and tear on the drive unit and drains the battery at a faster than normal rate Select Low Speed Counter or High Speed Counter to adjust how tightly the rudder corrects the turn overshoot If you set this value too high the autopilot can overshoot the turn again when attempting to counter the original turn 4 Test the autopilot configuration 5 Repeat steps 2 and 3 until the GHP 20 performance is ...

Page 14: ...the GHC 10 unconnected GHC 10 NMEA 2000 network provides power to the GHC 10 12 VDC power source NMEA 0183 compatible device Wire GHC 10 Wire Color Function NMEA 0183 Compatible Device Wire Function N A Power N A NMEA 0183 ground Blue Tx A Rx White unconnected N A Brown Rx A Tx A Green Rx B Tx B NOTE When connecting a NMEA 0183 device with only one receiving Rx line the NMEA 2000 bus and the NMEA ...

Page 15: ... 126996 Product Information 127258 Magnetic Variation 127488 Engine Parameters Rapid Update 129025 Position Rapid Update 129026 COG SOG Rapid Update 129283 Cross Track Error 129284 Navigation Data Transmit 059392 ISO Acknowledgment 059904 ISO Request 060928 ISO Address Claim 126208 NMEA Command Request Acknowledge Group Function 126464 Transmit Receive PGN List Group Function 126996 Product Inform...

Page 16: ...or low speeds This setting applies to the vessel when operating below planing speed If you set this value too high the autopilot may be overactive attempting to constantly adjust the heading at the slightest deviation Rudder Gains Low Speed Counter Allows you to set the rudder gain counter correction for low speeds This setting applies to the vessel when operating below planing speed If you set th...

Page 17: ...he GHP 20 See the configuration section of the GHC 10 Owner s Manual for more information Error and Warning Messages Error Message Cause Autopilot Action Autopilot is not receiving navigation data Autopilot placed in heading hold The autopilot is no longer receiving valid navigation data while performing a Route To This message will also be shown if navigation is stopped on a chartplotter prior to...

Page 18: ......

Page 19: ...wing the directions starting on page 5 Mount the CCU in a location free of magnetic interference Use a handheld compass to test for magnetic interference in the area Mount the CCU in the bracket so that the wires hang straight down 4 Mount the GHC 10 by following the directions starting on page 5 5 Connect the CCU to the steering system of the boat using the steering controller cable page 7 6 Conn...

Page 20: ...hout obligation to notify any person or organization of such changes or improvements Visit the Garmin Web site www garmin com for current updates and supplemental information concerning the use and operation of this and other Garmin products Garmin and the Garmin logo are registered trademarks of Garmin Ltd or its subsidiaries registered in the USA and other countries GHP GHC and myGarmin are trad...

Reviews: