G300 Installation Manual – GTP 59
Page 5-3
190-00921-01
Revision
A
1.
Prepare the surface. The metal body of the OAT probe should be grounded to the aircraft. The
installation requirements vary depending on the airframe material composition.
a.
Aluminum airframe: When a mounting location has been found, prepare the inside surface of
the aircraft. Remove all paint from the contacting area and clean with a degreaser.
b.
Composite airframe: If possible, mount the OAT probe through a grounded metal strap or
band. Otherwise, mount the OAT probe in an area of the airframe that has a significant
amount of underlying metal foil or mesh. To ensure adequate conductivity, it may be
necessary to mount the OAT probe through a metal doubler. Use fasteners that allow a
conductive path to the airframe.
2.
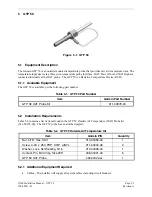
Mount the OAT probe on the prepared surface. Place the ring terminal (2) over the end of the
OAT probe (4). Insert the probe and ring terminal into the hole in the skin of the aircraft. Place
the washer (6) over the end of the OAT probe on the outside skin of the aircraft. Thread the nut
(5) onto the OAT probe. Holding the OAT probe on the inside, tighten the nut (5) to 100 inch-
lbs.
±
20 inch-lbs.
3.
Route the OAT probe cable (3) to the GSU 73.
4.
Cut the OAT Probe cable (3) to the required length. Strip back 2.0” to 3.5” of jacket while
retaining the shield on the OAT Probe cable (3). Trim away enough to leave 0.5” of shield
exposed.
5.
Strip back 1/8” (0.125”) of insulation and crimp pins (11) to each of the conductors in the
shielded cable.
6.
Cut an AWG #16 (8) wire to 3” long. Strip back 0.5” of insulation from this cable. Connect the
shield of the OAT Probe cable (3) to the AWG #16 wire (8).
7.
Attach the ring terminal (9) to the backshell, using the screw provided in the OAT Probe Kit (10)
and one of the tapped holes on the backshell termination area.
8.
Insert newly crimped pins into the D-Sub connector and wires (3, 11) into the appropriate
connector housing location (12, 7) as specified by the installation wiring diagrams.
9.
Verify that all necessary pins for the GSU 73 have been attached to the cables and snapped into
the proper slots of the 78 pin D-Sub connector.
10.
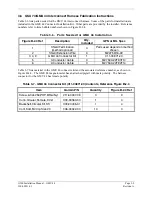
Wrap the cable bundle with Silicone Fusion Tape (GPN: 249-00114-00 or a similar) at the point
where the backshell strain relief and cast housing contact the cable bundle. The smooth side of
the backshell strain relief should contact the tape.

