background image

Fusion

®

 MS-RA60 Installation Instructions 

Important Safety Information

 WARNING

Failure to follow these warnings and cautions could result in personal injury, damage to the vessel, or poor 
product performance.
See the Important Safety and Product Information guide in the product box for product warnings and other 
important information.
This device must be installed according to these instructions.
Disconnect the vessel's power supply before beginning to install this product.
Before applying power to this product, make sure it has been correctly grounded, following the instructions in 
the guide.

 CAUTION

To avoid possible personal injury, always wear safety goggles, ear protection, and a dust mask when drilling, 
cutting, or sanding.

NOTICE

When drilling or cutting, always check what is on the opposite side of the surface to avoid damaging the vessel.

You must read all installation instructions before beginning the installation. If you experience difficulty during 
the installation, contact Fusion Product Support.

What's In the Box

• Mounting gasket
• Four 6-gauge, self-tapping screws
• Two screw covers
• Power and speaker wiring harness
• Auxiliary-in, line-out, and subwoofer-out wiring harness

Tools Needed

• Phillips screwdriver
• Electric drill
• Drill bit (size varies based on surface material and screws used)
• Rotary cutting tool or jigsaw
• Silicone-based marine sealant (optional)

TA-2021/0772

GUID-3453BF25-825C-403E-917D-EF24C7294A81 v2

December 2021

Summary of Contents for Fusion MS-RA60

Page 1: ...e personal injury always wear safety goggles ear protection and a dust mask when drilling cutting or sanding NOTICE When drilling or cutting always check what is on the opposite side of the surface to...

Page 2: ...reo in a location that may be exposed to water add a drip loop to the cable to allow water to drip off of the cable and avoid damage to the stereo If you need to mount the stereo outside a boat you mu...

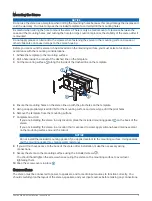
Page 3: ...pilot holes on the template 5 Using an appropriately sized drill bit for the mounting surface and screw type drill the pilot holes 6 Remove the template from the mounting surface 7 Complete an action...

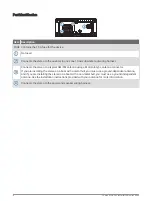
Page 4: ...Motorola type antenna connector If you are installing the stereo on a boat with a metal hull you must use a ground dependent antenna and if you are installing the stereo on a boat with a non metal hul...

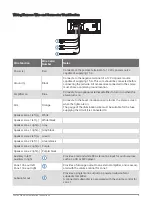
Page 5: ...gauge of the illumination wire must be suitable for the fuse supplying the circuit it is connected to Speaker zone 1 left White Speaker zone 1 left White black Speaker zone 1 right Gray Speaker zone 1...

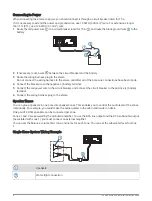
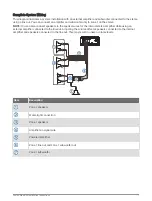
Page 6: ...battery terminal 5 Connect the red power wire to the circuit breaker and connect the circuit breaker to the positive battery terminal 6 Connect the wiring harness plug to the stereo Speaker Zones You...

Page 7: ...er wires for the internal stereo amplifier while using an external amplifier connected to the line out Adjusting the volume affects speakers connected to the internal amplifier and speakers connected...

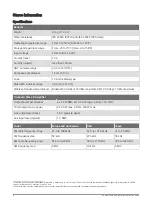
Page 8: ...nnel 4 x 22 W RMS at 14 4 Vdc input 4 Ohm 10 THD2 Total output music power 4 x 45 W max 4 Ohm 180 W max Line output level max 5 5 V peak to peak Aux input level typical 1 V RMS Tuner Europe and Austra...

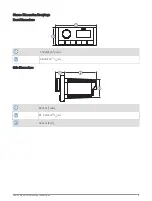
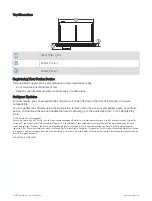
Page 9: ...Stereo Dimension Drawings Front Dimensions 157 mm 6 3 16in 68 mm 2 11 16in Side Dimensions 22 mm 7 8in 81 2 mm 33 16 in 50 mm 2 in Fusion MS RA60 Installation Instructions 9...

Page 10: ...Fusion and the Fusion logo are trademarks of Garmin Ltd or its subsidiaries registered in the USA and other countries Connect IQ Fusion Link and Fusion Link Lite are trademarks of Garmin Ltd or its su...

Reviews: