


• To move between different menu items, press and .
• To select a menu item, press .
• To move back to a previous menu item, press .
• To exit the menu, press
, or press repeatedly until you
reach the main screen.
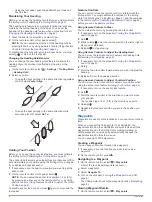
Calibrating the Remote Control
NOTICE
Calibrate the electronic compass outdoors. To improve heading
accuracy, do not stand near objects that influence magnetic
fields, such as vehicles, buildings, and overhead power lines.
You must calibrate the compass in the remote control before
you can control the motor using gestures. If the gesture controls
are not working properly after calibration, you can repeat this
process as often as needed.
1
Select
>
Settings
>
Remote Control
>
Calibrate
.
2
Select
Start
, and follow the on-screen instructions.
Pairing the Remote Control
The remote control is paired with the trolling motor at the factory,
but you may need to pair them again if the connection is broken.
1
Turn on the trolling motor.
2
On the trolling motor display panel, press three times to
enter pairing mode.
on the trolling motor display panel illuminates blue as it
searches for a connection.
3
Bring the remote control within 1 m (3 ft.) of the display panel
on the trolling motor.
4
Turn on the remote control.
5
On the remote control, select
>
Settings
>
Remote
Control
>
Pair
>
Start
.
on the trolling motor display panel illuminates green when
the connection is successful.
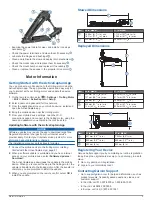
Foot Pedal
You can use the foot pedal to operate the trolling motor.
Momentary
propeller
control
Hold to turn on the propeller at the set speed.
Release to turn off the propeller.
Speed wheel
Rotate the wheel away from you to increase the
propeller speed or cruise control speed.
Rotate the wheel toward you to decrease the
propeller speed or cruise control speed.
NOTE:
The speed wheel is inactive when anchor
lock is on.
Steering pedal Push the pedal with your toes to turn the motor
clockwise.
Push the pedal with your heel to turn the motor
counter-clockwise.
NOTE:
When anchor lock or heading hold is on, or
you are following a route, press the pedal to
resume manual control at the previous propeller
speed.
Status
indicator
Shows the status of the foot pedal (
).
Continuous
propeller
control
Press to turn the propeller on and off (
).
Heading hold
Press to set and maintain the current heading
(
).
Press to turn off heading hold, stop the propeller,
and resume manual control.
Anchor lock
Press to turn on anchor lock. Anchor lock uses the
trolling motor to hold your position (
).
Press to turn off anchor lock and return to the
previous steering mode.
Installing Batteries
The foot pedal can operate using two AA alkaline, NiMH, or
lithium batteries (not included). Use lithium batteries for best
results.
1
Lift up the front of the foot pedal as far as possible.
2
Pinch the sides of the battery cover , and pull up to remove
it.
3
Insert two AA batteries, observing polarity.
4
Place the battery cover over the batteries, and push down
until both sides snap into place.
Pairing the Foot Pedal
The foot pedal is paired with the trolling motor at the factory, but
you may need to pair them again if the connection is broken.
1
Turn on the trolling motor.
2
On the trolling motor display panel, press three times to
enter pairing mode.
on the trolling motor display panel illuminates blue as it
searches for a connection.
3
Bring the foot pedal within 1 m (3 ft.) of the display panel on
the trolling motor.
4
Connect the foot pedal to power using the power cable, or
insert batteries to turn it on.
5
Within 30 seconds of turning on the foot pedal, hold until
the status LED on the foot pedal illuminates blue.
6
Release .
The status LED on the foot pedal illuminates blue as it
searches for a connection, then turns off when it pairs
successfully with the trolling motor.
4
Foot Pedal
Summary of Contents for Force
Page 1: ...FORCE TROLLINGMOTOR Owner sManual...
Page 4: ......
Page 16: ...support garmin com August 2019 190 02521 00_0A...