


Key
Description
Press to enable heading hold (set and maintain the current
heading).
Press to disable heading hold, stop the propeller, and
resume manual control.
Hold to set the heading hold by pointing the remote (
Gesture Controls to Set and Adjust Heading Hold
).
Press to enable anchor lock. Anchor lock uses the trolling
motor to hold your position.
When in anchor lock, press to disable heading hold and
return to the previous steering mode.
Hold to jog the anchor lock position by pointing the remote
(
Using Gesture Controls to Adjust Your Anchor Lock
).
Press to open the menu.
Press to exit the menu.
Press to mark a waypoint.
1 through 4 Press to open the shortcut for the Garmin chartplotter
assigned to the key.
1
Remote Control Screen
Shows the operational status of the trolling motor.
For example, when in manual control, Manual is shown, and
when the heading hold is enabled, Heading Hold is shown,
along with the heading-hold set point in degrees.
Shows the trolling motor battery status.
Green: the motor battery power is good.
Yellow: the motor battery is low.
Red: the motor battery power is critically low.
TIP:
You can view the remote control battery level by pressing
.
Shows the status of the propeller.
When the propeller icon is shown, the propeller is enabled.
When the propeller icon is not shown, the propeller is disabled.
Shows the GPS signal strength of the trolling motor.
PROP Shows the speed level of the propeller.
SOG
Shows the measured speed over ground (SOG) in the specified
units.
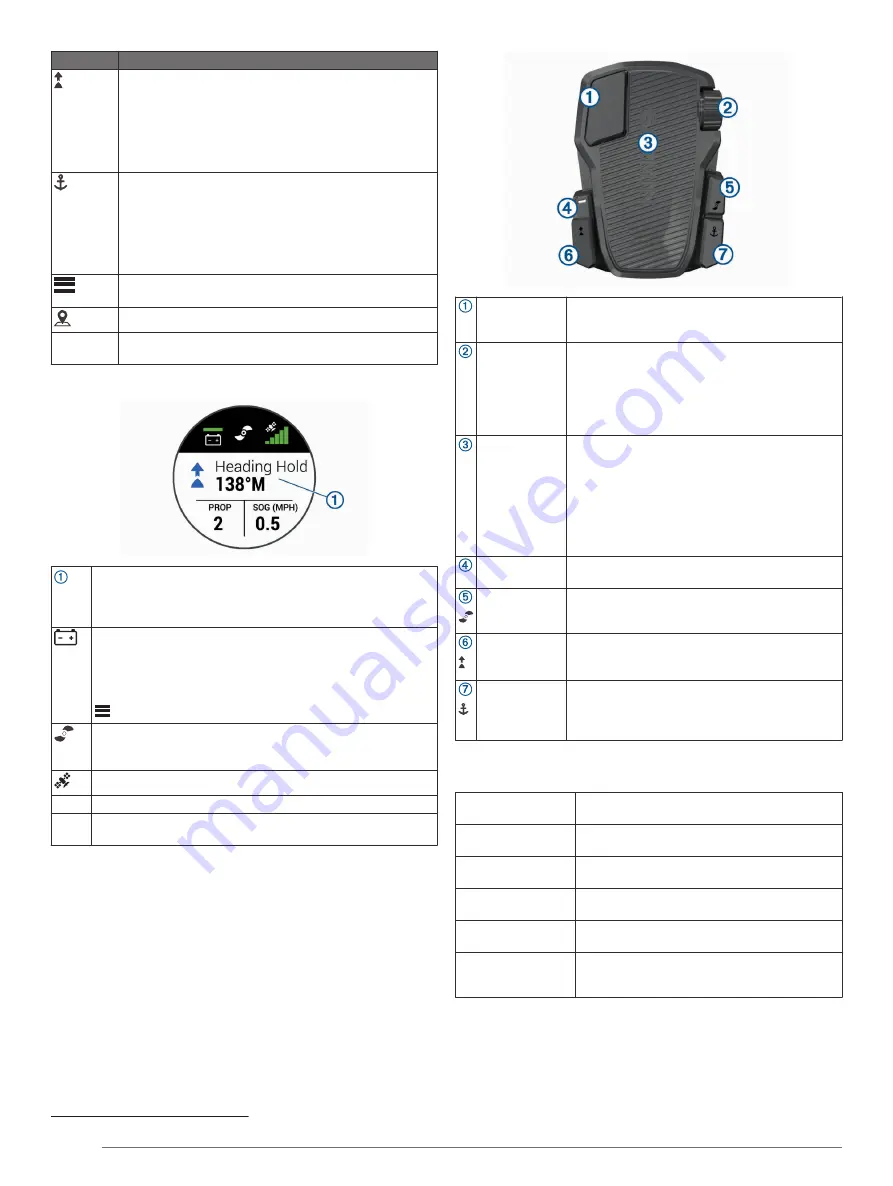
Foot Pedal
You can use the foot pedal to operate the trolling motor.
Momentary
propeller
control
Hold to enable the propeller at the set speed.
Release to disable the propeller.
Speed wheel
Rotate the wheel away from you to increase the
propeller speed or cruise control speed.
Rotate the wheel toward you to decrease the
propeller speed or cruise control speed.
NOTE:
The speed wheel is inactive when anchor
lock is enabled.
Steering pedal Push the pedal with your toes to turn the motor
clockwise.
Push the pedal with your heel to turn the motor
counter-clockwise.
NOTE:
When anchor lock or heading hold is
enabled, or you are following a route, press the
pedal to resume manual control at the previous
propeller speed.
Status indicator Shows the status of the foot pedal (
).
Continuous
propeller
control
Press to enable and disable the propeller.
Heading hold
Press to set and maintain the current heading.
Press to disable heading hold, stop the propeller,
and resume manual control.
Anchor lock
Press to enable anchor lock . Anchor lock uses the
trolling motor to hold your position.
Press to disable anchor lock and return to the
previous steering mode.
Status Indicator
The LED on the foot pedal indicates the foot pedal status.
Flashes green, then
stops
The foot pedal is powering on.
Flashes blue, then
stops
The foot pedal is connected to the trolling motor.
Flashes green when
pushing a button
The foot pedal is sending a command for the
button being pushed.
Flashes red when
pushing a button
The foot pedal is not connected to the trolling
motor.
Blinking red
The foot pedal batteries are low and should be
replaced.
Off
The LED turns off when the pedal is connected
to the trolling motor and not sending commands.
This prolongs battery life.
Gesture Controls
You can point or move the remote control to interact with the
trolling motor. You must calibrate the compass in the trolling
motor (
Calibrating the Trolling Motor
), and the
compass in the remote control (
Calibrating the Remote Control
) before you can use gesture controls.
1
Requires a connection to a compatible Garmin chartplotter.
4
Quick Start Manual
DRAFT
Summary of Contents for Force
Page 1: ...FORCE TROLLINGMOTOR QuickStartManual D R A F T...
Page 7: ...D R A F T...


