• Examine the power cable for wear, and patch or repair as
necessary .
• Check the power terminals, and clean them if necessary .
• Lubricate the hinges and bushings .
• Clean and lubricate the stow and deploy latch mechanism .
• Check the mount rails, and replace them if necessary .
• Check the mount bumper, and replace it if necessary .
• Clean or replace the anodes in the propeller drive motor .
Motor Information
Getting Started with the ActiveCaptain App
You can connect a mobile device to the trolling motor using the
ActiveCaptain app. The app provides a quick and easy way for
you to interact with your trolling motor and update the device
software.
1
On the remote control, select
>
Settings
>
Trolling Motor
>
Wi-Fi
>
Mode
>
ActiveCaptain
>
Setup
.
2
Enter a name and password for this network.
3
From the application store on your mobile device, install and
open the ActiveCaptain app.
4
Bring the mobile device near the trolling motor.
5
From your mobile device settings, open the Wi
‑
Fi
connections page and connect to the trolling motor, using the
name and password you entered in the previous step.
Updating Software with the ActiveCaptain App
NOTICE
Software updates may require the app to download large files.
Regular data limits or charges from your Internet service
provider apply. Contact your Internet service provider for more
information about data limits or charges.
The installation process can take several minutes.
1
Connect the mobile device to the trolling motor (
Started with the ActiveCaptain App
).
2
When a software update is available and you have internet
access on your mobile device, select
Software Updates
>
Download
.
The ActiveCaptain app downloads the update to the mobile
device. When you reconnect the app to the trolling motor, the
update is transferred to the trolling motor. After the transfer is
complete, you are prompted to install the update.
3
When you are prompted on the remote control, select
OK
to
install the update.
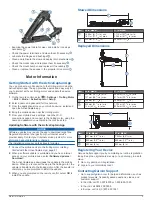
Stowed Dimensions
Item
50 in. Model
57 in. Model
1.558 m (61
5
/
16
in.) min.
1.811 m (71
5
/
16
in.) max.
1.712 m (67
3
/
8
in.) min.
2.066 m (81
5
/
16
in.) max.
300 mm (11
13
/
16
in.)
340 mm (13
3
/
8
in.)
Deployed Dimensions
Item
50 in. Model
57 in. Model
461 mm (18
1
/
8
in.) min.
721 mm (28
3
/
8
in.) max.
488 mm (19
3
/
16
in.) min.
817 mm (32
1
/
8
in.) max.
708 mm (27
7
/
8
in.)
799 mm (31
7
/
16
in.)
839 mm (33
1
/
16
in.) min.
1.1 m (43
5
/
16
in.) max.
1.724 m (67
7
/
8
in.) max.
920 mm (36
3
/
16
in.) min.
Item
50 in. Model
57 in. Model
931 mm (36
11
/
16
in.)
1.022 m (40
1
/
4
in.)
402 mm (15
13
/
16
in.)
402 mm (15
13
/
16
in.)
203 mm (8 in.)
203 mm (8 in.)
Registering Your Device
Help us better support you by completing our online registration
today. Keep the original sales receipt, or a photocopy, in a safe
place.
1
.
2
Sign in to your Garmin account.
Contacting Garmin Support
• Go to
for help and information, such as
product manuals, frequently asked questions, videos, and
customer support.
• In the USA, call 913-397-8200 or 1-800-800-1020.
• In the UK, call 0808 238 0000.
• In Europe, call +44 (0) 870 850 1241.
Motor Information
9
Summary of Contents for Force
Page 1: ...FORCE TROLLINGMOTOR Owner sManual...
Page 4: ......
Page 16: ...support garmin com August 2019 190 02521 00_0A...


