background image

Resetting to Factory Default Values

Before you reset the device to its factory default values, you 

should back up all user data. This enables you to retrieve 

important data, if necessary.

NOTICE

Data deleted through a factory reset cannot be restored from the 

internal storage.

You can reset the device to its factory default values. This 

removes all applications, accounts, and user data. If data 

backup is enabled, some account and user data may be 

restored from your backup account after the factory reset, but 

many user data types are not included in this backup.

Select 

Settings

 > 

Backup & Reset

 > 

Factory Data Reset

.

Appendix

Connecting to a Wireless Network

1

Select 

Settings

 > 

Wi-Fi

.

2

If necessary, select the toggle switch to turn on wireless 

network technology.

3

If necessary, select 

Scan

 to scan for available networks.

4

Select a wireless network.

5

If necessary, enter the encryption key.

The device connects to the wireless network. The device 

remembers the network information and connects automatically 

when you return to this location in the future.

Connecting to a Wireless Display

You can show the contents of the device screen on a compatible 

external display using wireless technology.

1

Select 

Settings

 > 

Miracast

.

2

If necessary, select the toggle switch to turn on wireless 

display technology.

3

If necessary, select 

Search for Displays

.

4

Select a wireless display.

5

If necessary, enter the PIN.

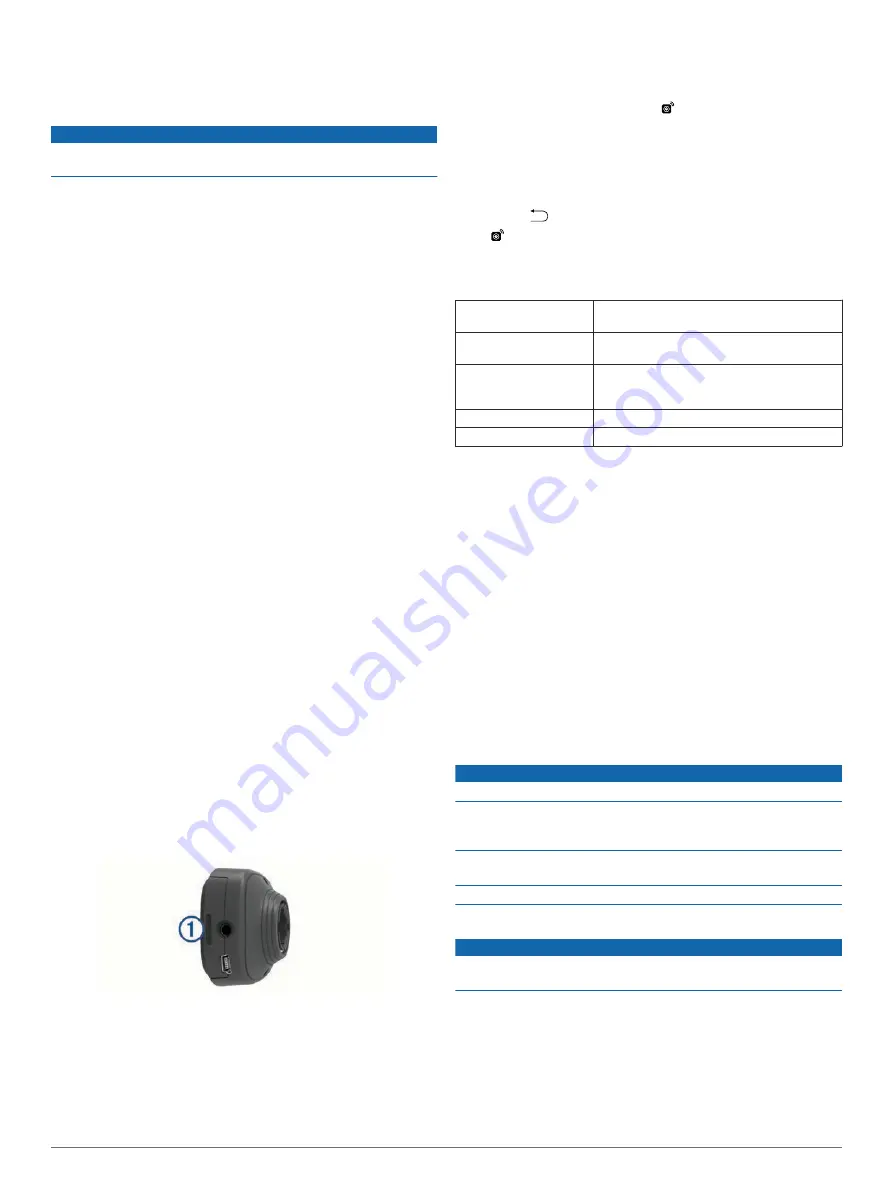
Connecting a Backup Camera

NOTE: 

This feature is available only for the Garmin fleet 670V 

model.
On supported models, the device mount includes a 3.5 mm 

composite video input jack. You can connect a composite video 

backup camera and view the output on the device screen.

Plug the camera video cable into the video input jack 

À

 on 

the device mount.

Viewing the Backup Camera

Your device shows video from the connected backup camera in 

different ways, depending on how the camera is connected to 

power.

1

Select an option to show video:
• If the camera is connected to a reverse lamp 

(recommended), place the vehicle into reverse.

The device automatically shows video from the backup 

camera.

• If the camera is connected to a steady power source, from 

the notification panel, select  .

2

Select an option to resume normal device operation:
• If the camera is connected to a reverse lamp 

(recommended), take the vehicle out of reverse.
The device automatically resumes normal operation.

• If the transmitter is connected to a steady power source, 

select 

.

 remains in the notification panel as long as the device 

receives a video input signal.

Specifications

Operating temperature 
range

-20° to 60°C (-4° to 140°F)

Charging temperature 
range (vehicle power)

0° to 40°C (32° to 104°F)

Power input type

Vehicle power using an optional accessory. 
AC power using an optional accessory for 
home or office use only.

Battery type

Rechargeable lithium-ion, 3.7 Vdc

Input

Maximum DC 5 V, 2 A

Charging the Device

NOTE: 

This Class III product shall be powered by an LPS power 

supply.
You can charge the battery in the device using any of these 

methods.
• Connect the device to the vehicle power cable.
• Connect the device to a computer using a USB cable.

The device may charge slowly when connected to a 

computer. Some portable computers may not charge the 

device.

• Connect the device to an optional power adapter accessory, 

such as a wall power adapter.
You can purchase an approved Garmin AC-DC adapter 

suitable for home or office use from a Garmin dealer or 

www.garmin.com

.

Device Care

NOTICE

Avoid dropping your device.
Do not store the device where prolonged exposure to extreme 

temperatures can occur, because it can cause permanent 

damage.
Never use a hard or sharp object to operate the touchscreen, or 

damage may result.
Do not expose the device to water.

Cleaning the Outer Casing

NOTICE

Avoid chemical cleaners and solvents that can damage plastic 

components.

1

Clean the outer casing of the device (not the touchscreen) 

using a cloth dampened with a mild detergent solution.

2

Wipe the device dry.

Cleaning the Touchscreen

1

Use a soft, clean, lint-free cloth.

2

If necessary, lightly dampen the cloth with water.

Appendix

15

Summary of Contents for fleet 670V

Page 1: ...Garmin fleet 670 670V Owner s Manual July 2015 Printed in Taiwan 190 01792 00_0B...

Page 2: ...es registered in the USA and other countries These trademarks may not be used without the express permission of Garmin ecoRoute Garmin fleet Garmin Express and myTrends are trademarks of Garmin Ltd or...

Page 3: ...Condition Warnings 5 Other Warnings 5 Up Ahead 5 Finding Upcoming Points of Interest 6 Customizing the Up Ahead Categories 6 Trip Information 6 Viewing Trip Data from the Map 6 Viewing the Trip Inform...

Page 4: ...ings 14 Language and Keyboard Settings 14 Proximity Alerts Settings 14 Bluetooth Settings 14 Disabling Bluetooth 14 Sound Settings 14 Device and Privacy Settings 14 Adding Accounts 14 Restoring Settin...

Page 5: ...are updates Map chart or course updates Vehicles voices and other extras Setting Up Garmin Express 1 Connect the device to your computer using a USB cable 2 Go to www garmin com express 3 Follow the o...

Page 6: ...Points of Interest The detailed maps loaded in your device contain trucking points of interest such as truck stops rest areas and weigh stations Select Where To Trucking Finding TruckDown Points of I...

Page 7: ...re To Categories Coordinates 2 If necessary select and change the coordinate format or datum 3 Select the latitude coordinate 4 Enter the new coordinate and select Done 5 Select the longitude coordina...

Page 8: ...ions page 2 2 Select a location 3 Select Go Previewing Multiple Routes 1 Search for a location Finding a Location by Category page 2 2 From the search results select a location 3 Select Routes 4 Selec...

Page 9: ...e next turn on the map Active Lane Guidance As you approach a turn while navigating a route a detailed simulation of the road appears beside the map if available A colored line indicates the proper la...

Page 10: ...the speedometer on the first page Select Reset Trip Data to reset the information on the trip computer Select Reset Max Speed to reset the maximum speed Select Reset Trip B to reset the odometer Usin...

Page 11: ...You should update your device frequently to receive the most up to date safety camera information For some devices and regions basic safety camera data may be included with your device Included data...

Page 12: ...n the device 6 Enter the code 7 Select Done trafficTrends When the trafficTrends feature is enabled your device uses historic traffic data to calculate more efficient routes NOTE Different routes may...

Page 13: ...atus 1 Select Hours of Service 2 Select a driver 3 Select Duty Status 4 Select an option Select Off Duty to record the time you are off duty Select Sleeper to record the time you are resting in a slee...

Page 14: ...when the device enters and exits voice command Starting a Route Using Voice Command You can say the names of popular well known locations 1 Say your wakeup phrase Setting the Wakeup Phrase page 10 2...

Page 15: ...hone Number TIP After you save a home number you can edit the home number by editing Home in your list of saved locations Editing a Saved Location page 3 1 Select Device Set Home Number 2 Enter your p...

Page 16: ...ing items on your roof Remove rooftop carriers and removable racks when not in use Maintain the recommended tire pressure Check tire pressure regularly and before long trips Keep your vehicle well tun...

Page 17: ...nd other relevant restrictions when driving Always defer to all posted road signs and road conditions when making driving decisions 1 Select Settings Truck Profile 2 Select a profile type Select Truck...

Page 18: ...voice prompts Text Language Sets all on screen text to the selected language NOTE Changing the text language does not change the language of user entered data or map data such as street names Keyboard...

Page 19: ...he camera is connected to a reverse lamp recommended place the vehicle into reverse The device automatically shows video from the backup camera If the camera is connected to a steady power source from...

Page 20: ...charge in my vehicle Check the fuse in the vehicle power cable Verify the vehicle is turned on and is supplying power to the power outlet Verify the interior temperature of the vehicle is between 32...

Page 21: ...fuel logs 8 fuel price changing 11 G Garmin Express 1 registering the device 1 updating software 1 geocaching 3 going home 3 GPS 1 2 H hands free phone calls 10 help 11 See also product support home...

Page 22: ...d locations 4 sleep mode 1 software updating 1 version 14 specifications 15 speech recognition 10 suction cup 16 T theft avoiding 16 time settings 14 traffic 7 8 14 activating a subscription 8 adding...

Page 23: ......

Page 24: ...9 33 99 39 02 36 699699 52 001 855 792 7671 0800 0233937 47 815 69 555 00800 4412 454 44 2380 662 915 35 1214 447 460 386 4 27 92 500 0861 GARMIN 427 646 27 0 11 251 9999 34 93 275 44 97 46 7744 52020...

Reviews: