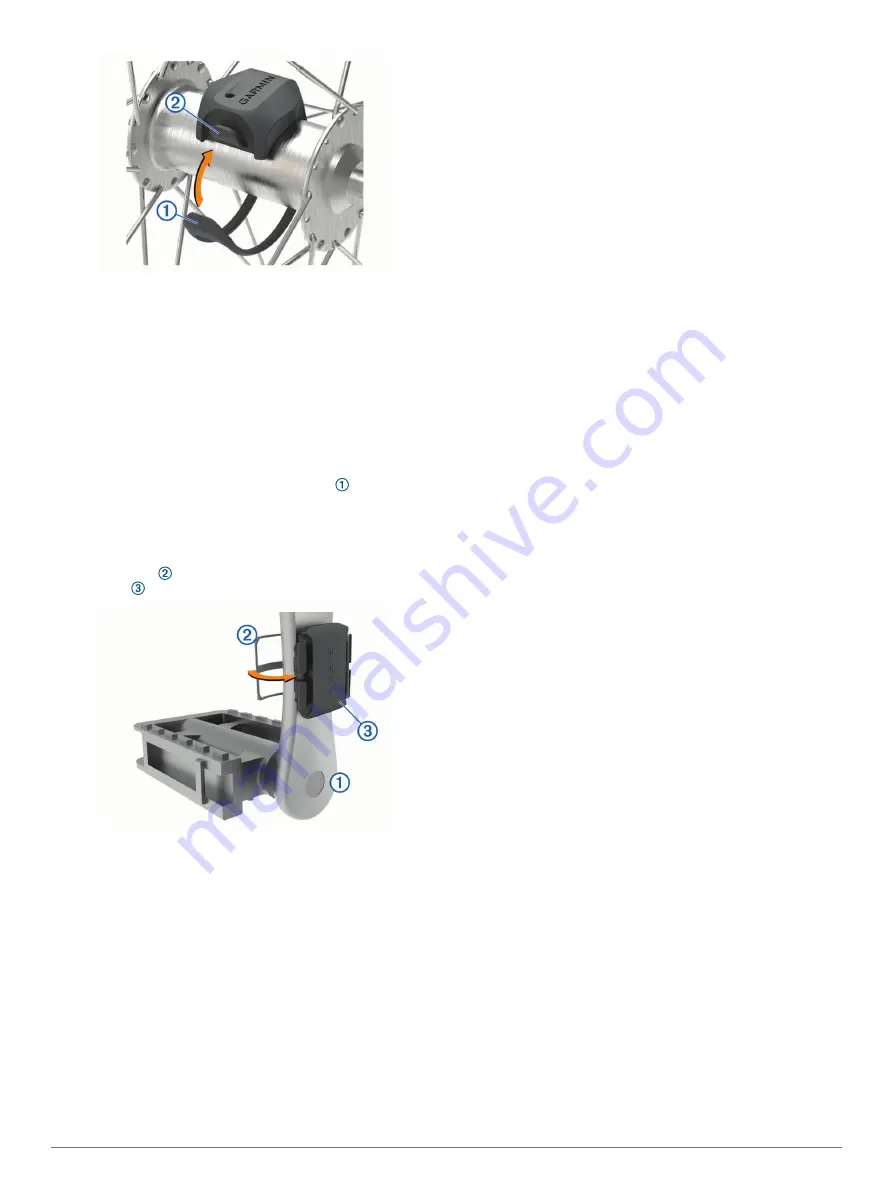
The sensor may be tilted when installed on an asymmetrical
hub. This does not affect operation.
3
Rotate the wheel to check for clearance.
The sensor should not contact other parts of your bike.
NOTE:
The LED flashes green for five seconds to indicate
activity after two revolutions.
Installing the Cadence Sensor
NOTE:
If you do not have this sensor, you can skip this task.
TIP:
Garmin recommends you secure your bike on a stand while
installing the sensor.
1
Select the band size that fits your crank arm securely.
The band you select should be the smallest one that
stretches across the crank arm.
2
On the non-drive side, place and hold the flat side of the
cadence sensor on the inside of the crank arm.
3
Pull the bands around the crank arm, and attach them to
the hooks on the sensor.
4
Rotate the crank arm to check for clearance.
The sensor and bands should not contact any part of your
bike or shoe.
NOTE:
The LED flashes green for five seconds to indicate
activity after two revolutions.
5
Take a 15 minute test ride and inspect the sensor and bands
to ensure there is no evidence of damage.
About the Speed and Cadence Sensors
Cadence data from the cadence sensor is always recorded. If no
speed and cadence sensors are paired with the device, GPS
data is used to calculate the speed and distance.
Cadence is your rate of pedaling or “spinning” measured by the
number of revolutions of the crank arm per minute (rpm).
Data Averaging for Cadence or Power
The non-zero data-averaging setting is available if you are
training with an optional cadence sensor or power meter. The
default setting excludes zero values that occur when you are not
pedaling.
You can change the value of this setting (
).
Pairing Your Wireless Sensors
Before you can pair, you must put on the heart rate monitor or
install the sensor.
Pairing is the connecting of ANT+ or Bluetooth wireless sensors,
for example, connecting a heart rate monitor with your Garmin
device.
1
Bring the device within 3 m (10 ft.) of the sensor.
NOTE:
Stay 10 m (33 ft.) away from other riders' sensors
while pairing.
2
Select
Menu
>
Settings
>
Sensors
>
Add Sensor
.
3
Select an option:
• Select a sensor type.
• Select
Search All
to search for all nearby sensors.
A list of available sensors appears.
4
Select one or more sensors to pair with your device.
5
Select
Add Sensor
.
When the sensor is paired with your device, the sensor status
is Connected. You can customize a data field to display
sensor data.
Training with Power Meters
• Go to
for a list of ANT+ sensors
that are compatible with your device (such as Vector
™
).
• For more information, see the owner's manual for your power
meter.
• Adjust your power zones to match your goals and abilities
(
).
• Use range alerts to be notified when you reach a specified
power zone (
).
• Customize the power data fields (
).
Setting Your Power Zones
The values for the zones are default values and may not match
your personal abilities. You can manually adjust your zones on
the device or using Garmin Connect. If you know your functional
threshold power (FTP) value, you can enter it and allow the
software to calculate your power zones automatically.
1
Select
Menu
>
My Stats
>
Training Zones
>
Power Zones
.
2
Enter your FTP value.
3
Select
Based On:
.
4
Select an option:
• Select
watts
to view and edit the zones in watts.
• Select
% FTP
to view and edit the zones as a percentage
of your functional threshold power.
Calibrating Your Power Meter
Before you can calibrate your power meter, you must install it,
pair it with your device, and begin actively recording data with it.
For calibration instructions specific to your power meter, see the
manufacturer's instructions.
1
Select
Menu
>
Settings
>
Sensors
.
2
Select your power meter.
3
Select
Calibrate
.
4
Keep your power meter active by pedaling until the message
appears.
5
Follow the on-screen instructions.
12
Wireless Sensors
Summary of Contents for EDGE 530
Page 1: ...EDGE 530 Owner sManual ...
Page 29: ......
Page 30: ...support garmin com March 2019 190 02513 00_0A ...


