background image

Getting Started

 WARNING

See the 

Important Safety and Product Information

 guide in the 

product box for product warnings and other important 

information.
• Update the maps and software on your device (

Map and 

Software Updates

, page 20

).

• Mount the device in your vehicle and connect it to power 

(

Mounting and Powering the Garmin DriveLuxe Device in 

Your Vehicle

, page 1

).

• Acquire GPS signals (

Acquiring GPS Signals

, page 1

).

• Adjust the volume (

Adjusting the Volume

, page 2

) and 

display brightness (

Adjusting the Screen Brightness

page 2

).

• Navigate to your destination (

Starting a Route

, page 3

).

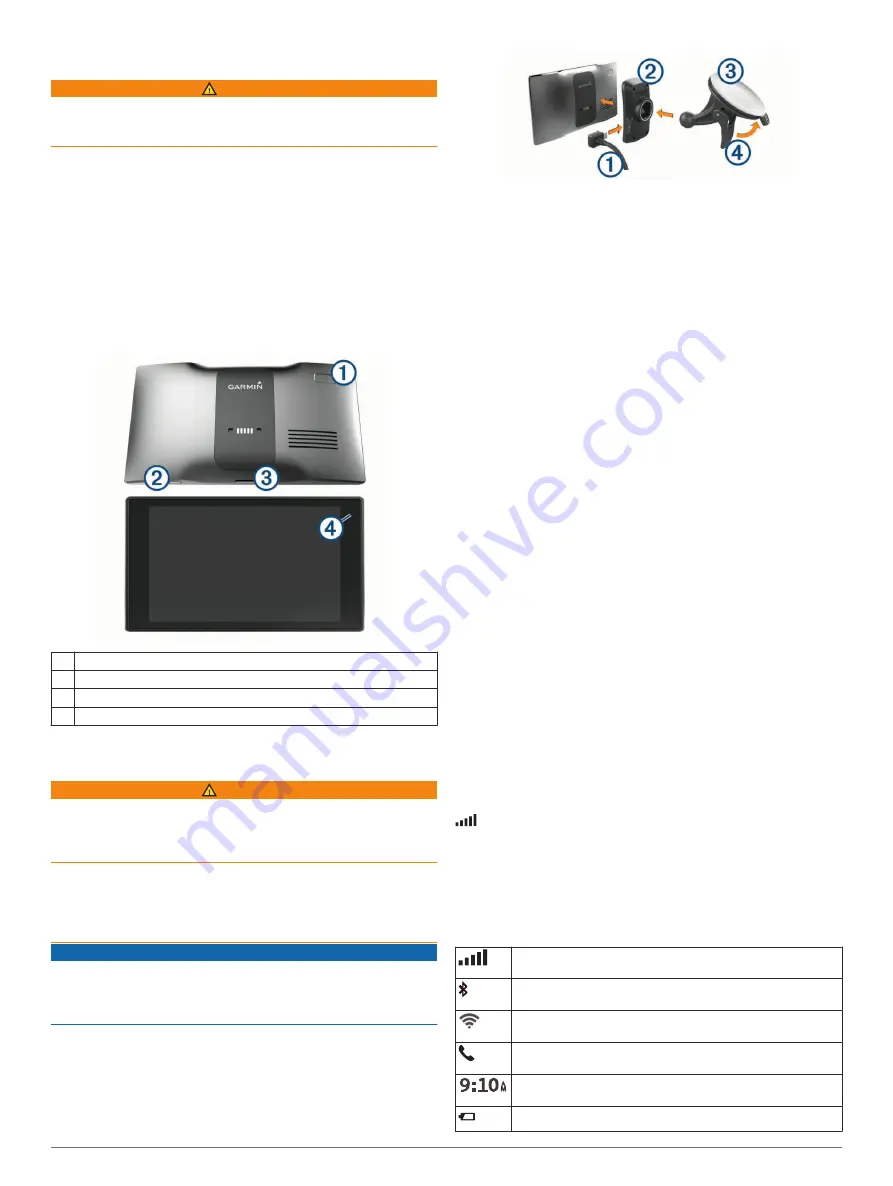
Garmin DriveLuxe 51 Device Overview

À

Power key

Á

USB power and data port

Â

Map and data memory card slot

Ã

Microphone for Voice Command or hands-free calling

Mounting and Powering the Garmin 

DriveLuxe Device in Your Vehicle

 WARNING

This product contains a lithium-ion battery. To prevent the 

possibility of personal injury or product damage caused by 

battery exposure to extreme heat, store the device out of direct 

sunlight.
Both the device and its mount contain magnets. Under certain 

circumstances, magnets may cause interference with some 

internal medical devices, including pacemakers and insulin 

pumps. Keep the device and its mount away from such medical 

devices.

NOTICE

Both the device and its mount contain magnets. Under certain 

circumstances, magnets may cause damage to some electronic 

devices, including hard drives in laptop computers. Use caution 

when the device or its mount is near electronic devices.
Before you use your device on battery power, you should charge 

it.

1

Plug the vehicle power cable 

À

 into the USB port on the 

mount.

2

Press the mount 

Á

 onto the suction cup 

Â

 until it snaps into 

place.
The Garmin

®

 logo on the mount should face right-side up.

3

Press the suction cup to the windshield, and flip the lever 

à

back toward the windshield.

4

Place the back of the device onto the magnetic mount.

5

Plug the other end of the vehicle power cable into a power 

outlet in your vehicle.

Turning the Device On or Off

• To turn the device on, press the power key, or connect the 

device to power.

• To put the device in power saving mode, press the power key 

while the device is on.
While in power saving mode, the screen is off and the device 

uses very little power, but it can wake instantly for use.

TIP: 

You can charge your device faster by putting it in power 

saving mode while charging the battery.

• To turn off the device completely, hold the power key until a 

prompt appears on the screen, and select 

Off

.

The prompt appears after five seconds. If you release the 

power key before the prompt appears, the device enters 

power saving mode.

Acquiring GPS Signals

When you turn on your navigation device, the GPS receiver 

must collect satellite data and establish the current location. The 

time required to acquire satellite signals varies based on several 

factors, including how far you are from the location where you 

last used your navigation device, whether you have a clear view 

of the sky, and how long it has been since you last used your 

navigation device. The first time you turn on your navigation 

device, it may take several minutes to acquire satellite signals.

1

Turn on the device.

2

Wait while the device locates satellites.

3

If necessary, go to an open area, away from tall buildings and 

trees.

 in the status bar indicates the satellite signal strength. When 

at least half the bars are filled, the device is ready for navigation.

Status Bar Icons

The status bar is located at the top of the main menu. The status 

bar icons display information about features on the device. You 

can select some icons to change settings or view additional 

information.

GPS signal status. Hold to view GPS accuracy and acquired 
satellite information (

Viewing GPS Signal Status

, page 23

).

Bluetooth

®

 technology status. Select to view the Bluetooth 

settings (

Wireless Network Settings

, page 19

).

Wi-fi signal strength. Select to change the wi-fi settings 
(

Wireless Network Settings

, page 19

).

Connected to hands-free calling. Select to place a phone call 
(

Hands-Free Calling

, page 13

).

Current time. Select to set the time (

Setting the Time

page 19

).

Battery charge level.

Getting Started

1

Summary of Contents for driveluxe 51

Page 1: ...GARMINDRIVELUXE 51 Owner sManual...

Page 2: ...without the express permission of Garmin Garmin DriveLuxe Garmin Express myTrends n Maps Guarantee and n Maps Lifetime are trademarks of Garmin Ltd or its subsidiaries These trademarks may not be used...

Page 3: ...ess 8 Finding an Intersection 8 Finding a City 8 Finding a Location Using Coordinates 8 Foursquare 8 Connecting to Your Foursquare Account 8 Searching Foursquare Points of Interest 9 Viewing Foursquar...

Page 4: ...ngs 18 Enabling Maps 18 Navigation Settings 18 Calculation Mode Settings 18 Setting a Simulated Location 19 Wireless Network Settings 19 Driver Assistance Settings 19 Backup Camera Settings 19 babyCam...

Page 5: ...cle Turning the Device On or Off To turn the device on press the power key or connect the device to power To put the device in power saving mode press the power key while the device is on While in pow...

Page 6: ...red border on the speed limit icon when you exceed the posted speed limit for the current road Wrong way on a one way street The device plays a message and displays a full screen warning if you travel...

Page 7: ...notification when it detects an incident 1 Select Settings Driver Assistance Incident Notification 2 Clear the Incident Detection SMS check box Navigating to Your Destination Routes A route is a path...

Page 8: ...Finding Your Destination Using Your Garmin Watch page 4 When you stop at your destination the device automatically ends the route If the device does not detect your arrival automatically you can selec...

Page 9: ...oute The device re calculates the route to include the added location and guides you to the destinations in order Shaping Your Route Before you can shape your route you must start a route Starting a R...

Page 10: ...void To always allow environmental zones select Allow 3 Select Save Custom Avoidances Custom avoidances allow you select specific areas or sections of road to avoid When the device calculates a route...

Page 11: ...st of recently found locations in the selected category Select a subcategory if necessary and select a destination Navigating to Points of Interest Within a Venue NOTE This feature may not be availabl...

Page 12: ...or coded to show the likelihood of finding parking Symbols indicate the type of parking available street or lot relative pricing information and payment type You can view the legend for these colors a...

Page 13: ...Information You can use the Where Am I page to view information about your current location This feature is helpful if you need to tell emergency personnel your location From the map select the vehicl...

Page 14: ...itions for your area photoLive Displays live traffic cameras from your photoLive subscription photoLive Traffic Cameras page 18 Report Camera Allows you to report a speed or red light camera This tool...

Page 15: ...rack Up to display the map in two dimensions 2 D with your direction of travel at the top Select North Up to display the map in 2 D with north at the top Select 3 D to display the map in three dimensi...

Page 16: ...our Smartphone to Your Device You can search for a location using the Smartphone Link app on your phone and send it to your Garmin DriveLuxe device 1 On your smartphone open the Smartphone Link app 2...

Page 17: ...time your phone and the device connect It may take a few minutes for the phone book to be available Some phones do not support this feature 1 Select Apps Phone Phone Book 2 Select a contact 3 Select C...

Page 18: ...smart notifications clear the Smartphone Link check box To disable specific app notifications use the settings in the Smartphone Link app Showing or Hiding Notifications for Your Smartphone with Andr...

Page 19: ...for all languages and regions and may not be available on all models NOTE Voice Activated Navigation may not achieve desired performance when in a noisy environment Voice command allows you to use yo...

Page 20: ...ou may have to swipe left or right to find the Watch Link option 7 Select your watch from the list and select Continue 8 When the setup is complete select OK When your phone connects to your Garmin Dr...

Page 21: ...anced Weather service using Smartphone Link 1 Select Apps Weather 2 If necessary select a city 3 Select Road Conditions Trip Planner You can use the trip planner to create and save a trip which you ca...

Page 22: ...Live 2 Select Touch to Add 3 Select a road 4 Select an intersection 5 Select Save Viewing Previous Routes and Destinations Before you can use this feature you must enable the travel history feature De...

Page 23: ...ust the position of the guidance lines babyCam Settings The babyCam settings allow you to manage paired Garmin babyCam cameras and camera settings This menu appears on your navigation device only when...

Page 24: ...n dealer or www garmin com The device may charge slowly when connected to a third party adapter Device Maintenance Garmin Support Center Go to support garmin com for help and information such as produ...

Page 25: ...Add a Device The Garmin Express software detects your device 8 Click Add Device 9 Follow the on screen instructions to register your device and add it to the Garmin Express software When setup is comp...

Page 26: ...ttery does not stay charged for very long Decrease the screen brightness Display Settings page 19 Shorten the display timeout Display Settings page 19 Decrease the volume Adjusting the Volume page 2 T...

Page 27: ...e prompts you to enter file transfer mode select Yes A picture of your device connected to a computer appears on the device screen Depending on your computer operating system the device appears as eit...

Page 28: ...bar 1 ID number 20 incident contact 3 incident notification 2 3 intersections finding 8 K keyboard language 19 layout 19 L language keyboard 19 voice 19 latitude and longitude 8 LiveTrack 16 17 locati...

Page 29: ...ver 15 searching for delays 11 15 traffic cameras viewing 18 travel history 20 trip information 10 resetting 11 viewing 11 trip log viewing 11 trip planner 17 18 editing a trip 17 shaping points 17 Tr...

Page 30: ...support garmin com April 2017 190 02121 00_0B...

Reviews: