background image

Getting Started

 WARNING

See the 

Important Safety and Product Information

 guide in the 

product box for product warnings and other important 

information.
• Update the maps and software on your device (

Updating 

Maps and Software with Garmin Express

, page 17

).

• Mount the device in your vehicle and connect it to power 

(

Mounting and Powering the Garmin Drive Device in Your 

Vehicle

, page 1

).

• Acquire GPS signals (

Acquiring GPS Signals

, page 1

).

• Adjust the volume (

Adjusting the Volume

, page 2

) and 

display brightness (

Adjusting the Screen Brightness

page 2

).

• Navigate to your destination (

Starting a Route

, page 3

).

Device Overviews

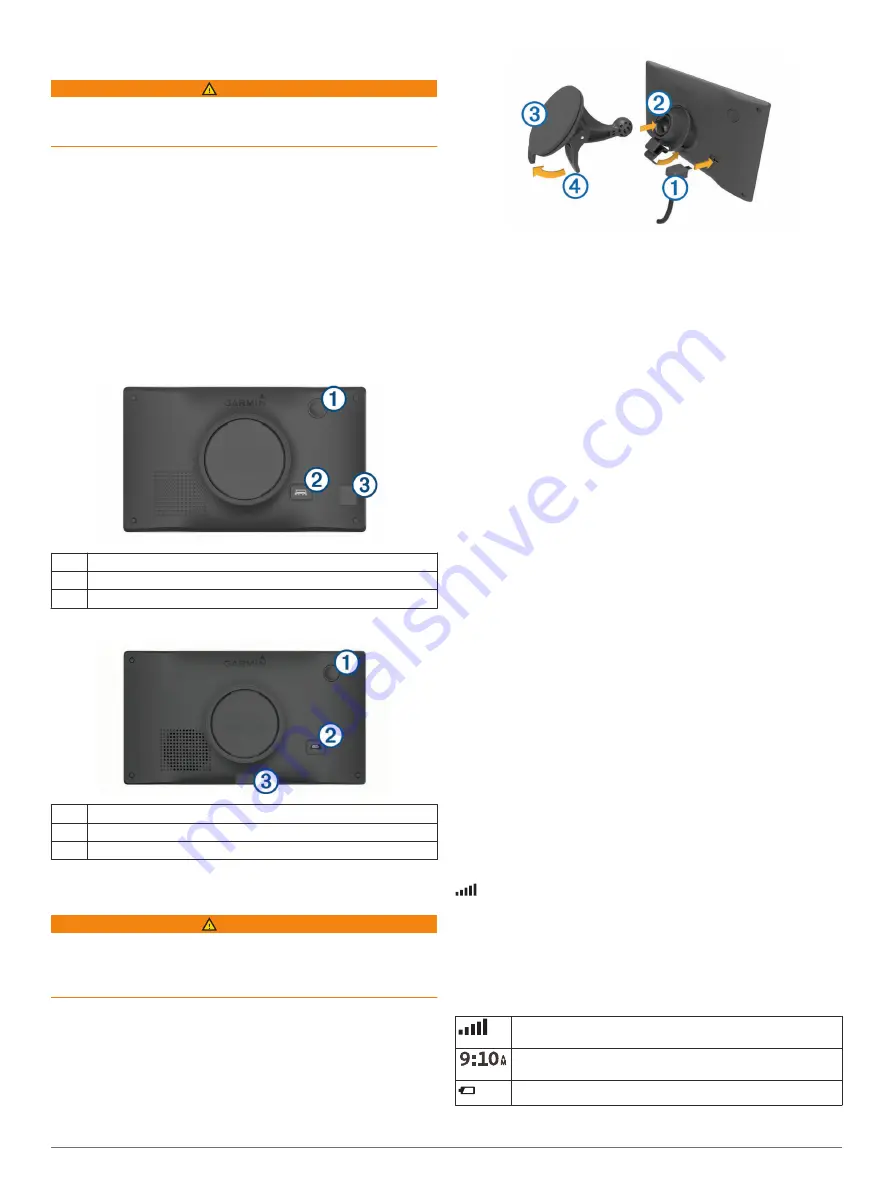
Garmin Drive 51 Device Overview

À

Power key

Á

USB power and data port

Â

Map and data memory card slot

Garmin Drive 61 Device Overview

À

Power key

Á

USB power and data port

Â

Map and data memory card slot

Mounting and Powering the Garmin Drive 

Device in Your Vehicle

 WARNING

This product contains a lithium-ion battery. To prevent the 

possibility of personal injury or product damage caused by 

battery exposure to extreme heat, store the device out of direct 

sunlight.
Before you use your device on battery power, you should charge 

it.

1

Plug the vehicle power cable 

À

 into the USB port on the 

device.

2

Press the mount 

Á

 onto the suction cup 

Â

 until it snaps into 

place.

3

Press the suction cup to the windshield, and flip the lever 

à

back toward the windshield.

4

Fit the tab on the top of the mount into the slot on the back of 

the device.

5

Press the bottom of the mount into the device until it clicks.

6

Plug the other end of the vehicle power cable into a power 

outlet in your vehicle.

Turning the Device On or Off

• To turn the device on, press the power key, or connect the 

device to power.

• To put the device in power saving mode, press the power key 

while the device is on.
While in power saving mode, the screen is off and the device 

uses very little power, but it can wake instantly for use.

TIP: 

You can charge your device faster by putting it in power 

saving mode while charging the battery.

• To turn off the device completely, hold the power key until a 

prompt appears on the screen, and select 

Off

.

The prompt appears after five seconds. If you release the 

power key before the prompt appears, the device enters 

power saving mode.

Acquiring GPS Signals

When you turn on your navigation device, the GPS receiver 

must collect satellite data and establish the current location. The 

time required to acquire satellite signals varies based on several 

factors, including how far you are from the location where you 

last used your navigation device, whether you have a clear view 

of the sky, and how long it has been since you last used your 

navigation device. The first time you turn on your navigation 

device, it may take several minutes to acquire satellite signals.

1

Turn on the device.

2

Wait while the device locates satellites.

3

If necessary, go to an open area, away from tall buildings and 

trees.

 in the status bar indicates the satellite signal strength. When 

at least half the bars are filled, the device is ready for navigation.

Status Bar Icons

The status bar is located at the top of the main menu. The status 

bar icons display information about features on the device. You 

can select some icons to change settings or view additional 

information.

GPS signal status. Hold to view GPS accuracy and acquired 
satellite information (

Viewing GPS Signal Status

, page 19

).

Current time. Select to set the time (

Setting the Time

page 16

).

Battery charge level.

Getting Started

1

Summary of Contents for DRIVE 51

Page 1: ...GARMINDRIVE 51 61 Owner sManual...

Page 2: ...d without the express permission of Garmin Garmin Drive Garmin Express myTrends n Maps Guarantee and n Maps Lifetime are trademarks of Garmin Ltd or its subsidiaries These trademarks may not be used w...

Page 3: ...oursquare Points of Interest 8 Viewing Foursquare Location Details 8 Checking in with Foursquare 8 TripAdvisor 8 Finding TripAdvisor Points of Interest 8 Viewing Recently Found Locations 8 Clearing th...

Page 4: ...Maintenance 17 Support and Updates 17 Updating Maps and Software with Garmin Express 17 Device Care 17 Cleaning the Outer Casing 17 Cleaning the Touchscreen 17 Avoiding Theft 17 Resetting the Device 1...

Page 5: ...ce on press the power key or connect the device to power To put the device in power saving mode press the power key while the device is on While in power saving mode the screen is off and the device u...

Page 6: ...oad crossing Animal crossing The device plays a tone and displays the distance to an upcoming animal crossing area Curve The device plays a tone and displays the distance to a curve in the road Slower...

Page 7: ...hanging the Map Data Field page 10 Viewing Turns and Directions While navigating a route you can view upcoming turns lane changes or other directions for your route 1 From the map select an option To...

Page 8: ...t unplug the vehicle power cable to save your parking spot On your Garmin Drive device select Apps Last Spot Go On your watch start the Watch Link app select Find My Car and walk toward your parking s...

Page 9: ...device may still include a toll area in your route if no other reasonable routes are available 1 Select Settings Navigation 2 Select an option NOTE The menu changes based on your area and the map data...

Page 10: ...e movie theaters To search for a business name enter all or part of the name To search for an address near you enter the house number and street name To search for an address in another city enter the...

Page 11: ...lect Where To Categories Parking 2 Select Filter Parking and select one or more categories to filter parking by availability type price or payment methods optional NOTE Detailed parking data is not av...

Page 12: ...a point of interest 3 Select Check In TripAdvisor Your device includes TripAdvisor points of interest and ratings TripAdvisor ratings appear automatically in the search results list for applicable po...

Page 13: ...ch you are traveling Up Ahead page 9 Turns Displays a list of upcoming turns in your route Viewing Turns and Directions page 3 Trip Data Displays customizable trip data such as speed or mileage Viewin...

Page 14: ...n the Map The traffic map shows color coded traffic flow and delays on nearby roads 1 From the main menu select Apps Traffic 2 If necessary select Legend to view the legend for the traffic map Searchi...

Page 15: ...as an in app purchase The subscription is tied to the app store account for your smartphone 1 On your smartphone open the Smartphone Link app 2 Select My Account A list of available services and subs...

Page 16: ...traffic receiver unit ID 4 Go to www garmin com fmtraffic to purchase a subscription and get a 25 character code The traffic subscription code cannot be reused You must obtain a new code each time yo...

Page 17: ...13 You can start sharing your LiveTrack data using your Garmin Drive device or the Smartphone Link app On your Garmin Drive device select Apps LiveTrack Start LiveTrack On your smartphone open the Sma...

Page 18: ...o add the attraction to your trip Changing Routing Options for a Trip You can customize how the device calculates the route when you start your trip 1 Select Apps Trip Planner Saved Trips 2 Select a s...

Page 19: ...to drive but can be longer in distance Shorter Distance Calculates routes that are shorter in distance but can take more time to drive Off Road Calculates a direct line from your location to your des...

Page 20: ...to the selected language NOTE Changing the text language does not change the language of user entered data or map data such as street names Keyboard Language Enables keyboard languages Proximity Alert...

Page 21: ...n Express software downloads and installs the updates onto your device Map updates are very large and this process may take a long time on slower Internet connections Device Care NOTICE Avoid dropping...

Page 22: ...ompatible Smartphone Link features are available only for product models ending in LMT S If your phone was previously connected select Apps Smartphone Link The Bluetooth option must be enabled Enable...

Page 23: ...puter 1 Connect the device to your computer Connecting the Device to Your Computer page 19 Depending on your computer operating system the device appears as either a portable device a removable drive...

Page 24: ...eme 15 tools 9 updating 17 viewing routes 3 memory card 1 19 installing 18 microSD card 1 18 mount removing 17 mounting the device automobile 1 removing from mount 17 suction cup 1 18 myTrends routes...

Page 25: ...U unit ID 16 up ahead 9 customizing 10 updating maps 17 software 17 USB disconnecting 19 V vehicle power cable 1 venues 6 volume adjusting 2 W Watch Link 4 12 13 weather 13 radar 13 road conditions 1...

Page 26: ...55 69 33 99 39 02 36 699699 52 001 855 792 7671 0800 427 652 0800 0233937 47 815 69 555 00800 4412 454 44 2380 662 915 35 1214 447 460 386 4 27 92 500 0861 GARMIN 427 646 27 0 11 251 9800 34 93 275 44...

Reviews: