Garmin DEZLCAM 785 Owner'S Manual Download Page 7

TIP: 

You can charge your device faster by putting it in power 

saving mode while charging the battery.

• To turn off the device completely, hold the power key until a 

prompt appears on the screen, and select 

Power Off

.

Acquiring GPS Signals

When you turn on your navigation device, the GPS receiver 

must collect satellite data and establish the current location. The 

time required to acquire satellite signals varies based on several 

factors, including how far you are from the location where you 

last used your navigation device, whether you have a clear view 

of the sky, and how long it has been since you last used your 

navigation device. The first time you turn on your navigation 

device, it may take several minutes to acquire satellite signals.

1

Turn on the device.

2

Verify   appears in the status bar, and enable location 

services if it does not (

Enabling or Disabling Location 

Services

, page 26

).

3

If necessary, go to an open area with a clear view of the sky, 

away from tall buildings and trees.
Acquiring Satellites appears at the top of the navigation map 

until the device determines your location.

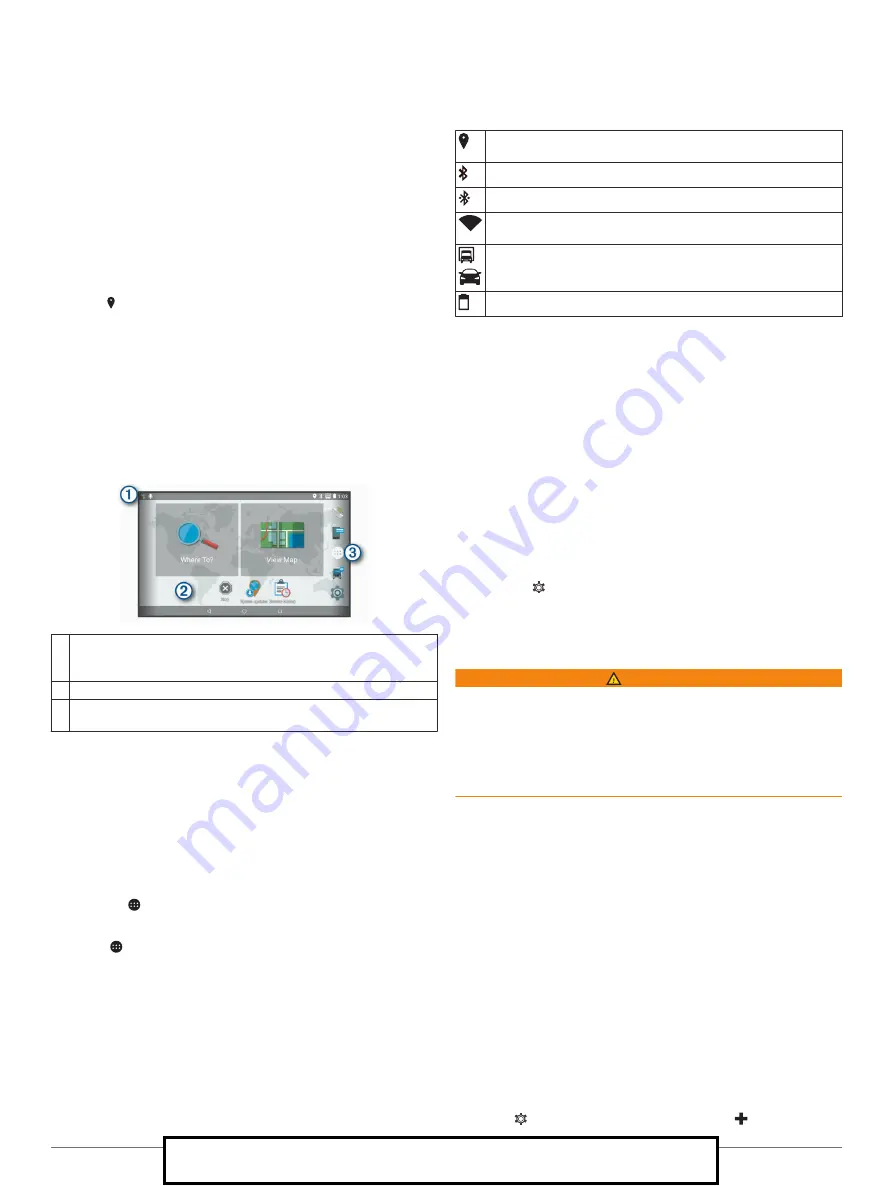
Home Screen

NOTE: 

The home screen layout may vary if it has been 

customized.

À

Swipe down to view notifications.
Swipe down twice to quickly change settings and backlight 
brightness.

Á

Hold to customize the wallpaper or add widgets to the home screen.

Â

Select to open the app drawer. The app drawer contains shortcuts 
to all the apps installed on your device.

Opening an App

The home screen contains shortcuts for frequently used apps. 

The app drawer contains all the apps installed on your device, 

organized into two tabs. The Navigation tab contains Garmin 

apps useful for navigation, dispatching, and hours of service 

recording. The Productivity tab contains apps useful for 

communication, document viewing, and other tasks.

Select an option to start an app:
• Select an app shortcut from the home screen.
• Select  , select a tab, and select an app.

Adding Shortcuts to the Home Screen

1

Select  .

2

Swipe up or down to view additional applications.

3

Hold an application, and drag it to a location on the home 

screen.

Viewing Notifications

1

Swipe down from the top of the screen.
The list of notifications appears.

2

Select an option:
• To launch the action or app mentioned in the notification, 

select the notification.

• To dismiss a notification, swipe the notification to the right.

Status Bar Icons

The status bar is located at the top of the main menu. The status 

bar icons display information about features on the device.

Location services is enabled (

Enabling or Disabling Location 

Services

, page 26

).

Bluetooth

®

 technology is enabled.

Connected to a Bluetooth device.

Connected to a Wi

Fi

®

 network (

Connecting to a Wireless 

Network

, page 26

).

Active vehicle profile. Swipe down twice and select to view the 
vehicle profile settings (

Vehicle Profiles

, page 2

).

Battery charge level.

Using the Touchscreen

• Tap the screen to select an item.
• Drag or swipe your finger across the screen to pan or scroll.
• Pinch two fingers together to zoom out.
• Spread two fingers apart to zoom in.

Adjusting the Screen Brightness

The device uses an ambient light sensor to adjust the screen 

brightness to your vehicle conditions automatically. You can also 

adjust the brightness manually, using either the notification 

panel or the settings menu.

1

Select an option:
• Swipe down twice from the top of the screen to expand 

the quick settings in the notification panel.

• Select   > 

Display

 > 

Brightness Level

.

2

Use the slider bar to adjust the brightness.

Vehicle Profiles

 WARNING

Entering your vehicle profile characteristics does not guarantee 

that your vehicle's characteristics will be accounted for in all 

route suggestions or that you will receive the warning icons in all 

cases. Limitations may exist in the map data such that your 

device cannot account for these restrictions or road conditions in 

all cases. Always defer to all posted road signs and road 

conditions when making driving decisions.

Routing and navigation are calculated differently based on your 

vehicle profile. The activated vehicle profile is indicated by an 

icon in the status bar. The navigation and map settings on your 

device can be customized separately for each vehicle type.
When you activate a truck vehicle profile, the device avoids 

including restricted or impassable areas in routes based on the 

dimensions, weight, and other characteristics you entered for 

your vehicle.

Car Profile

The car profile is a preloaded vehicle profile intended for use in 

an automobile. While using the car profile, the device calculates 

standard automobile routes, and truck routing is not available. 

Some truck-specific features and settings are not available while 

using the car profile.

Adding a Vehicle Profile

You can add a vehicle profile that includes the weight, 

dimensions, and other characteristics for your vehicle.

1

Select   > 

Navigation

 > 

Vehicle Profile

 >  .

2

Vehicle Profiles

For Sales Information Please Contact RoadTrucker Inc (www.RoadTrucker.com) 

8312 Sidbury Rd.; Wilmington, NC 28411 - (800) 507-0482 / (910) 686-4281

Summary of Contents for DEZLCAM 785

Page 1: ...D ZLCAM 785 Owner sManual For Sales Information Please Contact RoadTrucker Inc www RoadTrucker com 8312 Sidbury Rd Wilmington NC 28411 800 507 0482 910 686 4281...

Page 2: ...r its subsidiaries These trademarks may not be used without the express permission of Garmin Android is a trademark of Google Inc Apple and Mac are trademarks of Apple Inc registered in the U S and ot...

Page 3: ...Finding TruckDown Points of Interest 9 Finding a Location Using the Search Bar 9 Finding an Address 9 Finding a Location by Category 9 Searching Within a Category 9 Location Search Results 10 Locatio...

Page 4: ...Garmin eLog Map Tool Overview 20 Driving in a Team 20 Changing Duty Status 21 Viewing Hours of Service 21 Recording Adverse Conditions 21 Reviewing Logs 21 Certifying Daily Logs 21 Submitting a Daily...

Page 5: ...t charge in my vehicle 29 My battery does not stay charged for very long 29 My video recordings are blurry 29 My memory card has degraded and needs to be replaced 29 My video recordings are choppy or...

Page 6: ...insulin pumps Keep the device and its mount away from such medical devices NOTICE Both the device and its mount contain magnets Under certain circumstances magnets may cause damage to some electronic...

Page 7: ...top of the main menu The status bar icons display information about features on the device Location services is enabled Enabling or Disabling Location Services page 26 Bluetooth technology is enabled...

Page 8: ...Tilt the device to align the camera The crosshairs should point straight ahead and the horizon line should be centered between the top and bottom of the screen TIP If the suction cup appears in the da...

Page 9: ...pen it 2 Locate the memory card slot 3 Press the existing memory card in until it clicks and release it The existing memory card ejects from the slot 4 Remove the existing card from the slot 5 Insert...

Page 10: ...ility to observe all road and driving conditions abide by all traffic regulations and use safe driving judgment at all times The FCWS relies on the camera to provide a warning of upcoming vehicles and...

Page 11: ...ere are specific roads you need to use or avoid you can customize the route Shaping Your Route page 7 You can add multiple destinations to a route Adding a Location to Your Route page 7 Starting a Rou...

Page 12: ...he device prompts you select Yes to search for nearby parking If the device does not prompt you select Where To Categories Parking and select My Destination 2 Select Filter Parking and select one or m...

Page 13: ...l roads toll bridges or congestion areas The device may still include a toll area in your route if no other reasonable routes are available 1 Select Navigation Route Preferences 2 Select an option NOT...

Page 14: ...rest such as truck stops rest areas and weigh stations Select Where To Categories Trucking Finding TruckDown Points of Interest The TruckDown directory lists businesses for the trucking industry such...

Page 15: ...on your device using POI Loader software 1 Go to www garmin com poiloader 2 Follow the on screen instructions Finding Custom POIs Before you can find custom POIs you must load custom POIs on your devi...

Page 16: ...e you must connect to a supported phone running Smartphone Link and log in to your Foursquare account 1 Select Foursquare Check In 2 Select a point of interest 3 Select Check In TripAdvisor Your devic...

Page 17: ...ls and displays forward collision and lane departure alerts Also allows you to access the dash cam viewfinder and the driver assistance settings Change Route Allows you to take a detour or skip locati...

Page 18: ...Warnings Height Weight Axle Weight Length Width No Trucks Allowed No Trailers Allowed No Hazardous Materials Allowed No Flammables Allowed No Water Pollutants Allowed No Left Turn No Right Turn No U T...

Page 19: ...cts in real time Dispatch and Track page 17 Smart Notifications Displays phone notifications and messages on your device This feature is not available for all languages or message types Hands Free cal...

Page 20: ...view notifications from your smartphone on your d zlCam device such as text messages incoming calls and calendar appointments Receiving Smart Notifications WARNING Do not read or reply to notification...

Page 21: ...uracy or timeliness of the traffic information Your device can provide information about traffic on the road ahead or on your route You can set your device to avoid traffic when calculating routes and...

Page 22: ...Resetting the Break Timer The break timer pauses automatically when the vehicle stops for three minutes or longer You can pause the timer manually for brief stops such as parking or stopping at a truc...

Page 23: ...calculates a route to the destination and starts a new Dispatch and Track session IFTA NOTE This feature is not available in all areas Before you can use this feature a truck vehicle profile must be a...

Page 24: ...Garmin eLog app in order to be in compliance with FMCSA ELD regulations For more information about installing the Garmin eLog adapter in your vehicle see the Garmin eLog Owner s Manual at garmin com m...

Page 25: ...and Malfunctions page 22 NOTE The diagnostic and malfunction indicator also appears in the status bar or near the top of every screen on your d zlCam device Select to record adverse conditions create...

Page 26: ...responsible for reviewing and claiming logs if applicable 1 Select Hours of Service 2 Select a log 3 Select an option If the log applies to you and your hours of service select Accept If the log does...

Page 27: ...ew all affected driver logs for missing or incorrect data Engine Synchronization Data Diagnostic Event The adapter failed to synchronize with the vehicle engine computer to record required engine data...

Page 28: ...covered without clearing all app data which causes all recorded Garmin eLog data to be deleted You must use the administrator account to perform some Garmin eLog app functions including adding driver...

Page 29: ...rded for the Voice Control phrase The voice control menu appears 2 Follow the on screen instructions Voice Control Tips Speak in a normal voice directed at the device Reduce background noise such as v...

Page 30: ...oute as a trip which you can navigate again later optional Viewing Previous Routes and Destinations Before you can use this feature you must enable the travel history feature Device Settings page 27 Y...

Page 31: ...location and speed information in the recorded video Record After Power Loss Continues recording video up to a selected time period after external power is lost Enabling Bluetooth Wireless Technology...

Page 32: ...2 4 GHz Charging the Device NOTE This Class III product shall be powered by an LPS power supply You can charge the battery in the device using any of these methods Install the device in the mount and...

Page 33: ...s and make sure they are put back in the proper position The vehicle power cable does not work unless it is assembled correctly If your device does not charge in your vehicle you may need to replace t...

Page 34: ...a reputable vendor My video recordings are choppy or incomplete For the best camera and video results use a high quality memory card with a speed rating of class 10 or higher A slower memory card may...

Page 35: ...NOTE The device is not compatible with Windows 95 98 Me Windows NT and Mac OS 10 3 and earlier About Memory Cards You can purchase memory cards from an electronics supplier or purchase pre loaded Garm...

Page 36: ...ward collision warning system FCWS 4 5 Foursquare 11 fuel stations 11 fuel data 18 fuse changing 28 G Garmin Connect 14 Garmin Live Services 15 subscribing to 15 geocaching 11 going home 6 GPS 2 simul...

Page 37: ...27 timer 17 tolls avoiding 8 tools maps 12 touchscreen 2 traffic 13 16 26 alternate route 8 cameras 16 17 incidents 14 16 map 14 16 searching for delays 14 16 traffic cameras viewing 16 17 travel hist...

Reviews: