Garmin DĒZL OTR810 Owner'S Manual Download Page 30

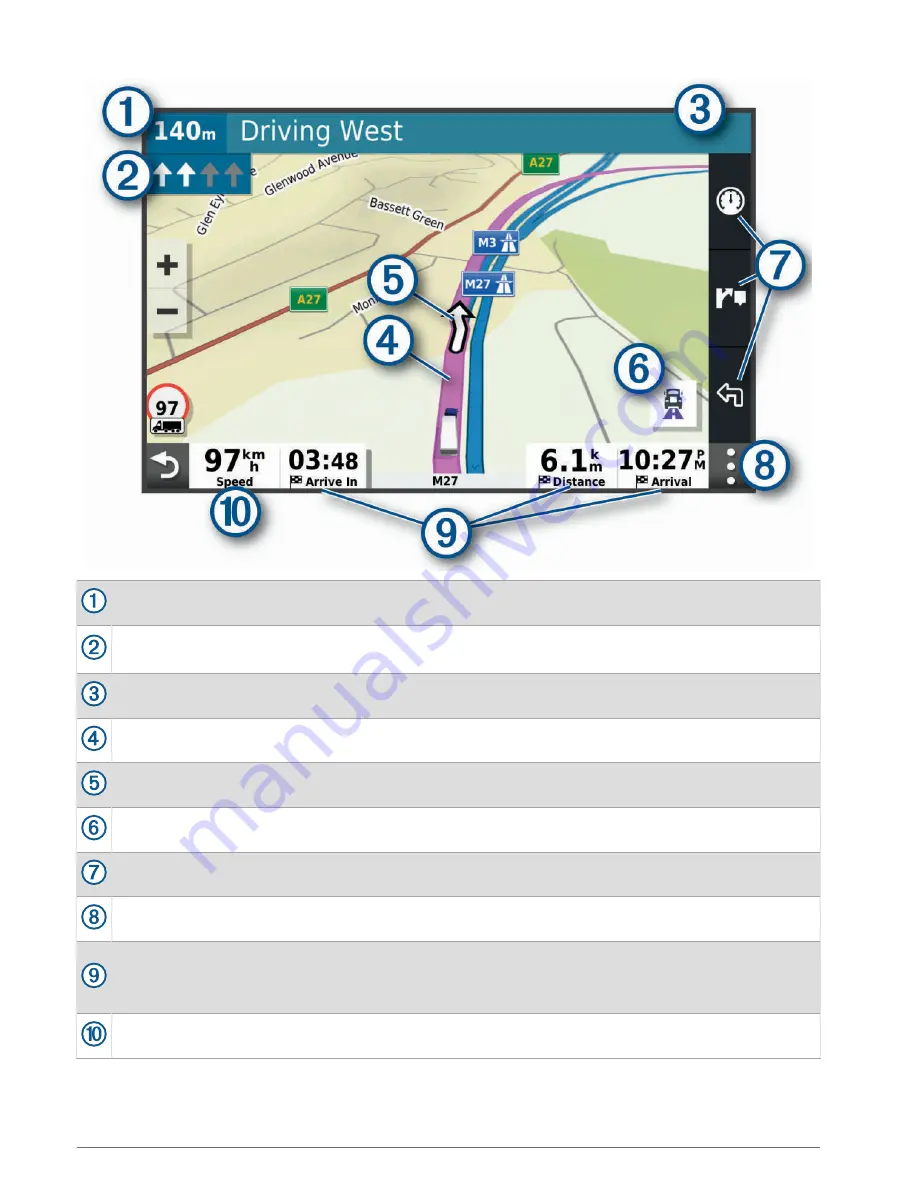
Distance to the next action.

Next action in the route. Indicates the next turn, exit, or other action and the lane in which you should 
travel, if available.

Name of the street or exit associated with the next action.

Route highlighted on the map.

Next action in the route. Arrows on the map indicate the location of upcoming actions.

Select to toggle popular lorry routes on the map.

Map tool shortcuts.

Map tools. You can select the tools to show you more information about your route and surroundings.

Data fields.
TIP: you can touch these fields to change the information they show (

Changing the map data field

page 34

).

Vehicle speed.

24

Navigating to your destination

Summary of Contents for DĒZL OTR810

Page 1: ...D ZL OTR810 OTR1010 LGV810 LGV1010 Owner smanual...

Page 2: ...se trademarks may not be used without the express permission of Garmin Android is a trademark of Google LLC Apple and Mac are trademarks of Apple Inc registered in the U S and other countries The Blue...

Page 3: ...Loader 18 Finding custom POIs 18 Parking 19 Finding lorry parking 19 Finding Lorry Parking in Europe 19 Finding Parking Near Your Current Location 19 Search tools 19 Finding a junction 19 Finding a lo...

Page 4: ...35 Smart Notifications 36 Receiving notifications 36 Hands free calling 36 Placing a call 36 Receiving a call 36 Using in call options 37 Saving a Phone Number as a Preset 37 Wireless Headsets 37 Enab...

Page 5: ...or Functions 53 Adding Driver Profiles 53 Editing a Driver Profile 53 Clearing Garmin eLog App Data 54 Voice Command 54 Tips for Speaking to the Device 54 Launching Garmin Voice Activated Navigation 5...

Page 6: ...nt does not hold my device in place while I drive 68 My device is not acquiring satellite signals 68 The device does not charge in my vehicle 68 My battery does not stay charged for very long 69 My de...

Page 7: ...a Wi Fi Network page 65 Mount the device in your vehicle and connect it to power Mounting and Powering the Device in Your Vehicle page 3 Adjust the volume Adjusting Sound and Notification Volume page...

Page 8: ...crophone for hands free calling and voice command Volume control Power key USB power and data port Map and data memory card slot Magnetic mount interface with 14 pin connector Speaker 2 Getting starte...

Page 9: ...ets may cause interference with some internal medical devices and electronic devices including pacemakers insulin pumps or hard drives in laptop computers Keep the device away from medical devices and...

Page 10: ...n the thumbscrew on the suction cup arm and the nut on the ball mount and adjust the mount for better viewing and operation 4 Tighten the thumbscrew on the suction cup arm and the nut on the ball moun...

Page 11: ...5 Place the device onto the magnetic mount 6 Plug the other end of the vehicle power cable into a power outlet in your vehicle Getting started 5...

Page 12: ...ting ventilation and air conditioning and other items when drilling pilot holes and attaching the mount to the vehicle Garmin is not responsible for any damages or consequences arising from the instal...

Page 13: ...5 Insert the ball mount arm into the mount 6 Insert the thumbscrew into the mount and tighten it to secure the ball mount arm Getting started 7...

Page 14: ...l mount that is compatible with third party mounting solutions 1 Remove the four screws securing the mount socket to the magnetic mount 2 Remove the mount socket 3 Secure the one inch ball mount to th...

Page 15: ...lect satellite data and establish the current location The time required to acquire satellite signals varies based on several factors including how far you are from the location where you last used yo...

Page 16: ...to open the app drawer The app drawer contains shortcuts to all the apps installed on your device Hold to customise the wallpaper or add widgets to the home screen Opening an App The home screen cont...

Page 17: ...n services is enabled Enabling or Disabling Location Services page 63 Bluetooth technology is enabled Connected to a Bluetooth device Connected to a Wi Fi network Connecting to a Wireless Network page...

Page 18: ...e 10 2 Select an option To add a straight lorry with a permanently attached cargo area select Straight Lorry To add a tractor or a tractor trailer combination select Articulated Lorry To add a bus sel...

Page 19: ...er configuration select a trailer configuration from the list To enter a new trailer configuration select New Configuration and enter the trailer information Editing a vehicle profile You can edit a v...

Page 20: ...tone to indicate a bend in the road Slower traffic the device plays a tone to indicate slower traffic when you approach slower traffic at a higher speed Your device must be receiving traffic informat...

Page 21: ...ice select Search Finding a location using the search bar page 16 To find an address select Address Finding an address page 16 To browse or search pre loaded points of interest by category select Cate...

Page 22: ...r a business name enter all or part of the name To search for an address near you enter the house number and street name To search for an address in another town enter the house number street name tow...

Page 23: ...he selected category Select a subcategory if necessary and select a destination Location Search Results The location search results appear in a list with the nearest location at the top Each numbered...

Page 24: ...near this area first Custom points of interest Custom POIs are customised points on the map They can contain alerts that let you know if you are near a designated point or if you are travelling faste...

Page 25: ...arch for a junction between two streets motorways or other roads 1 Select Where To Junctions 2 Follow the on screen instructions to enter street information 3 Select the junction Finding a location us...

Page 26: ...police stations and fuel stations 1 From the map select the vehicle 2 Select Hospitals Police Station Motorway Services or Petrol Stations NOTE some service categories are not available in all areas...

Page 27: ...essary select a category 3 Select a location 4 Select 5 Select Edit 6 Select an option Select Name Select Phone Number Select Categories to assign categories to the saved location Select Change Map Sy...

Page 28: ...Select Where To and search for a location Finding and saving locations page 15 2 Select a location 3 Select an option To start navigating using the recommended route select Go To choose an alternative...

Page 29: ...r your home location Your route on the map As you travel the device guides you to your destination using voice prompts and information on the map Instructions for your next turn or exit or other actio...

Page 30: ...d on the map Next action in the route Arrows on the map indicate the location of upcoming actions Select to toggle popular lorry routes on the map Map tool shortcuts Map tools You can select the tools...

Page 31: ...an view next turns lane changes or other directions for your route 1 From the map select an option To view next turns and directions as you navigate select Turns The map tool displays the next several...

Page 32: ...t announces you are approaching your destination When you approach some destinations the device automatically suggests parking areas You can select More to view a full list of suggested parking areas...

Page 33: ...tops you can use the trip planner to plan schedule and save a trip Planning a Route page 55 1 From the map select Where To 2 Search for a location Finding and saving locations page 15 3 Select a locat...

Page 34: ...may appear in the navigation bar on the map along with the estimated time of travel and traffic information Select the navigation bar to view a suggested route to the location Avoiding Delays Tolls a...

Page 35: ...p 6 Select Done Disabling a custom avoidance You can disable a custom avoidance without deleting it 1 Select Settings Navigation Custom Avoidances 2 Select a created avoidance 3 Select Disable Deletin...

Page 36: ...age 37 Weather displays weather conditions for your area photoLive displays live traffic cameras from your photoLive subscription photoLive traffic cameras page 38 Garmin eLog displays hours of servic...

Page 37: ...ng towns along the highway For each town the map tool shows the distance to the highway exit and the services available similar to the information on highway road signs Viewing Upcoming Towns and Exit...

Page 38: ...o Trailers Allowed Material Restrictions No Flammables or Explosives Allowed No Water Pollutants Allowed No Left Turn No Right Turn No U Turn Road condition warnings Risk of grounding Lateral wind Nar...

Page 39: ...peedometer Select All Select Reset Overall Data to reset Trip A and total data Select Reset Max Speed to reset the maximum speed Select Reset Trip Bto reset the odometer Viewing upcoming traffic NOTIC...

Page 40: ...tphone features WARNING Do not read or interact with notifications while driving because doing so can cause distraction that could lead to an accident resulting in serious personal injury or death The...

Page 41: ...etooth features you want to use are enabled Enabling or Disabling Bluetooth Features page 37 Pairing Additional Bluetooth Devices 1 Place your headset or phone and your Bluetooth device within 33 ft 1...

Page 42: ...select View Play The device reads the notification using text to speech technology This feature is not available for all languages To perform additional actions such as dismissing the notification fro...

Page 43: ...atures You can enable or disable Bluetooth features such as phone calls media audio and live services for your paired smartphone 1 Select Settings Wireless Networks Bluetooth 2 Select your phone name...

Page 44: ...a All product models can receive subscription free traffic data using the d zl app Receiving traffic data using your smartphone page 38 Traffic data is not available in all areas For information about...

Page 45: ...tegrated with a Garmin eLog compliant Electronic Logging Device ELD this device enables a motor carrier to comply with hours of service logging and break requirements For more information or to purcha...

Page 46: ...l areas 1 While using the break planner feature select Daily Hours Driven 2 Select the daily driving limit for your area 3 Select Save IFTA NOTE this feature is not available in all areas Before you c...

Page 47: ...eports folder on the device Editing and exporting trip reports 1 From the main menu select d zl IFTA Trip Reports 2 If necessary select a lorry 3 If necessary select a quarter 4 Select a report 5 Sele...

Page 48: ...s When you delete a service category all service records in the category are also deleted 1 Select Tools Service History 2 Select Delete Categories 3 Select the service categories to delete 4 Select D...

Page 49: ...rmin eLog adapter go to garmin com elog Setting Up Your Garmin eLog Adapter NOTE If you need to transfer Garmin eLog data from another device to your d zl device you must import the data during the se...

Page 50: ...may have different operation requirements Follow your motor carrier s recommendations for daily operation Verify the d zl is securely mounted in the vehicle and its screen is visible from a normal sea...

Page 51: ...Select to record adverse conditions create a Records of Duty Status RODS report or log out Select to view a chart of your hours of service information Select to view a summary of currently available...

Page 52: ...ou close the map tool you can open it manually by selecting Garmin eLog from the map As you drive the device displays your duty status and hours of service information in the Garmin eLog map tool Diag...

Page 53: ...than or equal to five miles per hour The vehicle is stopped when the diagnostic port reports a speed of zero miles per hour NOTE The vehicle must be stopped to change duty status You cannot manually c...

Page 54: ...nditions If you require a time extension because of adverse conditions you can add a two hour extension to your hours for the day From the Garmin eLog app select Record Adverse Conditions Yes Reviewin...

Page 55: ...urrent 24 hour period and any of the previous seven consecutive days You can view this information on the Garmin eLog app at any time From the Garmin eLog app select Inspection Transferring Data to an...

Page 56: ...nable Pairing Mode 6 Follow the on screen instructions in the app to pair the Garmin eLog adapter with the inspector s mobile device The inspection report transfers automatically after the pairing pro...

Page 57: ...e adapter is firmly plugged into the vehicle diagnostic port 3 Review all affected driver logs for missing or incorrect data Missing Required Data Elements Data Diagnostic Event The Garmin eLog system...

Page 58: ...data Positioning Compliance Malfunction The Garmin eLog system failed to acquire valid location positions required for driver logs At least 60 minutes of inaccurate data may have been recorded across...

Page 59: ...m the Garmin eLog app select Add Driver 2 Enter the administrator password 3 Enter the driver and motor carrier information 4 If the driver has an exempt status select Exempt Driver 5 If the driver is...

Page 60: ...f available commands Tips for Speaking to the Device Speak in a clear voice directed at the device Start each request with OK Garmin Reduce background noise such as voices or the radio to help the dev...

Page 61: ...e and save a route which you can navigate later This can be useful for planning a delivery route a vacation or a road trip You can edit a saved route to further customise it including reordering locat...

Page 62: ...m your current location to the selected location and then it guides you to the remaining route destinations in order Editing and saving your active route If a route is active you can use the route pla...

Page 63: ...u can open the media player at any time by selecting Tools Music from the main menu Information about the currently playing media such as title artist album station or channel Progress through the cur...

Page 64: ...Garmin PowerSwitch device Displays the device name Displays Garmin PowerSwitch device tabs and custom layout tabs Activating a Power Switch Before you can use the Garmin PowerSwitch app to activate a...

Page 65: ...ntrol input select a control input 4 Select 5 Select Done Assigning a Switch to a Control Input Before you can use control input functions you must connect a control input to your Garmin PowerSwitch d...

Page 66: ...als 10 If applicable use the slider to set the brightness of lights 11 Select 12 If necessary select Add Action to add additional actions to the button You can add one action for every switch on the G...

Page 67: ...for the routine select When and select a trigger To change an action select on the action you want to change and update the action To add an action to the routine select Add Action and enter informati...

Page 68: ...f necessary enter the encryption key The device connects to the wireless network The device remembers the network information and connects automatically when you return to this location in the future...

Page 69: ...enable or disable sounds for other device interactions such as screen touches screen locking or charging Adjusting Sound and Notification Volume 1 Select Settings Device Sound Notification 2 Use the s...

Page 70: ...ncluded vehicle power cable AC power using an optional accessory for home and office use only Battery type Rechargeable lithium ion Charging the Device NOTE this Class III product shall be powered by...

Page 71: ...fication when an update is available 3 Select an option When an update notification appears swipe down from the top of the screen and select An update is available To manually check for updates select...

Page 72: ...r using a USB cable The small end of the cable connects to the USB port on your d zl device and the large end connects to an available USB port on your computer 4 When your d zl device prompts you to...

Page 73: ...equirements To install on a Windows computer select Download for Windows To install on a Mac computer select Download for Mac 3 Open the downloaded file and follow the on screen instructions to comple...

Page 74: ...o the suction cup If the device shifts position while you are driving you should complete these actions Remove the powered mount from the suction cup arm and wipe the ball and socket with a cloth Dust...

Page 75: ...r phone is compatible Go to www garmin com bluetooth for more information Complete the pairing process again To repeat the pairing process you must unpair your phone and device Deleting a paired phone...

Page 76: ...holes and attaching the mount to the vehicle Garmin is not responsible for any damages or consequences arising from the installation 1 Place the mount on the selected location 2 Using the mount as a t...

Page 77: ...Opening the Front Cover You must open the front cover to make electrical connections 1 Lift the front cover latch and rotate it anticlockwise 2 Pull the front cover off of the device Appendix 71...

Page 78: ...to 30 A for each channel and a maximum of 100 A for the entire system Use 10 AWG 6 mm2 wires for accessories that use 20 to 30 A Use 12 AWG 4 mm2 wires for accessories that use 10 to 20 A Use 14 AWG...

Page 79: ...ly each time you start your vehicle The control terminals detect a signal from 3 3 V to 18 V You can configure output functions with the Garmin PowerSwitch app Connect the control wire from the contro...

Page 80: ...are turned on and within range Garmin PowerSwitch Specifications Dimensions D x W x H 75 x 125 x 32 mm 2 95 x 4 92 x 1 26 in Operating temperature range From 25 to 85 C from 13 to 185 F Wireless frequ...

Page 81: ...rmin Navigation Device Before you can connect to a camera you must enable the Wi Fi setting on your Garmin navigation device The BC 50 wireless backup camera is compatible with some Garmin navigation...

Page 82: ...turn on your navigation device and you can manually show the camera at any time If your navigation device is connected to an ignition switched power outlet recommended turn on your vehicle If your na...

Page 83: ...fore you connect a dash camera to the powered mount you should mount the dash camera device to your windscreen You can use the d zl device mount to power a compatible Garmin dash camera This can be us...

Page 84: ...e card 1 Select Settings Device Storage USB 2 Select your memory card 3 Select Settings Format ERASE FORMAT 4 Select Done Connecting the Device to Your Computer You can connect the device to your comp...

Page 85: ......

Page 86: ...support garmin com GUID 162C838D 5D61 40B4 A682 BFB8E574A22A v2 June 2022...

Reviews: