background image

Training Status

These measurements are estimates that can help you track and understand your training activities. The 
measurements require a few activities using wrist-based heart rate or a compatible chest heart rate monitor. 
Cycling performance measurements require a heart rate monitor and a power meter.
These estimates are provided and supported by Firstbeat. For more information, go to 

garmin.com

/performance-data/running

.

NOTE: The estimates may seem inaccurate at first. The device requires you to complete a few activities to 
learn about your performance.
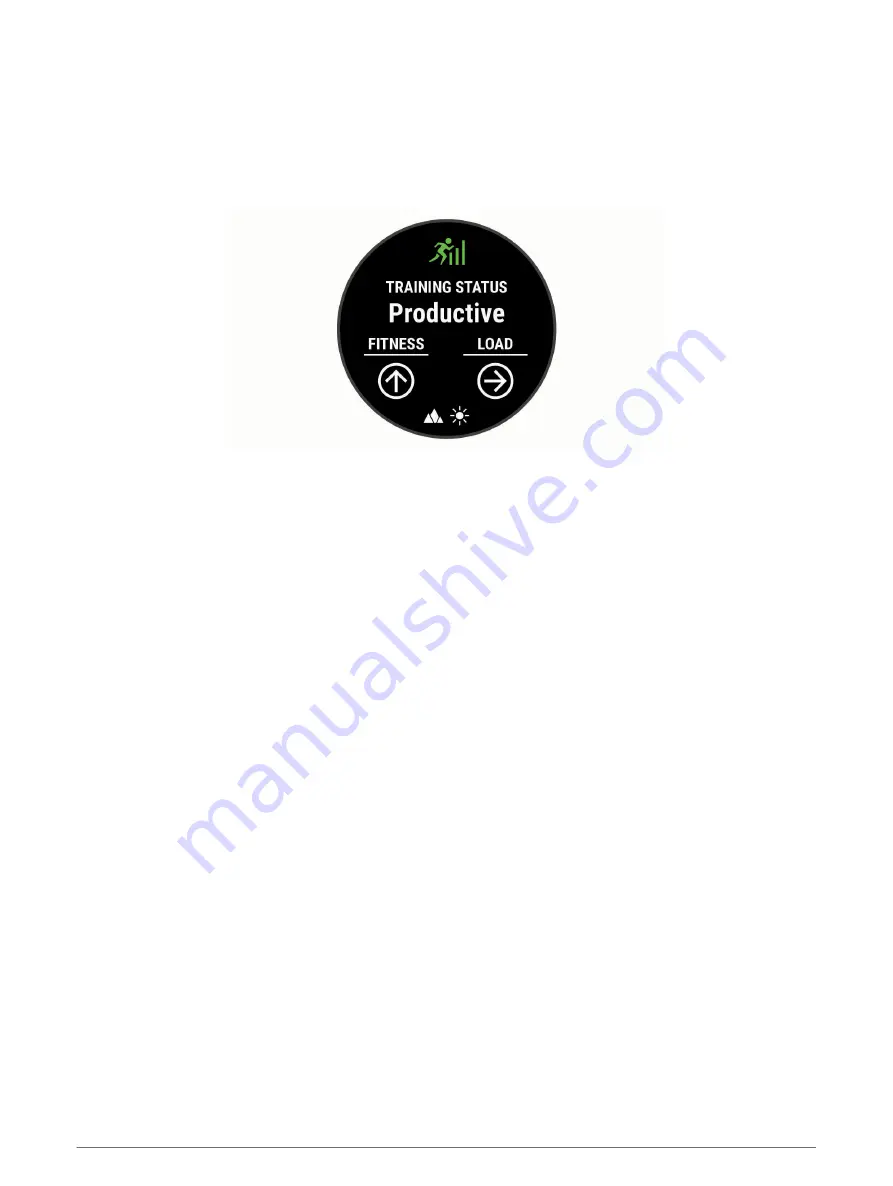
Training status: Training status shows you how your training affects your fitness and performance. Your 

training status is based on changes to your training load and VO2 max. over an extended time period.

VO2 max.: VO2 max. is the maximum volume of oxygen (in milliliters) you can consume per minute per 

kilogram of body weight at your maximum performance. Your device displays heat and altitude corrected 
VO2 max. values when you are acclimating to high heat environments or high altitude.

Training load: Training load is the sum of your excess post-exercise oxygen consumption (EPOC) over the last 

7 days. EPOC is an estimate of how much energy it takes for your body to recover after exercise.

Training load focus: Your device analyzes and distributes your training load into different categories based on 

the intensity and structure of each activity recorded. Training load focus includes the total load accumulated 
per category, and the focus of the training. Your device displays your load distribution over the last 4 weeks.

Recovery time: The recovery time displays how much time remains before you are fully recovered and ready for 

the next hard workout.

Heart Rate Features

73

Summary of Contents for DESCENT MK2I

Page 1: ...DESCENT MK2I Owner sManual ...

Page 2: ...be used without the express permission of Garmin Android is a trademark of Google LLC Apple iPhone iTunes and Mac are trademarks of Apple Inc registered in the U S and other countries The BLUETOOTH word mark and logos are owned by the Bluetooth SIG Inc and any use of such marks by Garmin is under license The Cooper Institute as well as any related trademarks are the property of The Cooper Institut...

Page 3: ...ge Data Screens 21 Apnea and Apnea Hunt Data Screens 22 Starting a Dive 23 Navigating with the Dive Compass 23 Using the Dive Stopwatch 24 Viewing the Transmitter Data Screens 25 Switching Gases During a Dive 25 Switching Between CC and OC Diving for a Bailout Procedure 26 Performing a Safety Stop 26 Performing a Decompression Stop 27 Diving with the Map 27 Viewing the Surface Interval Widget 28 V...

Page 4: ...dometer 47 Viewing PlaysLike Distance 47 Viewing the Direction to the Pin 48 Climbing Sports 48 Recording an Indoor Climbing Activity 48 Recording a Bouldering Activity 49 Starting an Expedition 49 Changing the Track Point Recording Interval 49 Recording a Track Point Manually 50 Viewing Track Points 50 Connected Features 50 Enabling Bluetooth Notifications 51 Viewing Notifications 51 Receiving an...

Page 5: ...itor 63 Running Dynamics 64 Training with Running Dynamics 64 Color Gauges and Running Dynamics Data 65 Ground Contact Time Balance Data 65 Vertical Oscillation and Vertical Ratio Data 66 Tips for Missing Running Dynamics Data 66 Performance Measurements 67 Turning Off Performance Notifications 67 Detecting Performance Measurements Automatically 67 Syncing Activities and Performance Measurements 6...

Page 6: ...ily Suggested Workout Prompts On and Off 84 Following a Pool Swim Workout 84 Recording a Critical Swim Speed Test 85 Editing Your Critical Swim Speed Result 85 About the Training Calendar 85 Using Garmin Connect Training Plans 85 Adaptive Training Plans 85 Interval Workouts 86 Creating an Interval Workout 86 Starting an Interval Workout 86 Stopping an Interval Workout 87 PacePro Training 87 Downlo...

Page 7: ... Customizing Your Device 105 Activities and App Settings 105 Customizing the Data Screens 107 Adding a Map to an Activity 107 Alerts 108 Setting an Alert 109 Activity Map Settings 109 Routing Settings 110 Auto Lap 110 Marking Laps by Distance 110 Enabling Auto Pause 111 Enabling Auto Climb 111 3D Speed and Distance 111 Turning On and Off the Lap Key 111 Using Auto Scroll 112 Changing the GPS Setti...

Page 8: ...ice Maintenance 129 Device Care 129 Cleaning the Device 129 Changing the QuickFit Bands 130 Extra Long Diving Band 130 Metal Watch Band Adjustment 130 Descent T1 Device Care 130 Cleaning the Transmitter 130 User Replaceable Batteries 131 Replacing the Descent T1 Battery 131 Troubleshooting 131 My device is in the wrong language 131 Is my smartphone compatible with my device 131 My phone will not c...

Page 9: ... don t match 136 The floors climbed amount does not seem accurate 137 Getting More Information 137 Appendix 138 Data Fields 138 VO2 Max Standard Ratings 145 FTP Ratings 146 Wheel Size and Circumference 147 Symbol Definitions 148 Index 149 Table of Contents vii ...

Page 10: ......

Page 11: ...rst time you should complete these tasks to set it up and get to know the basic features 1 Press LIGHT to turn on the watch Buttons page 2 2 Follow the on screen instructions to complete the initial setup During the initial setup you can pair your smartphone with your watch to receive notifications sync your activities and more Pairing Your Smartphone page 5 3 Charge the device Charging the Device...

Page 12: ...ata screens during a dive Hold to view the music controls from any screen NOTE While diving hold functions are disabled START STOP Press to view the activity list and start or stop an activity Press to choose an option in a menu Press to view the menu during a dive BACK LAP Press to return to the previous screen Press to exit a menu during a dive Press to record a lap rest or transition during a m...

Page 13: ...trols Menu The controls menu contains options such as turning on do not disturb mode locking the keys and turning the device off You can also open the Garmin Pay wallet NOTE You can add reorder and remove the options in the controls menu Customizing the Controls Menu page 117 1 From any screen hold LIGHT 2 Press UP or DOWN to scroll through the options Enabling Airplane Mode You can enable airplan...

Page 14: ...he watch face If you are recording an activity press BACK to return to the activity data pages Customizing the Watch From the watch face hold MENU to change the watch face From the widget screens hold MENU to customize the widget options From the controls menu hold MENU to add remove and reorder the controls From any screen hold MENU to change additional settings Default Watch Face Alternate time ...

Page 15: ...on your watch During the initial setup select Yes when you are prompted to pair with your smartphone If you previously skipped the pairing process hold MENU and select Pair Phone 3 Select an option to add your watch to your account If this is the first time you are pairing a device with the Garmin Dive app follow the on screen instructions If you already paired another device with the Garmin Dive ...

Page 16: ...app This provides easy access to these services for Garmin devices Software updates Map updates Course updates Data uploads to Garmin Dive Product registration Setting Up Garmin Express 1 Connect the device to your computer using a USB cable 2 Go to www garmin com express 3 Follow the on screen instructions 6 Introduction ...

Page 17: ...dive immediately and safely return to the surface Disregarding the alarm may result in serious injury or death This device should not be shared between multiple users for diving purposes Diver profiles are user specific and using another diver s profile can result in misleading information that could lead to injury or death For safety reasons you should never dive alone Dive with a designated budd...

Page 18: ... CCR diving allows you to configure two partial pressure of oxygen PO2 setpoints closed circuit CC diluent gases and open circuit OC decompression and backup gases Gauge This mode allows you to dive with basic bottom timer features NOTE After diving in gauge mode the device can only be used in gauge or apnea mode for 24 hours Apnea This mode allows you to free dive with apnea specific dive data Th...

Page 19: ...e Delay Allows you to set the length of time before the device ends and saves a dive after surfacing CCR Setpoints Allows you to set high and low PO2 setpoints for closed circuit rebreather CCR dives Setting CCR Setpoints page 11 Backlight Allows you to adjust the backlight settings for dive activities You can enable the backlight throughout the dive or only when you are at depth Heart Rate Allows...

Page 20: ...n and helium percentage and select Mode to set the intended use for the gas such as decompression or backup NOTE For the multi gas dive mode you can select Set as Travel Gas to set a decompression gas as your intended gas for descending Setting PO2 Thresholds You can configure the partial pressure of oxygen PO2 thresholds in bars for decompression warning and critical alerts 1 Hold MENU 2 Select D...

Page 21: ...If you manually change setpoints within 1 8 m 6 ft of an automatic switch depth then automatic setpoint switching is disabled until you are more than 1 8 m 6 ft above or below the automatic switch depth This prevents unintended setpoint switching 6 Select PO2 and enter a value 7 If necessary select Depth and enter a depth value for the automatic setpoint change Air Integration The Descent Mk2i div...

Page 22: ...earing your dive computer For example if you wear your dive computer on your left wrist you should install the transmitter on the left side of the tank regulator For the best reception you should wear the tank high on your back This allows the transmitter to have a clear line of sight over your shoulders If you wear your tank inverted with the regulator at the bottom you can use a high pressure ho...

Page 23: ...stall the transmitter you need a 5 8 in 16 mm open ended wrench The transmitter connects to a high pressure output port of the first stage regulator 1 Confirm the regulator is depressurized and detached from a scuba cylinder 2 Remove the port plug from the high pressure output port of the first stage regulator 3 Confirm the flow restrictor is installed in the transmitter 4 Screw the transmitter on...

Page 24: ... line of sight to the dive computer To install the transmitter you need two 5 8 in 16 mm open ended wrenches and a small flat screwdriver or flat nose pliers The transmitter can connect to a high pressure hose extension from the high pressure output port of the first stage regulator 1 Use a screwdriver or pliers to carefully remove the flow restrictor from the transmitter NOTICE Use care when remo...

Page 25: ...ent damage to the transmitter and possible loss of function do not overtighten Do not use the transmitter housing to tighten or loosen the transmitter Do not grip the regulator or the transmitter to move carry or adjust the tank 8 Ensure the connection between the transmitter and hose fitting is secure before using the device You must remove the air spool and reinstall the flow restrictor before i...

Page 26: ...er hold MENU and select Dive Setup Air Integration Transmitters Add New The dive computer starts searching and displays a list of nearby transmitters 4 From the list of transmitters select the transmitter ID you want to pair The transmitter ID is printed on the housing When the pairing process is complete Connected appears on the dive computer screen The transmitter begins sending tank pressure da...

Page 27: ... volume RMV and air time remaining ATR estimates Including Transmitters in Gas Consumption Calculations page 17 Set Transmit Power Allows you to adjust the power setting if your transmitter is losing connection with the paired dive computer underwater About Displays the transmitter ID software version and battery status Name Allows you to enter an easily identifiable name for the transmitter Remov...

Page 28: ...e to scroll through the data screens In the activity settings you can reorder the default data screens add a dive stopwatch and add custom data screens Customizing the Data Screens page 107 You can customize the data fields on some of the data screens 18 Diving ...

Page 29: ...1 m 26 and 33 ft per min Red Too high Ascent is greater than 10 1 m 33 ft per min Dive compass Allows you to view the compass and set a directional heading to aid with underwater navigation Navigating with the Dive Compass page 23 Customizable data screen Displays additional dive data and physiological information including the time of day battery level and your heart rate You can edit the gauges ...

Page 30: ...Good Ascent is less than 7 9 m 26 ft per min Yellow Moderately high Ascent is between 7 9 and 10 1 m 26 and 33 ft per min Red Too high Ascent is greater than 10 1 m 33 ft per min Dive compass Allows you to view the compass and set a directional heading to aid with underwater navigation Navigating with the Dive Compass page 23 Customizable data screen Displays additional dive data and physiological...

Page 31: ...bottom time stopwatch current maximum and average depth and rate of ascent or decent Using the Dive Stopwatch page 24 Dive compass Allows you to view the compass and set a directional heading to aid with underwater navigation Navigating with the Dive Compass page 23 Customizable data screen Displays additional dive data and physiological information including the time of day battery level and your...

Page 32: ...temperature for your last apnea dive Time of day screen Displays the time of day and your heart rate data Map Displays your current location on the map Diving with the Map page 27 In dive screen Displays the information about the current dive including the elapsed time current and maximum depth heart rate data and rate ascent or descent 22 Diving ...

Page 33: ...nd dive compass TIP You can also double tap the device to scroll through the screens Press START to view the in dive menu When you ascend to 1 m 3 3 ft the End Dive Delay timer begins counting down Dive Setup page 9 When the timer elapses the device automatically ends and saves the dive You should keep your wrist out of the water while the device saves your dive exit location Navigating with the D...

Page 34: ... Start a Gauge dive 2 Scroll to the stopwatch screen 3 Press START and select Reset Avg Depth to set the average depth to your current depth 4 Press START and select Start Stopwatch 5 Select an option To stop using the stopwatch press START and select Stop Stopwatch To restart the stopwatch press START and select Reset Stopwatch 24 Diving ...

Page 35: ... Selecting Paired Transmitters to View on Your Dive Data Screens page 16 2 From the transmitter data screen press START to view additional paired transmitters in the network Switching Gases During a Dive 1 Start a single gas multi gas or closed circuit rebreather CCR dive 2 Select an option Press START select Gas and select a backup or decompression gas NOTE If necessary you can select Add New and...

Page 36: ...ing a Safety Stop You should perform a safety stop during every dive to help reduce the risk of decompression sickness 1 After a dive of at least 11 m 35 ft ascend to 5 m 15 ft Safety stop information appears on the data screens Your depth relative to the surface As you ascend your position moves upward toward the safety stop depth The safety stop ceiling depth The safety stop timer When you are w...

Page 37: ...n stop timer reaches zero NOTE If you ascend more than 0 6 m 2 ft above the decompression stop ceiling depth the decompression stop timer pauses and the device alerts you to descend below the ceiling depth The depth and ceiling depth flash red until you are within the safe margin 3 Continue ascending to the surface Diving with the Map You can view your dive entry and exit locations on the map duri...

Page 38: ... Press START and select an option To view additional information about the activity select All Stats To view additional information about one of multiple apnea dives in the activity select Dives and select a dive To view the activity on a map select Map NOTE The device shows your entry and exit locations if you waited for GPS signals before and after the dive To save a dive entry or exit location ...

Page 39: ...llow the on screen instructions Creating a Decompression Plan You can create open circuit decompression plans and save them for future dives 1 Press START 2 Select Plan Dive Deco Plans Add New 3 Enter a name for the decompression plan 4 Select an option To enter the maximum partial pressure of oxygen in bars select PO2 NOTE The device uses the PO2 value for gas switching To enter your level of con...

Page 40: ...ch Face page 118 Altitude Diving At higher altitudes the atmospheric pressure is lower and your body contains a larger amount of nitrogen than it would at the start of a dive at sea level The device accounts for altitude changes automatically using the barometric pressure sensor The absolute pressure value used by the decompression model is not affected by the altitude or the gauge pressure displa...

Page 41: ...n the dive pre check screen for your next dive Battery is low Less than 20 battery power remains The alert appears when the device is below 20 battery power and on the dive pre check screen for your next dive CNS toxicity at 1 End your dive now Your CNS oxygen toxicity is too high During a dive 1 is replaced with your current CNS percentage The alert appears every two minutes up to three times CNS...

Page 42: ...completed the safety stop None This pool dive will not be saved to the dive log The device is in pool dive mode The device will not save the current dive to the dive log Transmitter Alerts Alert Message Cause Device Action None Your paired dive computer has lost communication with the transmitter for 30 seconds The tank pressure value flashes yellow 1 is below reserve pressure Your tank pressure i...

Page 43: ...require decompression time while ascending to the surface Oxygen toxicity units OTU A measure of pulmonary oxygen toxicity caused by exposure to increased partial pressure of oxygen PO2 while diving One OTU is equivalent to breathing 100 oxygen at 1 ATM for 1 minute Partial pressure of oxygen PO2 The pressure of the oxygen in the breathing gas based on depth and oxygen percentage Pressure based su...

Page 44: ...s of battery life gained with the selected power mode Playing Audio Prompts During an Activity You can enable your Descent Mk2i device to play motivational status announcements during a run or other activity Audio prompts play on your connected headphones using Bluetooth technology if available Otherwise audio prompts play on your smartphone paired through the Garmin Connect app During an audio pr...

Page 45: ...er time select Resume Later To mark a lap select Lap To navigate back to the starting point of your activity along the path you traveled select Back to Start TracBack NOTE This feature is available only for activities that use GPS To navigate back to the starting point of your activity by the most direct path select Back to Start Route NOTE This feature is available only for activities that use GP...

Page 46: ... are not available unless you have an optional sensor that sends speed and distance data to the device such as a speed or cadence sensor Going for a Virtual Run You can pair your Descent Mk2i device with a compatible third party app to transmit pace heart rate or cadence data 1 From the watch face press START 2 Select Virtual Run 3 On your tablet laptop or smartphone open the Zwift app or another ...

Page 47: ...tivity is complete 12 After your last set press START to stop the set timer 13 Select Save Using an ANT Indoor Trainer Before you can use a compatible ANT indoor trainer you must mount your bike on the trainer and pair it with your device Pairing Your Wireless Sensors page 125 You can use your device with an indoor trainer to simulate resistance while following a course ride or workout While using...

Page 48: ...1 From the watch face press START 2 Select Tides 3 Select an option To use your current location when you are near a tide station select Search Current Location To select a location on the map select Search Use Map To enter the name of a city select Search City Search To select a saved location select Search Saved Locations To enter coordinates for a location select Search Coordinates A 24 hour ti...

Page 49: ...tivity settings Recording an Ultra Run Activity 1 From the watch face press START 2 Select Ultra Run 3 Press START to start the activity timer 4 Start running 5 Press LAP to record a lap and start the rest timer NOTE You can configure the Lap Key setting to record a lap and start the rest timer start the rest timer only or record a lap only Activities and App Settings page 105 6 When you are done ...

Page 50: ...wer values are generally lower than cycling power values This is normal and occurs because humans are less efficient at skiing than they are at cycling It is common for ski power values to be 30 to 40 percent lower than cycling power values at the same training intensity Jumpmaster WARNING The jumpmaster feature is for use by experienced skydivers only The jumpmaster feature should not be used as ...

Page 51: ...h One trip down the pool Interval One or more consecutive lengths A new interval starts after a rest Stroke A stroke is counted every time your arm wearing the device completes a full cycle Swolf Your swolf score is the sum of the time for one pool length and the number of strokes for that length For example 30 seconds plus 15 strokes equals a swolf score of 45 For open water swimming swolf is cal...

Page 52: ...tivity options Activities and App Settings page 105 TIP For best results using the auto rest feature minimize your arm motions while resting If you do not want to use the auto rest feature you can select LAP to manually mark the beginning and end of each rest interval Training with the Drill Log The drill log feature is available only for pool swimming You can use the drill log feature to manually...

Page 53: ... After you complete your round press START and select End Round Hole Information The device shows the current hole you are playing and automatically transitions when you move to a new hole NOTE Because pin locations change the device calculates the distance to the front middle and back of the green but not the actual pin location Current hole number Distance to the back of the green Distance to th...

Page 54: ... Button Targeting From the hole information screen you can use the button targeting feature to measure the distance to a point on the map 1 Press UP or DOWN to measure the distance to the target 2 If necessary select or to zoom in or out Changing Holes You can change holes manually from the hole view screen 1 While playing golf press START 2 Select Change Hole 3 Select a hole Changing the Green If...

Page 55: ...l recorded shot distances Viewing Layup and Dogleg Distances You can view a list of layup and dogleg distances for par 4 and 5 holes Custom targets also appear in this list 1 From the hole information screen press START 2 Select Layups Each layup and the distance until you reach each layup appear on the screen NOTE Distances are removed from the list as you pass them Saving Custom Targets While pl...

Page 56: ...a scoring method About Stableford Scoring When you select the Stableford scoring method Setting the Scoring Method page 46 points are awarded based on the number of strokes taken relative to par At the end of a round the highest score wins The device awards points as specified by the United States Golf Association The scorecard for a Stableford scored game shows points instead of strokes Points St...

Page 57: ... enter the number of penalty strokes TruSwing Your device is compatible with the TruSwing sensor You can use the TruSwing app on your watch to view swing metrics recorded from your TruSwing sensor See the owner s manual for your TruSwing sensor for more information www garmin com manuals truswing Using the Golf Odometer You can use the odometer to record the time distance and steps traveled The od...

Page 58: ... next time you start an indoor climbing activity the device uses this grading system You can hold MENU select the activity settings and select Grading System to change the system 5 Select the difficulty level for the route 6 Press START 7 Start your first route NOTE When the route timer is running the device automatically locks the buttons to prevent accidental button presses You can hold any butt...

Page 59: ...ivity is complete 11 After your last route press STOP to stop the route timer 12 Select Save Starting an Expedition You can use the Expedition app to prolong the battery life while recording a multi day activity 1 From the watch face press START 2 Select Expedition 3 Press START to start the activity timer The device enters low power mode and collects GPS track points once an hour To maximize batt...

Page 60: ...etwork Phone notifications Displays phone notifications and messages on your Descent device LiveTrack Allows friends and family to follow your races and training activities in real time You can invite followers using email or social media allowing them to view your live data on a Garmin Connect tracking page GroupTrack Allows you to keep track of your connections using LiveTrack directly on screen...

Page 61: ...ce displays the name or phone number of the caller To accept the call select NOTE To talk to the caller you must use your connected smartphone To decline the call select To decline the call and immediately send a text message reply select Reply and select a message from the list NOTE This feature is available only if your device is connected to an Android smartphone Replying to a Text Message NOTE...

Page 62: ...one connection alerts are turned off by default 1 Hold MENU 2 Select Phone Alerts Locating a Lost Mobile Device You can use this feature to help locate a lost mobile device that is paired using Bluetooth technology and currently within range NOTE You can add options to the controls menu Customizing the Controls Menu page 117 1 Hold LIGHT to view the controls menu 2 Select The Descent device begins...

Page 63: ...and speed charts You can view more detailed information about your golf games including scorecards statistics and course information You can also view customizable reports NOTE To view some data you must pair an optional wireless sensor with your device Pairing Your Wireless Sensors page 125 Track your progress You can track your daily steps join a friendly competition with your connections and me...

Page 64: ...ice 5 Follow the on screen instructions Manually Syncing Data with Garmin Connect NOTE You can add options to the controls menu Customizing the Controls Menu page 117 1 Hold LIGHT to view the controls menu 2 Select Garmin Golf App The Garmin Golf app allows you to upload scorecards from your compatible Garmin device to view detailed statistics and shot analyses Golfers can compete with each other ...

Page 65: ...s available only if your device is connected to an Android smartphone GroupTrack Allows you to keep track of your connections using LiveTrack directly on screen and in real time Adding Emergency Contacts Emergency contact phone numbers are used for the safety and tracking features 1 From the Garmin Connect app select or 2 Select Safety Tracking Incident Detection Assistance Add Emergency Contact 3...

Page 66: ...6 Select Start LiveTrack 7 On the Descent Mk2i device start an activity 8 Scroll to the map to view your connections TIP From the map you can hold MENU and select Nearby Connections to view distance direction and pace or speed information for other connections in the GroupTrack session Tips for GroupTrack Sessions The GroupTrack feature allows you to keep track of other connections in your group u...

Page 67: ...ures You can add Connect IQ features to your watch from Garmin and other providers using the Connect IQ app You can customize your device with watch faces data fields widgets and device apps NOTE For your safety Connect IQ features are not available while diving This ensures that all dive capabilities function as designed Watch Faces Allow you to customize the appearance of the clock Data Fields A...

Page 68: ...watch near the payment reader with the watch facing the reader The watch vibrates and displays a check mark when it is finished communicating with the reader 6 If necessary follow the instructions on the card reader to complete the transaction TIP After you successfully enter your passcode you can make payments without a passcode for 24 hours while you continue to wear your watch If you remove the...

Page 69: ... a Third Party Provider Before you can download music or other audio files to your compatible watch from a supported third party provider you must connect to the provider using the Garmin Connect app 1 From the Garmin Connect app select or 2 Select Garmin Devices and select your device 3 Select Music 4 Select an option To connect to an installed provider select a provider and follow the on screen ...

Page 70: ...nstalled third party provider and follow the on screen instructions to disconnect the third party provider from your device Downloading Personal Audio Content Before you can send your personal music to your device you must install the Garmin Express application on your computer www garmin com express You can load your personal audio files such as mp3 and m4a files to a Descent Mk2i device from you...

Page 71: ...he selected source Select to adjust the volume Select to play and pause the current audio file Select to skip to the next audio file in the playlist Hold to fast forward through the current audio file Select to restart the current audio file Select twice to skip to the previous audio file in the playlist Hold to rewind through the current audio file Select to change the repeat mode Select to chang...

Page 72: ...meter sensor For more information about accuracy go to garmin com ataccuracy For more information about device wear and care go to www garmin com fitandcare Tips for Erratic Heart Rate Data If the heart rate data is erratic or does not appear you can try these tips Clean and dry your arm before putting on the device Avoid wearing sunscreen lotion and insect repellent under the device Avoid scratch...

Page 73: ...broadcasting your heart rate data during an activity 4 Pair your Descent Mk2i device with your Garmin ANT compatible device NOTE The pairing instructions differ for each Garmin compatible device See your owner s manual TIP To stop broadcasting your heart rate data stop the activity Stopping an Activity page 35 Setting an Abnormal Heart Rate Alert CAUTION This feature only alerts you when your hear...

Page 74: ...alance displays the left right balance of your ground contact time while running It displays a percentage For example 53 2 with an arrow pointing left or right Stride length Stride length is the length of your stride from one footfall to the next It is measured in meters Vertical ratio Vertical ratio is the ratio of vertical oscillation to stride length It displays a percentage A lower number typi...

Page 75: ...centile in Zone Cadence Range Ground Contact Time Range Purple 95 183 spm 218 ms Blue 70 95 174 183 spm 218 248 ms Green 30 69 164 173 spm 249 277 ms Orange 5 29 153 163 spm 278 308 ms Red 5 153 spm 308 ms Ground Contact Time Balance Data Ground contact time balance measures your running symmetry and appears as a percentage of your total ground contact time For example 51 3 with an arrow pointing ...

Page 76: ...5 29 9 8 11 5 cm 11 0 13 0 cm 8 7 10 1 10 1 11 9 Red 5 11 5 cm 13 0 cm 10 1 11 9 Tips for Missing Running Dynamics Data If running dynamics data does not appear you can try these tips Make sure you have a running dynamics accessory such as the HRM Pro accessory Accessories with running dynamics have on the front of the module Pair the running dynamics accessory with your Descent device again accor...

Page 77: ...you can conduct a guided test Lactate threshold Lactate threshold requires a chest heart rate monitor Lactate threshold is the point where your muscles start to rapidly fatigue Your device measures your lactate threshold level using heart rate data and pace Turning Off Performance Notifications Some performance notifications appear upon completion of your activity Some performance notifications ap...

Page 78: ...time Purple Superior Blue Excellent Green Good Orange Fair Red Poor VO2 max data is provided by Firstbeat Analytics VO2 max analysis is provided with permission from The Cooper Institute For more information see the appendix VO2 Max Standard Ratings page 145 and go to www CooperInstitute org Getting Your VO2 Max Estimate for Running This feature requires wrist based heart rate or a compatible ches...

Page 79: ... VO2 Max Estimates page 68 1 Hold MENU 2 Select Activities Apps 3 Select an activity 4 Select the activity settings 5 Select Record VO2 Max Off Viewing Your Predicted Race Times For the most accurate estimate complete the user profile setup Setting Up Your User Profile page 78 and set your maximum heart rate Setting Your Heart Rate Zones page 79 Your device uses the VO2 max estimate About VO2 Max ...

Page 80: ...s data fields to one of your training screens to monitor your numbers throughout the activity Training Effect Aerobic Benefit Anaerobic Benefit From 0 0 to 0 9 No benefit No benefit From 1 0 to 1 9 Minor benefit Minor benefit From 2 0 to 2 9 Maintains your aerobic fitness Maintains your anaerobic fitness From 3 0 to 3 9 Impacts your aerobic fitness Impacts your anaerobic fitness From 4 0 to 4 9 Hi...

Page 81: ... occurs at approximately 90 of their maximum heart rate and between 10k and half marathon race pace For average runners the lactate threshold often occurs well below 90 of maximum heart rate Knowing your lactate threshold can help you determine how hard to train or when to push yourself during a race If you already know your lactate threshold heart rate value you can enter it in your user profile ...

Page 82: ...e the new FTP or Decline to keep your current FTP Conducting an FTP Test Before you can conduct a test to determine your functional threshold power FTP you must pair a chest heart rate monitor and a power meter with your device Pairing Your Wireless Sensors page 125 and you must get your VO2 max estimate Getting Your VO2 Max Estimate for Cycling page 69 NOTE The FTP test is a challenging workout t...

Page 83: ...O2 max VO2 max is the maximum volume of oxygen in milliliters you can consume per minute per kilogram of body weight at your maximum performance Your device displays heat and altitude corrected VO2 max values when you are acclimating to high heat environments or high altitude Training load Training load is the sum of your excess post exercise oxygen consumption EPOC over the last 7 days EPOC is an...

Page 84: ...rements per week Your VO2 max estimate is updated after outdoor runs or rides with power during which your heart rate reached at least 70 of your maximum heart rate for several minutes Indoor run activities do not generate a VO2 max estimate in order to preserve the accuracy of your fitness level trend You can disable VO2 max recording for ultra run and trail run activities if you do not want thos...

Page 85: ...and frequency of your workouts Recovery Time You can use your Garmin device with wrist based heart rate or a compatible chest heart rate monitor to display how much time remains before you are fully recovered and ready for the next hard workout NOTE The recovery time recommendation uses your VO2 max estimate and may seem inaccurate at first The device requires you to complete a few activities to l...

Page 86: ... of your Body Battery level for the last several hours 1 Press UP or DOWN to view the Body Battery widget NOTE You may need to add the widget to your widget loop Customizing the Widget Loop page 115 2 Press START to view a graph of your body battery level since midnight 3 Press DOWN to view a combined graph of your Body Battery and stress levels Blue bars indicate periods of rest Orange bars indic...

Page 87: ...ation readings for the last 24 hours Your most recent oxygen saturation reading The oxygen saturation percentage scale A graph of your elevation readings for the last 24 hours Getting Pulse Oximeter Readings You can manually begin a pulse oximeter reading by viewing the pulse oximeter widget The widget displays your most recent blood oxygen saturation percentage a graph of your hourly average read...

Page 88: ...e pulse oximeter widget hold MENU 2 Select Options Pulse Ox Mode During Sleep Tips for Erratic Pulse Oximeter Data If the pulse oximeter data is erratic or does not appear you can try these tips Remain motionless while the device reads your blood oxygen saturation Wear the device above your wrist bone The device should be snug but comfortable Hold the arm wearing the device at heart level while th...

Page 89: ...ity set your maximum heart rate You can also set each heart rate zone and enter your resting heart rate manually You can manually adjust your zones on the device or using your Garmin Connect account 1 Hold MENU 2 Select User Profile Heart Rate 3 Select Max HR and enter your maximum heart rate You can use the Auto Detection feature to automatically record your maximum heart rate during an activity ...

Page 90: ...ng Anaerobic and muscular endurance increased power Setting Your Power Zones The values for the zones are default values based on gender weight and average ability and may not match your personal abilities If you know your functional threshold power FTP value you can enter it and allow the software to calculate your power zones automatically You can manually adjust your zones on the device or usin...

Page 91: ...urs of sleep sleep stages and sleep movement You can view your sleep statistics on your Garmin Connect account NOTE Naps are not added to your sleep statistics You can use do not disturb mode to turn off notifications and alerts with the exception of alarms Using Do Not Disturb Mode page 81 Using Automated Sleep Tracking 1 Wear your device while sleeping 2 Upload your sleep tracking data to the Ga...

Page 92: ...e and duration but they do not appear in your activities list or newsfeed For more detail and accuracy you can record a timed activity on your device Activity Tracking Settings Hold MENU and select Activity Tracking Status Turns off the activity tracking features Move Alert Displays a message and the move bar on the digital watch face and steps screen The device also beeps or vibrates if audible t...

Page 93: ...onnect page 53 1 From the Garmin Connect app select or 2 Select Training Workouts Create a Workout 3 Select an activity 4 Create your custom workout 5 Select Save 6 Enter a name for your workout and select Save The new workout appears in your list of workouts NOTE You can send this workout to your device Sending a Custom Workout to Your Device page 83 Sending a Custom Workout to Your Device You ca...

Page 94: ...appears 3 Select START and select an option To do the workout select Do Workout To discard the workout select Dismiss To preview the workout steps select Steps To update the workout target setting select Target Type To turn off future workout notifications select Disable Prompt The suggested workout updates automatically to changes in training habits recovery time and VO2 max Turning Daily Suggest...

Page 95: ...an send them to your device All scheduled workouts sent to the device appear in the calendar widget When you select a day in the calendar you can view or do the workout The scheduled workout stays on your device whether you complete it or skip it When you send scheduled workouts from Garmin Connect they overwrite the existing training calendar Using Garmin Connect Training Plans Before you can dow...

Page 96: ... 3 Hold MENU 4 Select Training Intervals Edit Interval Type 5 Select Distance Time or Open TIP You can create an open ended interval by selecting the Open option 6 If necessary select Duration enter a distance or time interval value for the workout and select 7 Press BACK 8 Select Rest Type 9 Select Distance Time or Open 10 If necessary enter a distance or time value for the rest interval and sele...

Page 97: ... you to create a custom pace band based on distance and pace or distance and time You can also create a pace band for a known course to optimize your pace effort based on elevation changes You can create a PacePro plan using the Garmin Connect app You can preview the splits and elevation plot before you run the course Downloading a PacePro Plan from Garmin Connect Before you can download a PacePro...

Page 98: ...N and select View Splits to preview the splits 6 Press START to start the plan 7 If necessary select Yes to enable course navigation 8 Press START to start the activity timer Target split pace Current split pace Completion progress for the split Distance remaining in the split Overall time ahead of or behind your target time Stopping a PacePro Plan 1 Hold MENU 2 Select Stop PacePro Yes The device ...

Page 99: ...an race a segment trying to match or exceed your personal record or other participants who have raced the segment NOTE When you download a course from your Garmin Connect account you can download all of the available segments in the course Strava Segments You can download Strava segments to your Descent Mk2i device Follow Strava segments to compare your performance with your past rides friends and...

Page 100: ...g a Segment to Adjust Automatically You can set your device to automatically adjust the target race time of a segment based on your performance during the segment NOTE This setting is enabled for all segments by default 1 From the watch face press START 2 Select an activity 3 Hold MENU 4 Select Training Segments Auto Effort Using Virtual Partner Your Virtual Partner is a training tool designed to ...

Page 101: ...an race a previously recorded or downloaded activity This feature works with the Virtual Partner feature so you can see how far ahead or behind you are during the activity NOTE This feature is not available for all activities 1 From the watch face press START 2 Select an activity 3 Hold MENU 4 Select Training Race an Activity 5 Select an option Select From History to select a previously recorded a...

Page 102: ... you can pause your training status You can continue to record fitness activities but your training status training load focus recovery feedback and workout recommendations are temporarily disabled Select an option From the training status widget hold MENU and select Options Pause Training Status From your Garmin Connect settings select Performance Stats Training Status Pause Training Status TIP Y...

Page 103: ... the alarm select Label To delete the alarm select Delete Starting the Countdown Timer 1 From the watch face hold MENU 2 Select Clocks TIMERS 3 Select an option To set and save a countdown timer for the first time enter the time press MENU and select Save Timer To set and save additional countdown timers select Add Timer and enter the time To set a countdown timer without saving it select Quick Ti...

Page 104: ...nable or disable lap recording press MENU and select Lap Key Adding Alternate Time Zones You can display the current time of day in additional time zones on the alternate time zones widget You can add up to four alternate time zones NOTE You may need to add the alternate time zones widget to the widget loop Customizing the Widget Loop page 115 1 From the watch face hold MENU 2 Select Clocks ALT TI...

Page 105: ...distance and bearing from your current location to a new location NOTE You may need to add the Project Wpt app to the activities and apps list 1 From the watch face press START 2 Select Project Wpt 3 Press UP or DOWN to set the heading 4 Press START 5 Press DOWN to select a unit of measure 6 Press UP to enter the distance 7 Press START to save The projected waypoint is saved with a default name Na...

Page 106: ...d can include popular travel destinations such as gas stations restaurants hotels and entertainment venues Courses You can send a course from your Garmin Connect account to your device After it is saved to your device you can navigate the course on your device You can follow a saved course simply because it is a good route For example you can save and follow a bike friendly commute to work You can...

Page 107: ...evation Plot To save the course select Save To view a list of ascents in the course select View Climbs Creating a Course on Garmin Connect Before you can create a course on the Garmin Connect app you must have a Garmin Connect account Garmin Connect page 53 1 From the Garmin Connect app select or 2 Select Training Courses Create Course 3 Select a course type 4 Follow the on screen instructions 5 S...

Page 108: ...re or in real time while following a course Cycling climb categories based on length and gradient are indicated by color 1 Hold MENU 2 Select Activities Apps 3 Select an activity 4 Select the activity settings 5 Select ClimbPro Status On 6 Select an option Select Data Field to customize the data field that appears on the ClimbPro screen Select Alert to set alerts at the start of a climb or at a ce...

Page 109: ...hat use GPS 1 During an activity press STOP 2 Select Back to Start and select an option To navigate back to the starting point of your activity along the path you traveled select TracBack If you do not have a supported map or are using direct routing select Route to navigate back to the starting point of your activity in a straight line If you are not using direct routing select Route to navigate ...

Page 110: ...rom your current location to the starting point of the last saved activity if you are not using direct routing NOTE You can start the timer to prevent the device from timing out to watch mode 7 Press DOWN to view the compass optional The arrow points toward your starting point Stopping Navigation 1 During an activity hold MENU 2 Select Stop Navigation Map Your device comes preloaded with maps and ...

Page 111: ...ation select Review Navigating with the Around Me Feature You can use the around me feature to navigate to nearby points of interest and waypoints NOTE The map data installed on your device must include points of interest to navigate to them 1 From the map hold MENU 2 Select Around Me Icons indicating points of interest and waypoints appear on the map 3 Press UP or DOWN to highlight a section of t...

Page 112: ...ng the Compass Heading 1 From the compass widget press START 2 Select Lock Heading 3 Point the top of the watch toward your heading and press START When you deviate from the heading the compass displays the direction from the heading and degree of deviation Altimeter and Barometer The device contains an internal altimeter and barometer The device collects elevation and pressure data continuously e...

Page 113: ...ete the selected activity select Delete Multisport History Your device stores the overall multisport summary of the activity including overall distance time calories and optional accessory data Your device also separates the activity data for each sport segment and transition so you can compare similar training activities and track how quickly you move through the transitions Transition history in...

Page 114: ...hold MENU 2 Select History Options 3 Select an option Select Delete All Activities to delete all activities from the history Select Reset Totals to reset all distance and time totals NOTE This does not delete any saved activities 104 History ...

Page 115: ... Numbers Changes the size of the numbers on the golf hole information screen ClimbPro Displays ascent planning and monitoring screens while navigating Club Prompt Displays a prompt that enables you to enter which club you used after each detected shot while playing golf Countdown Start Enables a countdown timer for pool swimming intervals Data Screens Enables you to customize data screens and add ...

Page 116: ...ts Allows you to reset the activity settings Route Stats Enables route statistics tracking for indoor climbing activities Routing Sets the preferences for calculating routes for the activity Routing Settings page 110 Scoring Enables or disables scorekeeping automatically when you start a round of golf The Always Ask option prompts you when you begin a round Scoring Method Sets the scoring method t...

Page 117: ... field Select Left Gauge or Right Gauge to add graphical dive gauges Select Reorder to change the location of the data screen in the loop Select Remove to remove the data screen from the loop NOTE Not all options are available for dive activities 8 If necessary select Add New to add a data screen to the loop You can add a custom data screen or select one of the predefined data screens Adding a Map...

Page 118: ...e Alert Type Description Cadence Range You can set minimum and maximum cadence values Calories Event recurring You can set the number of calories Custom Event recurring You can select an existing message or create a custom message and select an alert type Distance Recurring You can set a distance interval Elevation Range You can set minimum and maximum elevation values Heart Rate Range You can set...

Page 119: ...d for your activity type The System option uses the preferences from the system map settings Map Themes page 120 Use Sys Settings Enables the device to use the preferences from the system map settings Map Settings page 120 Orientation Sets the orientation of the map The North Up option shows north at the top of the screen The Track Up option shows your current direction of travel at the top of the...

Page 120: ...nter that appears during direct routing Auto Lap Marking Laps by Distance You can use Auto Lap to mark a lap at a specific distance automatically This feature is helpful for comparing your performance over different parts of an activity for example every 1 mile or 5 kilometers 1 Hold MENU 2 Select Activities Apps 3 Select an activity NOTE This feature is not available for all activities 4 Select t...

Page 121: ...Navigating 7 Select an option Select Run Screen to identify which data screen appears while running Select Climb Screen to identify which data screen appears while climbing Select Invert Colors to reverse the display colors when changing modes Select Vertical Speed to set the rate of ascent over time Select Mode Switch to set how quickly the device changes modes NOTE The Current Screen option allo...

Page 122: ...lect UltraTrac to record track points and sensor data less frequently UltraTrac page 112 NOTE Using GPS and another satellite system together can reduce battery life more quickly than using GPS only GPS and Other Satellite Systems page 112 GPS and Other Satellite Systems Using GPS and another satellite system together offers increased performance in challenging environments and faster position acq...

Page 123: ...ttings for the activity Normal Sets the device to enter low power watch mode after 5 minutes of inactivity Extended Sets the device to enter low power watch mode after 25 minutes of inactivity The extended mode can result in shorter battery life between charges Changing the Order of an Activity in the Apps List 1 Hold MENU 2 Select Activities Apps 3 Select an activity 4 Select Reorder 5 Press UP o...

Page 124: ...ime spent participating in moderate to vigorous activities your weekly intensity minutes goal and progress toward your goal inReach controls Allows you to send messages on your paired inReach device Last activity Displays a brief summary of your last recorded activity such as your last run last ride or last swim Last sport Displays a brief summary of your last recorded sport Music controls Provide...

Page 125: ... added to the widget loop inReach Remote The inReach remote function allows you to control your inReach device using your Descent device Go to buy garmin com to purchase a compatible inReach device Using the inReach Remote Before you can use the inReach remote function you must add the inReach widget to the widget loop Customizing the Widget Loop page 115 1 Turn on the inReach device 2 On your Des...

Page 126: ...remote function you must enable the remote setting on your VIRB camera See the VIRB Series Owner s Manual for more information 1 Turn on your VIRB camera 2 Pair your VIRB camera with your Descent watch Pairing Your Wireless Sensors page 125 When the camera is paired a VIRB data screen is automatically added to activities NOTE The VIRB data screen is not available for dive activities 3 During an ac...

Page 127: ...aph of your average stress level for the last seven days 4 To start a breathing activity press START and follow the on screen instructions Customizing the My Day Widget You can customize the list of metrics displayed on the My Day widget 1 From the watch face press UP or DOWN to view the My Day widget 2 Hold MENU 3 Select Options 4 Select the toggle switches to show or hide each metric Customizing...

Page 128: ...ch face select Accent Color To change the background color select Bkgd Color To save the changes select Done Sensors Settings Compass Settings Hold MENU and select Sensors Accessories Compass Calibrate Allows you to manually calibrate the compass sensor Calibrating the Compass Manually page 118 Display Sets the directional heading on the compass to letters degrees or milliradians North Ref Sets th...

Page 129: ... select Calibrate Yes To enter the current elevation from the digital elevation model select Calibrate Use DEM To enter the current elevation from your GPS starting point select Calibrate Use GPS Barometer Settings Hold MENU and select Sensors Accessories Barometer Calibrate Allows you to manually calibrate the barometer sensor Plot Sets the time scale for the chart in the barometer widget Storm A...

Page 130: ...ap Track Color Changes the track log color Detail Sets the amount of detail shown on the map Showing more detail may cause the map to redraw more slowly Marine Sets the map to display data in marine mode Marine Map Settings page 120 Draw Segments Shows or hides segments as a colored line on the map Draw Contours Shows or hides contour lines on the map Map Themes You can change the map theme to dis...

Page 131: ... Navigation Heading Bug Setting Navigation Alerts You can set alerts to help you navigate to your destination 1 Hold MENU 2 Select Navigation Alerts 3 Select an option To set an alert for a specified distance from your final destination select Final Distance To set an alert for the estimated time remaining until you reach your final destination select Final ETE To set an alert when you stray from ...

Page 132: ... enable the battery saver feature during your normal sleep hours TIP You can set your normal sleep hours in the user settings on your Garmin Connect account 6 Select Low Battery Alert to receive an alert when the battery is low Customizing Power Modes Your device comes preloaded with several power modes allowing you to quickly adjust system settings activity settings and GPS settings to extend bat...

Page 133: ...time USB Mode Sets the device to use MTP media transfer protocol or Garmin mode when connected to a computer Reset Allows you to reset user data and settings Resetting All Default Settings page 133 Software Update Allows you to install software updates downloaded using Garmin Express Use the Auto Update option to enable your device to download the latest software update when a Wi Fi connection is ...

Page 134: ...Select Keys to turn on the backlight for key presses Select Alerts to turn on the backlight for alerts Select Gesture to turn on the backlight by raising and turning your arm to look at your wrist Select Timeout to set the length of time before the backlight turns off Select Brightness to set the brightness level of the backlight Customizing the Hot Keys You can customize the hold function of indi...

Page 135: ...old MENU 4 Select Sensors Accessories Add New 5 Select an option Select Search All Sensors Select your sensor type After the sensor is paired with your device the sensor status changes from Searching to Connected Sensor data appears in the data screen loop or a custom data field Extended Display Mode You can use Extended Display mode to display data screens from your Descent device on a compatible...

Page 136: ...rs on your device Approximately five hours of battery life remain Improving Foot Pod Calibration Before you can calibrate your device you must acquire GPS signals and pair your device with the foot pod Pairing Your Wireless Sensors page 125 The foot pod is self calibrating but you can improve the accuracy of the speed and distance data with a few outdoor runs using GPS 1 Stand outside for 5 minute...

Page 137: ...b sensors You can use paired club sensors to automatically track your golf shots including location distance and club type See the owner s manual for your club sensors for more information garmin com manuals ApproachCT10 Device Information Descent Mk2i Specifications Battery type Rechargeable built in lithium ion battery Descent Mk2i battery life Up to 16 days in smartwatch mode Water rating 10 AT...

Page 138: ...R123A lithium Battery life Up to 100 hr Thread type 7 16 in 20 UNF Normal operating temperature From 20 to 60 C from 4 to 140 F Underwater operating temperature From 0 to 40 C from 32 to 104 F Storage temperature From 30 to 70 C from 22 to 158 F Wireless frequency 2 4 GHz 0 dBm Surface transmission range ANT wireless tech nology Up to 10 m 33 ft Underwater transmission range sonar Up to 10 m 33 ft...

Page 139: ...ater sunscreen cosmetics alcohol or other harsh chemicals Prolonged exposure to these substances can damage the case Do not wash the device under high pressure because jets of water or air may cause damage to the depth sensor or barometer Avoid extreme shock and harsh treatment because it can degrade the life of the product Do not store the device where prolonged exposure to extreme temperatures c...

Page 140: ...ean the device Avoid chemical cleaners solvents and insect repellents that can damage plastic components and finishes Thoroughly rinse the device with fresh water after exposure to chlorine salt water sunscreen cosmetics alcohol or other harsh chemicals Prolonged exposure to these substances can damage the case Avoid extreme shock and harsh treatment because it can degrade the life of the product ...

Page 141: ... coin or flat screwdriver into the slot and rotate counter clockwise to unscrew the battery cap 2 Remove the battery cap and battery 3 Insert the new battery in the transmitter with the positive pole facing into the transmitter and the negative pole facing the battery door 4 Inspect both gaskets to verify they are clean undamaged and fully seated in the grooves If the gaskets appear worn or damage...

Page 142: ...ption Select Search All Sensors Select your sensor type You can customize the optional data fields Customizing the Data Screens page 107 My headphones will not connect to the device If your headphones were previously connected to your smartphone using Bluetooth technology they may connect to your smartphone before connecting to your device You can try these tips Turn off Bluetooth technology on yo...

Page 143: ...ou have music stored on your device this option deletes your stored music Diving Resetting Your Tissue Load You can reset your current tissue load saved on the device You should reset your tissue load only if you do not plan to use the device again in the future This can be useful for dive shops that provide devices for rent 1 Hold MENU 2 Select System Reset Reset Tissues Resetting the Surface Pre...

Page 144: ...screen 6 Select Software Update NOTE This option may take up to a minute to appear while the dive computer determines the transmitter s software version and battery status 7 Verify the transmitter ID when prompted The transmitter ID is printed on the housing 8 Keep the dive computer near the transmitter until the software update is complete My transmitter and watch lose connection underwater If yo...

Page 145: ...to acquire satellite signals The time and date are set automatically based on the GPS position TIP For more information about GPS go to www garmin com aboutGPS 1 Go outdoors to an open area The front of the device should be oriented toward the sky 2 Wait while the device locates satellites It may take 30 60 seconds to locate satellite signals Improving GPS Satellite Reception Frequently sync the d...

Page 146: ...ories burned Turn on manual pulse oximeter readings Turning Off Automatic Pulse Oximeter Readings page 78 Activity Tracking For more information about activity tracking accuracy go to garmin com ataccuracy My daily step count does not appear The daily step count is reset every night at midnight If dashes appear instead of your step count allow the device to acquire satellite signals and set the ti...

Page 147: ...with your sleeve or jacket as strong gusts can cause erratic readings Getting More Information You can find more information about this product on the Garmin website Go to support garmin com for additional manuals articles and software updates Go to buy garmin com or contact your Garmin dealer for information about optional accessories and replacement parts Go to www garmin com ataccuracy for info...

Page 148: ...verage vertical distance of ascent since the last reset Average Balance The average left right power balance for the current activity Average Cadence Cycling The average cadence for the current activity Average Cadence Running The average cadence for the current activity Average Descent The average vertical distance of descent since the last reset Average Distance Per Stroke Swimming The average d...

Page 149: ...or this data to appear Cadence Cycling The number of revolutions of the crank arm Your device must be connected to a cadence accessory for this data to appear Cadence Running The steps per minute right and left Cadence Gauge Running A color gauge showing your current cadence range Calories The amount of total calories burned CNS Your current central nervous system oxygen toxicity percentage COG Th...

Page 150: ...he destination elevation You must be navigating for this data to appear GPS The strength of the GPS satellite signal GPS Elevation The altitude of your current location using GPS GPS Heading The direction you are moving based on GPS Grade The calculation of rise elevation over run distance For example if for every 3 m 10 ft you climb you travel 60 m 200 ft the grade is 5 Grit The measurement of di...

Page 151: ...flow score for the current lap Lap GCT Balance The average ground contact time balance for the current lap Lap Grit The overall grit score for the current lap Lap Ground Contact Time The average amount of ground contact time for the current lap Lap Heart Rate The average heart rate for the current lap Lap Heart Rate Max The average percentage of maximum heart rate for the current lap Lap Left Peak...

Page 152: ...of strokes per minute spm during the last completed lap Last Lap Stroke Rate Paddle sports The average number of strokes per minute spm during the last completed lap Last Lap Strokes Swimming The total number of strokes for the last completed lap Last Lap Strokes Paddle sports The total number of strokes for the last completed lap Last Lap Swolf The swolf score for the last completed lap Last Lap ...

Page 153: ... Normalized Power for the current activity Off Course The distance to the left or right by which you have strayed from the original path of travel You must be navigating for this data to appear OTU Your current oxygen toxicity units Overall Ahead Behind Running The overall time ahead or behind of the target pace Pace The current pace PacePro Gauge Running Your current split pace and your target sp...

Page 154: ...de a consistent source of accurate temperature data Time in Zone The time elapsed in each heart rate or power zone Time of Day The time of day based on your current location and time settings format time zone daylight saving time Timer The current time of the countdown timer Time Seated The time spent seated while pedaling for the current activity Time Seated Lap The time spent seated while pedali...

Page 155: ...ccumulated work performed power output in kilojoules VO2 Max Standard Ratings These tables include standardized classifications for VO2 max estimates by age and gender Males Percentile 20 29 30 39 40 49 50 59 60 69 70 79 Superior 95 55 4 54 52 5 48 9 45 7 42 1 Excellent 80 51 1 48 3 46 4 43 4 39 5 36 7 Good 60 45 4 44 42 4 39 2 35 5 32 3 Fair 40 41 7 40 5 38 5 35 6 32 3 29 4 Poor 0 40 41 7 40 5 38...

Page 156: ... 5 04 Good From 2 79 to 3 92 Fair From 2 23 to 2 78 Untrained Less than 2 23 Females Watts per Kilogram W kg Superior 4 30 and greater Excellent From 3 33 to 4 29 Good From 2 36 to 3 32 Fair From 1 90 to 2 35 Untrained Less than 1 90 FTP ratings are based on research by Hunter Allen and Andrew Coggan PhD Training and Racing with a Power Meter Boulder CO VeloPress 2010 146 Appendix ...

Page 157: ...f your wheel or use one of the calculators available on the internet Tire Size Wheel Circumference mm 20 1 75 1515 20 1 3 8 1615 22 1 3 8 1770 22 1 1 2 1785 24 1 1753 24 3 4 Tubular 1785 24 1 1 8 1795 24 1 75 1890 24 1 1 4 1905 24 2 00 1925 24 2 125 1965 26 7 8 1920 26 1 1 0 1913 26 1 1952 26 1 25 1953 26 1 1 8 1970 26 1 40 2005 26 1 50 2010 26 1 75 2023 26 1 95 2050 26 2 00 2055 26 1 3 8 2068 26 ...

Page 158: ...6 700 30C 2146 700 32C 2155 700 35C 2168 700 38C 2180 700 40C 2200 700 44C 2235 700 45C 2242 700 47C 2268 Symbol Definitions These symbols may appear on the device or accessory labels WEEE disposal and recycling symbol The WEEE symbol is attached to the product in compliance with the EU directive 2012 19 EU on Waste Electrical and Electronic Equipment WEEE It is intended to deter the improper disp...

Page 159: ... 112 Garmin Connect 50 53 55 57 82 83 85 87 97 storing data 54 Garmin Express 6 57 updating software 6 Garmin Pay 58 59 GLONASS 112 123 goals 91 GPS 112 123 settings 112 signal 135 green view 44 pin location 45 48 ground contact time 64 65 GroupTrack 56 H handicap 46 heading setting 121 headphones 132 Bluetooth technology 61 132 connecting 61 heart rate 42 62 alerts 63 109 monitor 62 63 66 68 69 7...

Page 160: ...2 84 85 swing analysis 47 swolf score 41 system settings 123 T target 45 91 tempe 127 135 temperature 74 127 135 text messages 51 tides 38 time 123 alerts 109 settings 123 zones and formats 123 time zones 124 timer 37 39 41 48 49 102 countdown 93 tones 35 93 TracBack 35 99 100 tracking 55 78 tracks 95 training 39 50 74 75 84 86 89 91 calendar 86 plans 82 85 86 Training Effect 67 70 training load 7...

Page 161: ......

Page 162: ...support garmin com GUID 4A2D3019 BA14 49BD B371 4214D187D493 v2 May 2021 ...

Reviews: