Getting Started
WARNING
See the
Important Safety and Product Information
guide in the
product box for product warnings and other important
information.
Installing a Memory Card
The device supports microSD™ and microSDHC memory cards.
1
Insert a memory card into the slot on the device.
2
Press it in until it clicks.
Connecting the Device to Vehicle Power
Before you can use or turn on the device, you must install a
memory card.
You can power and charge the device using vehicle power.
TIP:
You should fully charge the device before you use the
device on battery power.
1
With the vehicle off, plug the power cable into a power outlet
in your vehicle.
2
Plug the other end of the power cable into the USB port on
the device.
3
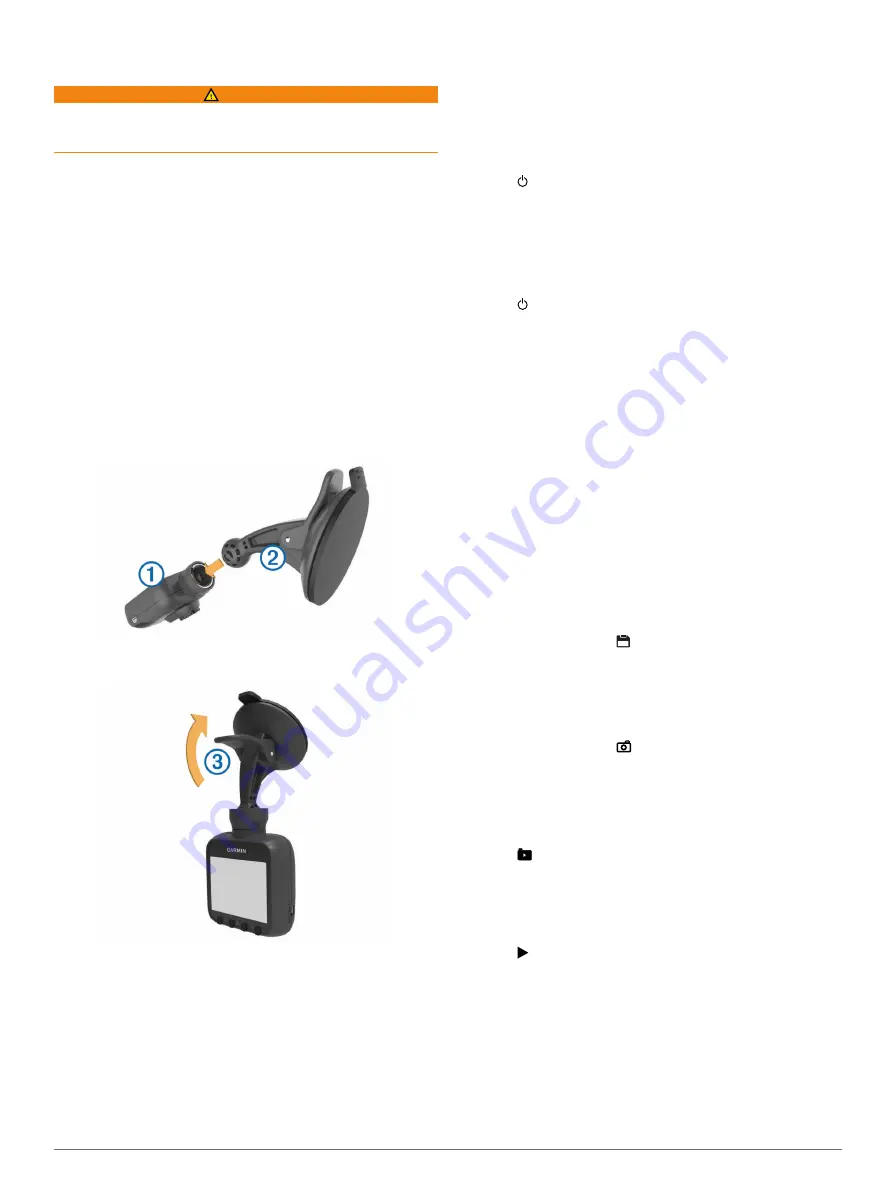
Press the device
À
onto the suction cup
Á
.
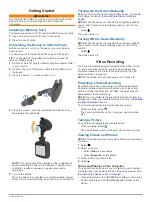
4
Press the suction cup to the windshield, and flip the lever
Â
back toward the windshield.
NOTE:
The device should be installed on the windshield as
shown. Installing the device in a sideways or upside-down
orientation results in sideways or upside-down video
recordings.
5
Turn on the vehicle.
When the device is connected to an ignition-switched power
outlet, it turns on automatically when you turn on the vehicle.
Turning On the Device Manually
Before you turn on the device using battery power, you should
fully charge the battery (
Connecting the Device to Vehicle
).
NOTE:
When the device is connected to an ignition-switched
power outlet, it turns on automatically when you turn on the
vehicle.
Select .
The device turns on.
Turning Off the Device Manually
NOTE:
When the device is connected to an ignition-switched
power outlet, it turns off automatically when you turn off the
vehicle.
Select .
The device turns off.
Video Recording
The device immediately begins recording video when it turns
on, and it continues recording, overwriting the oldest, non-
protected videos until it turns off. While recording, the LED
below the screen is solid red.
NOTE:
The device records continuously until it turns off.
Protecting a Video Recording
By default, the device uses a sensor to automatically detect
accidental collisions and protect the three video files during,
before, and after the detection. At 1080p, the video files are
approximately four minutes long.
NOTE:
You must calibrate the event detection sensor from the
settings menu after you install the device in your car (
You can also manually protect video files at any time.
While recording, select .
The device protects the current, previous, and next video
files.
Taking a Picture
You can take still photographs with this device.
While recording, select .
The device takes a photo and saves it to the memory card.
Viewing Videos and Photos
NOTE:
The device stops recording video while you view videos
or photos.
1
Select .
2
Select an option:
• Select
Video
to view videos.
• Select
Snapshot
to view photos.
3
Select a video or photo to view.
4
Select .
Videos and Photos on Your Computer
You can connect the device to your computer to view, transfer,
or delete videos and photos stored on the device memory card
(
Connecting the Device to Your Computer
).
• Videos are stored in the GARMIN\Video folder on the device.
• Photos are stored in the GARMIN\SnapShot folder on the
device.
Getting Started
1


