Garmin CAMPER 1090 Owner'S Manual Download Page 27

2

Select an option to resume normal device operation:
• If the camera is connected to a reverse lamp 

(recommended), take the vehicle out of reverse.
The device automatically resumes normal operation.

• If the transmitter is connected to a steady power source, 

select   to manually hide the camera.

Switching Cameras

When multiple backup cameras are transmitting to your device, 

you can switch between the views from the cameras.

1

Select   > 

Tools

 > 

Cameras

.

2

Select a camera from the bottom of the screen.
The video feed from the camera appears.

Changing the Camera Orientation

Depending on where the camera is placed on your vehicle, the 

video on your device may appear upside down or mirrored by 

default. You can rotate the video horizontally or flip the video 

vertically to correct the video.

1

Select   > 

Tools

 > 

Cameras

 >  .

2

Select an option:
• Select 

Mirror Video

.

NOTE: 

This is useful for cameras placed on the front or 

rear of your vehicle.

• Select 

Flip Video

.

NOTE: 

This is useful for cameras placed on either side of 

your vehicle.

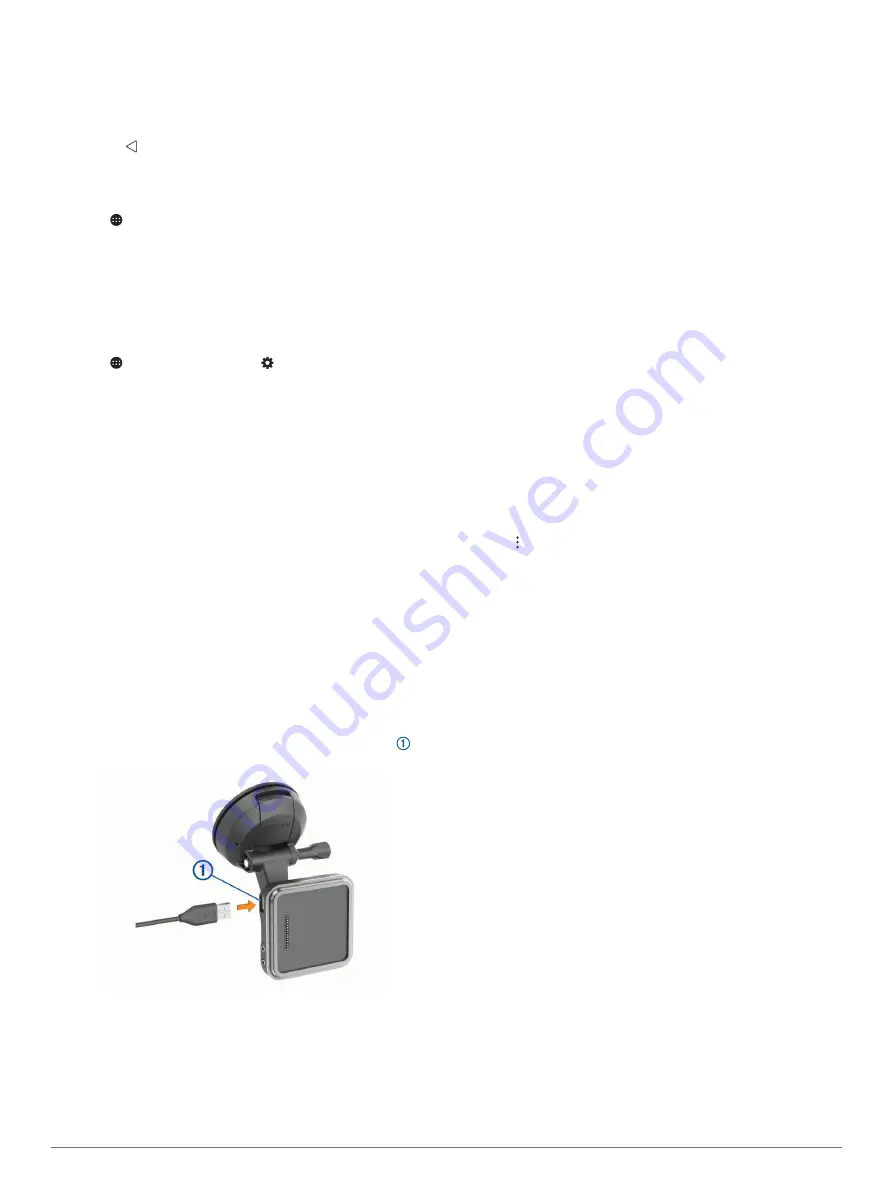
Connecting a Dash Camera to the Powered 

Mount

Before you connect a dash camera to the powered mount, you 

should mount the dash camera device to your windshield.
You can use the RV 890 / Camper 890 device mount to power a 

compatible Garmin dash camera. This can be useful if you need 

to connect the RV 890 / Camper 890 device and the dash 

camera to the same power source in your vehicle.

1

Mount the RV 890 / Camper 890 device in your vehicle, and 

connect it to power (

Mounting and Powering the Device in 

Your Vehicle

, page 1

).

2

If necessary, remove the RV 890 / Camper 890 device from 

the magnetic mount for a better view of the USB port.

3

Plug the dash camera's power cable into the USB port   on 

the mount.

Data Management

The device has a memory card slot for additional data storage.

NOTE: 

The device is compatible with Windows 7 and newer, 

and Mac OS 10.4 and newer. Mac computers may require 

additional third-party software to read and write files on Android 

devices.

About Memory Cards

You can purchase memory cards from an electronics supplier, 

or purchase pre-loaded Garmin mapping software 

(

www.garmin.com

). Memory cards can be used to store files 

such as maps and custom POIs.

Installing a Memory Card for Maps and Data

You can install a memory card to increase the storage space for 

maps and other data on your device. You can purchase memory 

cards from an electronics supplier, or go to 

www.garmin.com

/maps

 to purchase a memory card with pre-loaded Garmin 

mapping software. The device supports microSD memory cards 

from 4 to 256 GB. Memory cards must use the FAT32 file 

system format. Memory cards greater than 32 GB must be 

formatted using the device (

Formatting the Memory Card

page 23

).

1

Locate the map and data memory card slot on your device 

(

Device Overview

, page 1

).

2

Insert a memory card into the slot.

3

Press it in until it clicks.

Formatting the Memory Card

The device requires a memory card formatted using the FAT32 

file system. You can use the device to format your card using 

this file system.
You must format a brand new memory card if it is not formatted 

using the FAT32 file system.

NOTE: 

Formatting the memory card deletes all data on the card.

1

Select 

Settings

 > 

Device

 > 

Storage & USB

.

2

Select your memory card.

3

Select   > 

Settings

 > 

Format

 > 

ERASE & FORMAT

.

4

Select 

Done

.

Connecting the Device to Your Computer

You can connect the device to your computer using a USB 

cable.

1

Plug the small end of the USB cable into the port on the 

device.

2

Plug the larger end of the USB cable into a port on your 

computer.

3

When your RV 890 / Camper 890 device prompts you to 

enter file transfer mode, select 

Yes

.

Depending on your computer operating system, the device 

appears as either a portable device, a removable drive, or a 

removable volume.

Transferring Data From Your Computer

1

Connect the device to your computer (

Connecting the Device 

to Your Computer

, page 23

).

Depending on your computer operating system, the device 

appears as either a portable device, a removable drive, or a 

removable volume.

2

On your computer, open the file browser.

3

Select a file.

4

Select 

Edit

 > 

Copy

.

5

Browse to a folder on the device.

NOTE: 

For a removable drive or volume, you should not 

place files in the Garmin folder.

6

Select 

Edit

 > 

Paste

.

Transferring GPX Files From Your Computer

Apple computers may require additional third-party software, 

such as Android File Transfer, to read and write files on this 

device.
If you have already created routes that you want to use on your 

device, you can transfer GPX files directly from your computer.

Appendix

23

Summary of Contents for CAMPER 1090

Page 1: ...RV890 CAMPER890 Owner sManual...

Page 2: ...iaries These trademarks may not be used without the express permission of Garmin Android is a trademark of Google Inc Apple and Mac are trademarks of Apple Inc registered in the U S and other countrie...

Page 3: ...egory 8 Searching Within a Category 8 Location Search Results 8 Changing the Search Area 9 Custom Points of Interest 9 Installing POI Loader 9 Finding Custom POIs 9 Parking 9 Finding Parking Near Your...

Page 4: ...18 Viewing Weather Near a Different City 18 Settings 18 Navigation Settings 18 Map and Vehicle Settings 18 Enabling Maps 19 Connecting to a Wireless Network 19 Enabling Bluetooth Wireless Technology...

Page 5: ...um ion battery To prevent the possibility of personal injury or product damage caused by battery exposure to extreme heat store the device out of direct sunlight Both the device and its mount contain...

Page 6: ...ket 3 Secure the one inch ball mount to the magnetic mount using the screws removed in step 1 Turning the Device On or Off To turn the device on press the power key or connect the device to power To p...

Page 7: ...e your finger across the screen to pan or scroll Pinch two fingers together to zoom out Spread two fingers apart to zoom in Adjusting the Screen Brightness The device can use an ambient light sensor t...

Page 8: ...e or message and displays information for each alert You can enable or disable the audible tone for some types of driver alerts Not all alerts are available in all areas Schools The device plays a ton...

Page 9: ...route home the device prompts you to enter your home location 1 Select Where To Go Home 2 If necessary enter your home location Editing Your Home Location 1 Select Where To Set Home Location 2 Enter...

Page 10: ...ur Route Before you can shape your route you must start a route Starting a Route page 5 You can manually shape your route to change its course This allows you to direct the route to use a certain road...

Page 11: ...ting point of the section of road to avoid and select Next 5 Select the ending point of the road section and select Next 6 Select Done Avoiding an Area 1 Select Settings Navigation Custom Avoidances 2...

Page 12: ...or more amenities and select Save 4 Select a location Finding RV Services NOTE This feature is not available in all areas You can find nearby locations that offer repair towing and other services for...

Page 13: ...cations Garmin is not responsible for the accuracy or timeliness of live parking data Finding Parking Near Your Current Location 1 Select Where To Categories Parking 2 Select Filter Parking and select...

Page 14: ...e the Where Am I page to find the nearest hospitals police stations and fuel stations 1 From the map select the vehicle 2 Select Hospitals Police Stations Fuel or Roadside Assist NOTE Some service cat...

Page 15: ...u are done using the map tool select Up Ahead The Up Ahead tool provides information about upcoming locations along your route or the road on which you are traveling You can view upcoming points of in...

Page 16: ...arby roads 1 From the main menu select Navigation Traffic 2 If necessary select Legend to view the legend for the traffic map Searching for Traffic Incidents 1 From the main menu select Navigation Tra...

Page 17: ...d the location is added to your recent searches in the Where To menu Smart Notifications While your device is connected to the Garmin Drive app you can view notifications from your smartphone on your...

Page 18: ...ireless Networks Bluetooth 2 Next to the Bluetooth device name select Forget Traffic NOTICE Garmin is not responsible for the accuracy or timeliness of the traffic information Your device can provide...

Page 19: ...n set the volume to 0 OK Garmin set the volume to 9 OK Garmin decrease the brightness OK Garmin set the brightness to 5 Using the Apps Viewing the Owner s Manual on Your Device You can view the comple...

Page 20: ...ct your device to the stereo using Bluetooth technology in order to use the app If you connect the stereo to a Wi Fi network the app can communicate with the stereo using that network which provides a...

Page 21: ...sound produced by the speakers and the subwoofer Audio signals above the selected cutoff frequency are not passed to the subwoofer NOTE If a DSP setting has been applied to the zone this setting canno...

Page 22: ...t Tools Service History 2 Select a category 3 Select a field 4 Enter the new information and select Done Deleting Service Records 1 Select Tools Service History 2 Select a service category 3 Select De...

Page 23: ...ight color mode If you select the Automatic option the device automatically switches to day or night colors based on the time of day Wallpaper Sets the wallpaper background on your device Sleep Allows...

Page 24: ...oduct manuals frequently asked questions videos and customer support Updating Maps and Software Using a Wi Fi Network NOTICE Map and software updates may require the device to download large files Reg...

Page 25: ...r select System Requirements To install on a Windows computer select Download for Windows To install on a Mac computer select Download for Mac 3 Open the downloaded file and follow the on screen instr...

Page 26: ...age 14 and complete the pairing process Appendix Backup Cameras Your device can display the video feed from one or more connected backup cameras Pairing a BC 35 Backup Camera with a Garmin Navigation...

Page 27: ...s and custom POIs Installing a Memory Card for Maps and Data You can install a memory card to increase the storage space for maps and other data on your device You can purchase memory cards from an el...

Page 28: ...ice select an option To view imported waypoints select Where To Saved To view imported routes select Navigation Trip Planner Saved Trips Exporting GPX Files with a Memory Card You can share data such...

Page 29: ...5 GPS 2 simulator 19 H hands free phone calls 14 headset pairing 13 home editing location 5 going 5 home screen 3 customizing 3 I icons status bar 3 ID number 20 intersections finding 9 L language 19...

Page 30: ...c 12 14 19 alternate route 6 incidents 12 15 map 12 15 receiver 14 searching for delays 12 15 travel history 20 treble 17 trip information 12 resetting 12 trip log viewing 12 trip planner 15 16 editin...

Page 31: ......

Page 32: ...support garmin com GUID 9FC76615 A91B 4AAA A205 B2EAA899321A v2 June 2020...

Reviews: