Pairing the Speed Sensor With Your Smartphone
The speed sensor must be paired directly through the Garmin
Connect app, instead of from the Bluetooth settings on your
smartphone.
1
From the app store on your smartphone, install and open the
Garmin Connect app.
2
Bring your smartphone within 3 m (10 ft.) of the sensor.
NOTE:
Stay 10 m (33 ft.) away from other wireless sensors
while pairing.
3
Rotate the wheel two revolutions to wake up the sensor.
The LED flashes green for five seconds to indicate activity.
The LED flashes red to indicate a low battery level.
4
Select an option to add your device to your Garmin Connect
account:
• If this is the first device you have paired with the Garmin
Connect app, follow the on-screen instructions.
• If you have already paired another device with the Garmin
Connect app, from the
or menu, select
Garmin
Devices
>
Add Device
, and follow the on-screen
instructions.
Device Information
User Replaceable Batteries
WARNING
See the
Important Safety and Product Information
guide in the
product box for product warnings and other important
information.
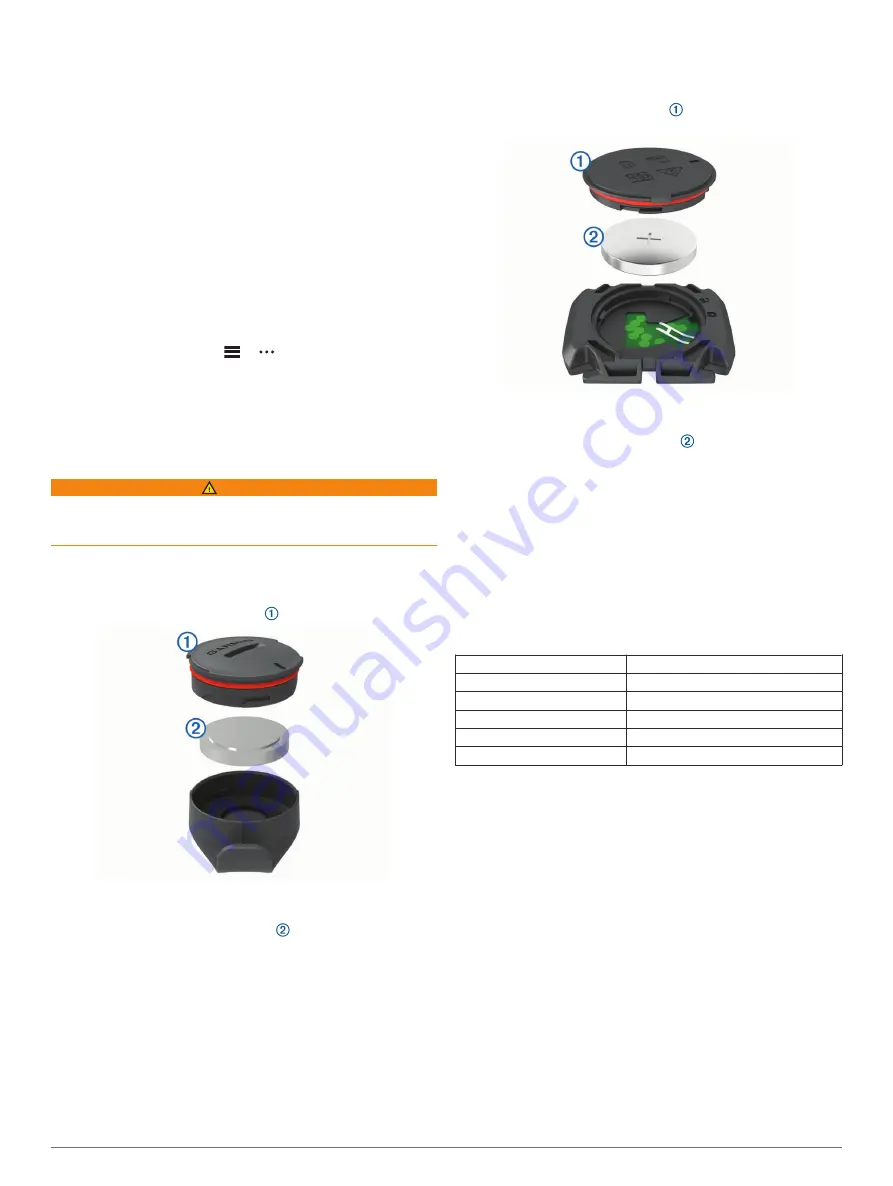
Replacing the Speed Sensor Battery
The device uses one CR2032 battery. The LED flashes red to
indicate a low battery level after two revolutions.
1
Locate the circular battery cover on the front of the sensor.
2
Twist the cover counter-clockwise until the cover is loose
enough to remove.
3
Remove the cover and the battery .
4
Wait 30 seconds.
5
Insert the new battery into the cover, observing polarity.
NOTE:
Do not damage or lose the O-ring gasket.
6
Twist the cover clockwise so that the marker on the cover
aligns with the marker on the case.
NOTE:
The LED flashes red and green for a few seconds
after battery replacement. When the LED flashes green and
then stops flashing, the device is active and ready to send
data.
Replacing the Cadence Sensor Battery
The device uses one CR2032 battery. The LED flashes red to
indicate a low battery level after two revolutions.
1
Locate the circular battery cover on the back of the
sensor.
2
Twist the cover counter-clockwise until the marker points to
unlocked and the cover is loose enough to remove.
3
Remove the cover and the battery .
4
Wait 30 seconds.
5
Insert the new battery into the cover, observing polarity.
NOTE:
Do not damage or lose the O-ring gasket.
6
Twist the cover clockwise until the marker points to locked.
NOTE:
The LED flashes red and green for a few seconds
after battery replacement. When the LED flashes green and
then stops flashing, the device is active and ready to send
data.
Speed Sensor and Cadence Sensor
Specifications
Battery type
User-replaceable CR2032, 3 V
Battery life
Approximately 12 mo. at 1 hr./day
Speed sensor storage
Up to 300 hr. of activity data
Operating temperature range
From -20º to 60ºC (from -4º to 140ºF)
Wireless frequency/protocol
2.4 GHz @ 4 dBm nominal
Water rating
IEC 60529 IPX7*
*The device withstands incidental exposure to water of up to 1 m
for up to 30 min. For more information, go to
.
Troubleshooting
My device will not connect to the sensors
If your device will not connect to the speed and cadence
sensors, you can try these tips.
• Rotate the crank arm or wheel two revolutions to wake up the
sensor.
The LED flashes green for five seconds to indicate activity.
The LED flashes red to indicate a low battery level.
• Replace the battery if the LED does not flash after two
revolutions.
• Enable Bluetooth technology on your smartphone or Garmin
device.
• Pair the sensor with your device using ANT+ technology.
2
Device Information
Summary of Contents for CADENCE SENSOR 2
Page 1: ...SPEEDSENSOR2ANDCADENCE SENSOR2 Owner sManual...
Page 4: ......
Page 9: ......
Page 10: ...support garmin com March 2019 190 02490 00_0A...


