Introduction
WARNING
See the
Important Safety and Product Information
guide in the
product box for product warnings and other important
information.
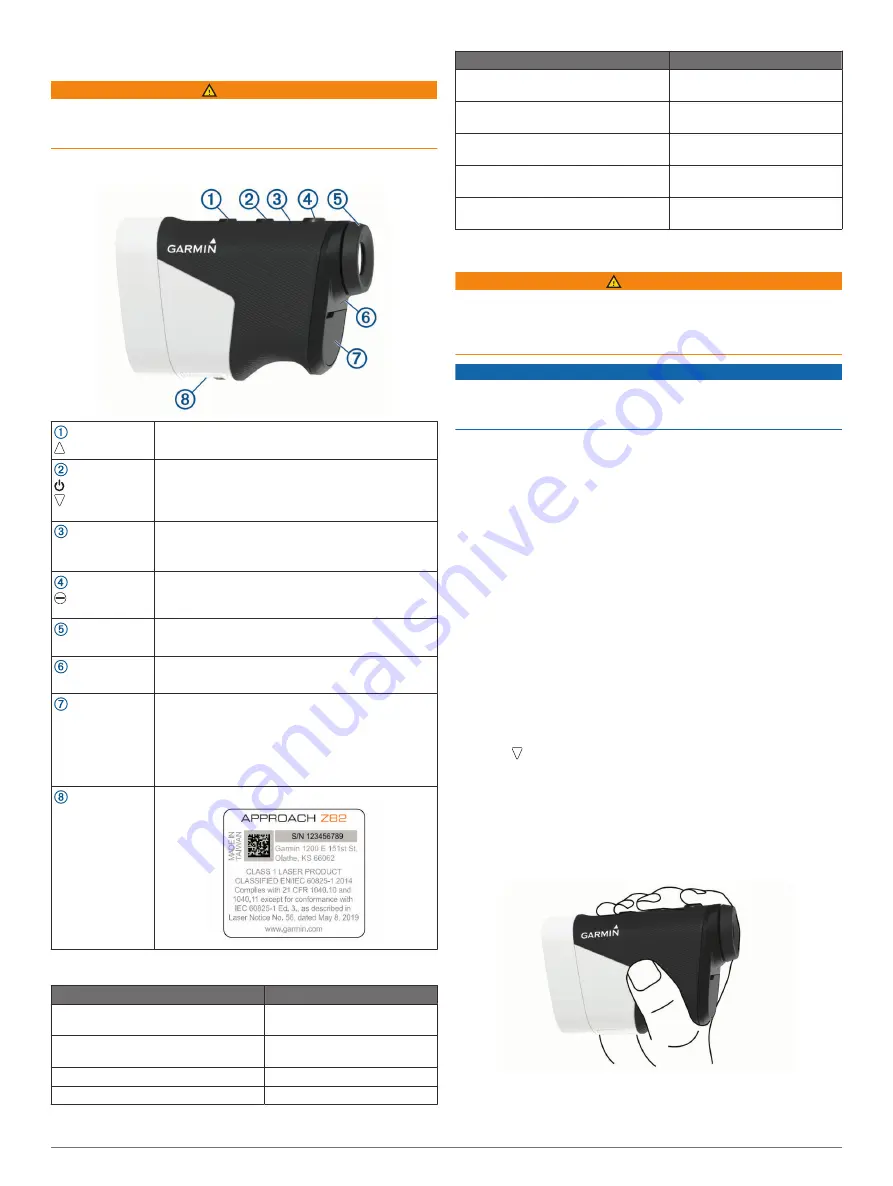
Device Overview
Press to open the menu and scroll through menu
options.
Press to turn on the device.
Press to open the menu and scroll through menu
options.
Hold to turn off the device.
Tournament
mode LED
View tournament mode status.
Press to range with the laser. While playing golf, the
flag finder feature starts automatically.
Press to select menu options.
Adjustable diopter
Rotate the eyepiece to focus the screen.
Status LED
View device and battery status.
Weather cap
Micro-USB power
and data port
(under weather
cap)
Pull up to access the micro-USB power and data
port.
Connect a compatible USB cable to charge the
device or transfer data using your computer.
Device label
View manufacturer's identification and certification.
Status LEDs
LED Activity
Status
Solid blue (for 5 seconds after turning
on)
The device is turned on.
Alternating red and blue (for 5 seconds
after turning on)
The battery is low.
Off
The device is in active mode.
Slow flashing blue
The device is in standby mode.
LED Activity
Status
Solid red (after holding the power
button)
The device is turned off.
Rapid flashing red (connected to a
power source)
The device is charging in
energy-saving mode.
Solid blue and flashing red (connected
to a power source)
The device is charging.
Solid red (connected to a power
source)
Charging is complete.
Slow flashing red
A software update is in
progress.
Charging the Device
WARNING
This product contains a lithium-ion battery. To prevent the
possibility of personal injury or product damage caused by
battery exposure to extreme heat, store the device out of direct
sunlight.
NOTICE
To prevent corrosion, thoroughly dry the USB port, the weather
cap, and the surrounding area before charging or connecting to
a computer.
The device is powered by a built-in lithium-ion battery that you
can charge using a standard wall outlet or a USB port on your
computer.
NOTE:
The device will not charge when outside the approved
temperature range (
).
1
Pull up the weather cap from the USB port.
2
Plug the small end of the USB cable into the USB port on the
device.
3
Plug the large end of the USB cable into an external power
source, such as an AC adapter or a USB port on your
computer.
4
Charge the device completely.
TIP:
You can turn off the device to charge it faster.
Turning On the Device
The first time you turn on the device, you are prompted to
choose a language, select a unit of measure, and set your driver
distance.
1
Press .
2
Follow the on-screen instructions.
Standby Mode
To conserve battery life, the device goes into standby mode
when not in use. The device wakes up when you hold it with
your thumb in the groove on the bottom of the device or push
any button.
Introduction
1
Summary of Contents for Approach Z82
Page 1: ...APPROACH Z82 Owner sManual...
Page 4: ......
Page 11: ......
Page 12: ...support garmin com GUID 705CC09E FFD5 464F 836C 8864F48560FF v1 April 2020...


