2
Select a new update rate.
Turning On the Handheld Battery Save Mode
You can use battery save mode to prolong the battery life.
Select
Setup
>
Display
>
Battery Save
>
On
.
When in battery save mode, the screen shuts off when the
backlight times out.
Adjusting the Map Drawing Speed
You can reduce the map drawing speed to conserve battery
power.
Select
Setup
>
Map
>
Map Speed
>
Normal
.
Turning On the Transmitter
Before you can add a contact or initiate an emergency alert, you
must ensure the transmitter is enabled.
NOTE:
In cold temperatures, if you transmit when the battery is
low, the device may shut down.
Select
Setup
>
Contacts
>
Pairing Setup
>
Transmitting
>
On
.
Turning Off the Transmitter
You can disable transmitting to conserve battery power on the
handheld device when you are not communicating with contacts.
NOTE:
At cold temperatures, if you transmit when the battery is
low, the device may shutdown.
Select
Setup
>
Contacts
>
Pairing Setup
>
Transmitting
>
Off
.
When the transmitter is off, you cannot send your location or
messages to contacts.
Saving Energy While Charging the Device
You can turn off the device display and all other features while
charging.
1
Connect your device to an external power source.
The remaining battery capacity appears.
2
Hold the power key for 4 to 5 seconds.
The display turns off, and the device goes into a low power,
battery charging mode.
3
Charge the device completely.
Data Management
You can store files on your device. The device has a memory
card slot for additional data storage.
NOTE:
The device is not compatible with Windows
®
95, 98, Me,
Windows NT
®
, and Mac
®
OS 10.3 and earlier.
File Types
The handheld device supports these file types.
• Files from BaseCamp. Go to
• JPEG photo files.
• GPX geocache files. Go to
• GPI custom POI files from the Garmin POI Loader. Go to
www.garmin.com/products/poiloader
.
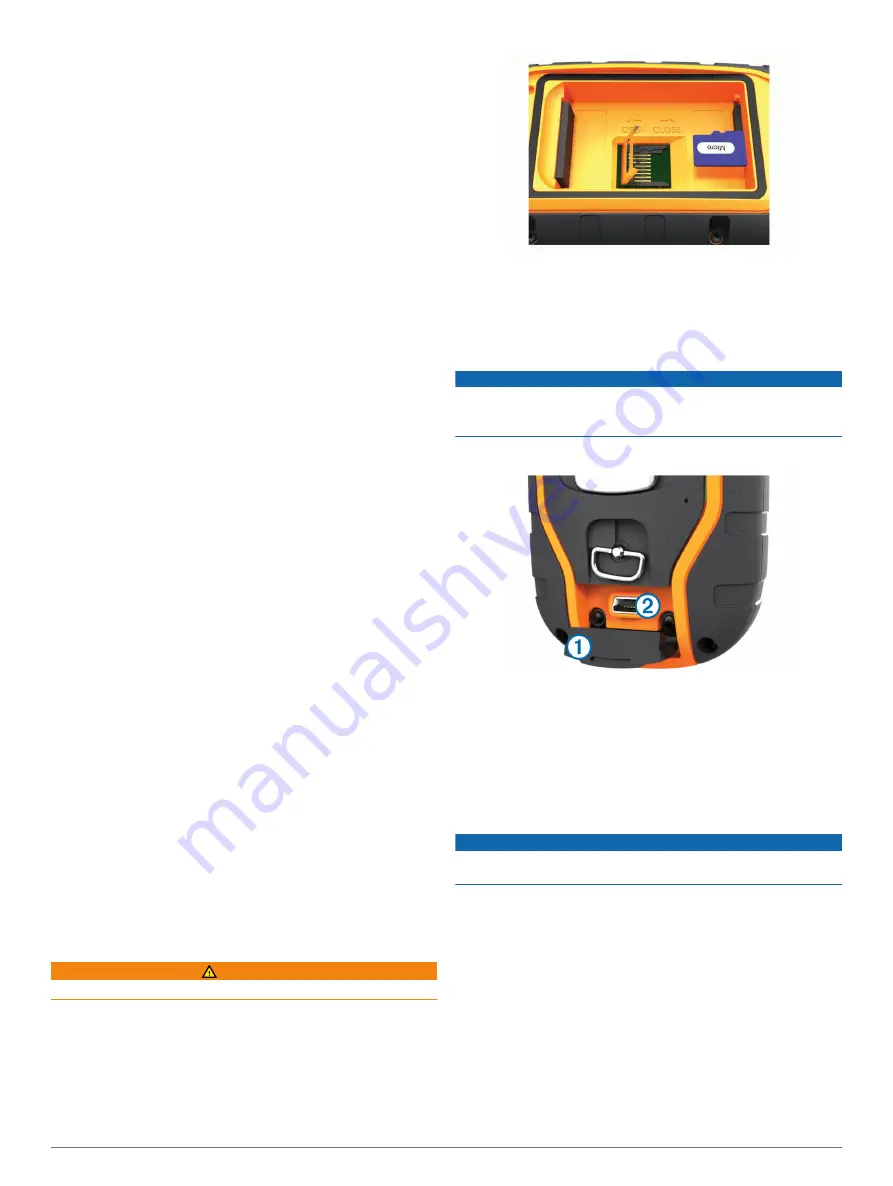
Installing a Memory Card
WARNING
Do not use a sharp object to remove user-replaceable batteries.
You can install a microSD memory card in the handheld device
for additional storage or pre-loaded maps.
1
Turn the D-ring counter-clockwise, and pull up to remove the
cover.
2
Remove the battery.
3
Slide the card holder to the left and lift up.
4
Place the memory card with the gold contacts facing down.
5
Close the card holder.
6
Slide the card holder to the right to lock it.
7
Replace the battery and cover.
Connecting the Handheld Device to a Computer
NOTICE
To prevent corrosion, thoroughly dry the USB port, the weather
cap, and the surrounding area before charging or connecting to
a computer.
1
Lift the weather cap
À
.
2
Plug the small end of the USB cable into the mini-USB
connector
Á
on the device.
3
Plug the other end of the USB cable into an available USB
port on the computer.
Your device and memory card (optional) appear as
removable drives in My Computer on Windows computers
and as mounted volumes on Mac computers.
Connecting the Collar to a Computer
NOTICE
To prevent corrosion, you should dry the contacts on the collar
and the surrounding area before connecting the charging clip.
You can connect the collar to your computer to use with
programs like BaseCamp. The collar is not a mass storage
device.
1
Snap the charging clip onto the collar.
2
Plug the small end of the USB cable into the mini-USB port
on the charging clip cable.
3
Plug the other end of the USB cable into a USB port on the
computer.
Transferring Dog Tracks to BaseCamp
You can transfer the dog tracks to BaseCamp.
1
Connect the collar to the computer (
).
The collar turns on automatically.
Device Information
15


