background image

21

www.gd-elmorietschle.com

 © Gardner Denver Schopfheim GmbH, Gardner Denver Deutschland GmbH


|

Z

Y

X

O

1

W

Maintenance and repair

s

d

G

1

b

c

Changing blades:

If the minimum height or the minimum thickness has 
already been reached or if the blades have fallen 
below these levels the whole blade set must be 
changed.

NOTICE

Do not undo the 

slotted nuts 

(Fig. 4/w

1

) on the 

housing lid (Fig.  5/b). Only the screws (Fig.  4/s) need 
to be removed to change the blades.

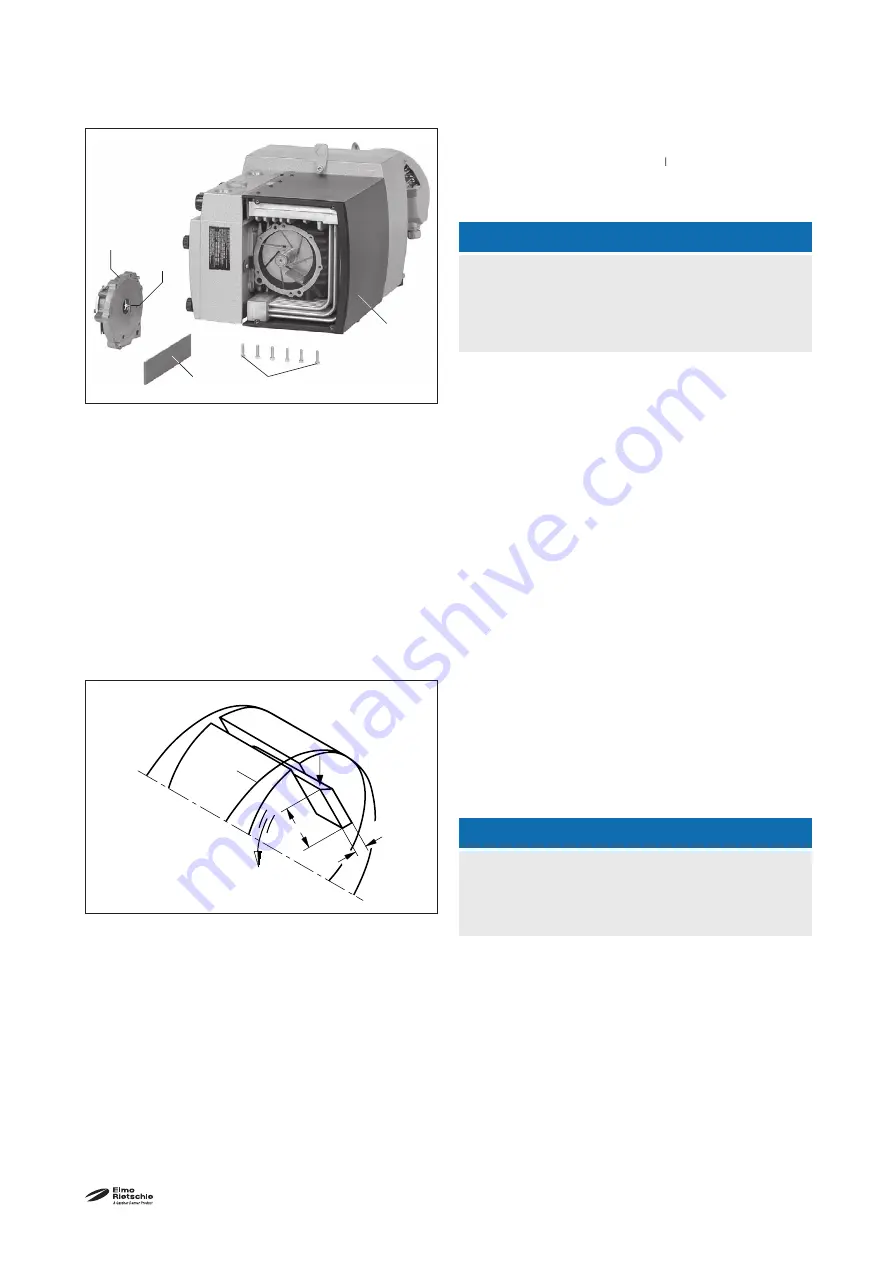
Blow out the housing and rotor slot. Insert the 
blades into the rotor slot. BWhen doing this you 
must ensure that the blades with the sloping side 
(Fig. 6/Y) point outwards and the direction of rota-
tion of these sloping sides (Fig. 6/O1) matches that 
of the drilled holes for the housing (Fig. 6/Z).
Before putting the housing cover (Fig. 5/ b) back 
onto the shaft end the excess grease in the grease 
store (Fig. 5/c) of the B bearing must be completely 
removed from the bearing cage. Also grease residue 
should be wiped off the end of the shaft and where 
the shaft passes through the housing lid. Otherwise 
this grease would get into the compressor housing 
and would mix with the blade wear debris to form 
a paste-like coating that could cause the blades to 
jam in the rotor slots.
When screwing the housing lid on the grease-free 
screws should be tightened alternately and evenly 
so that the lid does not get jammed on the locating 
pins. As soon as the lid is almost resting on the front 
of the housing, it is advisable to turn the fan to and 
fro (using a screw driver or similar) while you fi nish 
screwing in the screws. This will prevent the corners 
of the blades getting jammed and breaking away. 
Screw in the inlet grating (Fig. 4/G)

NOTICE

Ensure that no dirt gets into the bearing. At each 
blade change check the grease reservoir (Fig. 5/c) 
on the B bearing and top up if necessary.

Fig. 6  Blades

O

1


Direction of rotation

Minimum thickness

Minimum heigh

Slanting side of the blade

Drilled holes in the housing

Fig. 5   Lubrication/ Blades

G

1


Protective cover

b


Housing lid

c


Grease store

d


Blade

Screws

Summary of Contents for Elmo Rietschle V-KTR 100

Page 1: ...V V Serie V Series Drehschieber Rotary Vane Edition 1 12 2009 BA 461 EN Operating Instructions V KTR V KTR 100 140...

Page 2: ...notes for the operator 8 2 8 Safety instructions for installing commissioning and maintenance 9 2 9 Guarantee conditions 9 3 Transport storage and disposal 10 3 1 Transportation 10 3 1 1 Unpack and c...

Page 3: ...mbH Table of contents 7 Maintenance and repair 19 7 1 Ensuring operational safety 19 7 2 Maintenance work 19 7 2 1 Lubrication 20 7 2 2 Blades 20 7 2 3 Air ltering 22 7 2 4 Coupling 23 7 3 Repair Serv...

Page 4: ...uctions is technically trained specialists 1 3 Supplier documentation and accompanying documents Document Contents No Supplier documentation Operating Instructions BA 461 EN Declaration of Conformit C...

Page 5: ...combined use the machine may produce a vacuum and excess pres sure at the same time Rotary vane Machine s design or active principle Volume ow A pressure vacuum pump s suction air or compressed air O...

Page 6: ...tions for installation commissioning maintenance and inspection work which must be obeyed to en sure the safe operation of the machine and prevent physical and material damage The safety instructions...

Page 7: ...convey air with a relative humidity of 30 90 all non explosive non in ammable non ag gressive and non poisonous dry gases and gas air mixtures 2 4 Unacceptable operating modes extracting conveying and...

Page 8: ...stallation commissioning maintenance and inspection work Working with electricity personnel being trained to work on the ma chine must be supervised by technical special ists only 2 6 Safety conscious...

Page 9: ...ive devices again immediately after nishing work Vor Wie derinbetriebnahme die aufgef hrten Punkte f r die Inbetriebnahme beachten Conversion work or modi cations to the ma chine are only permissible...

Page 10: ...WARNING Death or limbs crushed as a result of the items being transported falling or tipping over When transporting with the lifting device remem ber a Select the lifting device suitable for the tota...

Page 11: ...uidelines Page 4 3 3 Disposal WARNING Danger from in ammable corrosive or poison ous substances Machines that come into contact with hazard ous substances must be decontaminated before disposal When d...

Page 12: ...up and operation 4 1 Setup Fig 2 Pressure vacuum pump V KTR 100 V KTR 140 A Vacuum connection B Pressure connection C Vacuum regulating valve D Pressure regulating valve E Cooling air inlet F Cooling...

Page 13: ...cuum pumps models V KTR 100 and V KTR 140 are suitable for creating pressure and vacuum at the same time Constant operation is permissible All models have nominal capacities of 100 and 140 m3 hr opera...

Page 14: ...Fig 2 F must be at least 30 cm away from adjacent walls Cooling air coming out must not be sucked in again or maintenance work there must be a minimum of 40 cm in front of the lter housing Fig 2 S an...

Page 15: ...cted correctly NOTICE Length of the connection pipes With connection pipes that have the same pipe cross section as the machine connection and are more than 3 m long a non return valve especially for...

Page 16: ...motor s terminal box not for the plug connec tion version Compare the motor data with the data of the existing mains network current type voltage network frequency permitted current value b Connect t...

Page 17: ...hen the machine is at operating temperature the surface temperatures on the components Fig 2 Q may go above 70 C You must avoid touching the hot surfaces marked with warning plates CAUTION Noise emiss...

Page 18: ...phase sequence indicator to check the direction of rotation anti clockwise rotating eld 6 2 Decommissioning storing Stop the machine a Switch the machine off b If available close the cut off device i...

Page 19: ...or installation com missioning and maintenance The whole unit should always be kept in a clean condition 7 2 Maintenance work Interval Maintenance to be carried out Section monthly Check the pipes and...

Page 20: ...5 c on the B bearing We recommend the following brands of grease Kl berPetamoGY193 or other equivalent greases see also grease recommendation plate Fig 4 M 7 2 2 Blades Blade check V KTR models have 7...

Page 21: ...o grease residue should be wiped off the end of the shaft and where the shaft passes through the housing lid Otherwise this grease would get into the compressor housing and would mix with the blade we...

Page 22: ...ers their separation ef ciency will continue to deteriorate Therefore the lters should be replaced every six months The lter cartridges Fig 7 e and Fig 7 f can be removed for cleaning after undoing th...

Page 23: ...n Undo the screws Fig 9 s5 on the motor ange Fig 9 n Remove the motor axially with the half of the coupling on the motor side Fig 5 q and sus pend with the lifting device If the sprocket Fig 9 k is da...

Page 24: ...s Please contact the manufacturer for the address of the service centre responsible for you see Manufac turer s address NOTICE For each machine that is sent to an Elmo Rietschle Servicecentreforinspec...

Page 25: ...ds Product Documents V Series Spare Parts Parts subject to wear and gaskets are indi cated separately on the list Web site http www service er de Select the type size and design NOTICE Only use origin...

Page 26: ...urrent at start up version with short circuit and overload trigger as per VDE 0660 Part 2 orIEC 947 4 The blow out lter cartridge accessory is dirty Clean or replace the lter cartridges Section 7 2 3...

Page 27: ...ob structed Check environmental condi tions Section 5 1 Clean ventilation slots Section 7 2 The blow out lter cartridge is dirty Clean or replace the lter cartridges Section 7 2 3 Section 7 4 The reg...

Page 28: ...Length mm 964 964 Width mm 406 406 Height mm 369 369 Vacuum connection G 11 4 G 11 4 Pressure connection G 11 4 G 11 4 Die L nge sowie das Gewicht k nnen je nach Motorfabrikat von den hier aufgef hrt...

Page 29: ......

Page 30: ...Denver s Industrial Products Division and part of Blower Operations www gd elmorietschle com er de gardnerdenver com Gardner Denver Schopfheim GmbH Roggenbachstra e 58 79650 Schopfheim Deutschland Te...

Page 31: ...in voltage limits codified version The following harmonized and national standards and specifications are applied EN 1012 1 1996 Compressors and vacuum pumps Safety requirements Part 1 Compressors EN...

Page 32: ...ance or process related dangerous reaction products with which the vacuum pumps components came into contact Trade name manufacturer s Chemical Hazard Action to be taken if toxic First aid in the even...

Reviews: