background image

7

AFTER SALES SUPPORT:

[email protected]

MODEL: 

SPS01-26TRB2

1300-720-985

AUS

04/2017

PRODUCT CODE: 40510

Make sure that fuel containers are stored in a place where 

they will not be accessible to children.

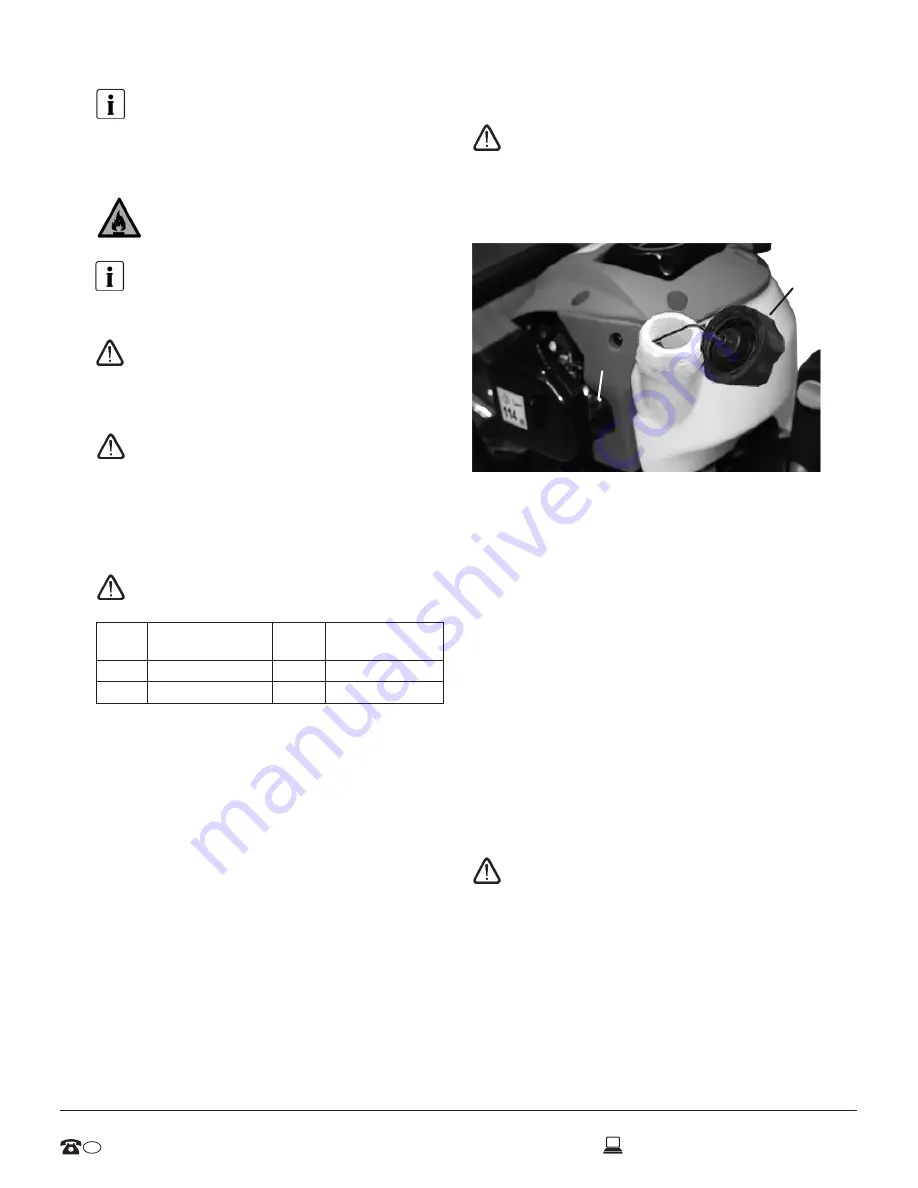
Filling up the hedge trimmer

• Switch off the motor and allow the tool to cool 

down!

•  Wear protective gloves!
•  Avoid contact with the skin or eyes (wear safety 

glasses) !

•  Pay strict attention to the section “Handling fuel“.

10

23

1.  Only fill up the hedge trimmer outdoors or in areas  with 

adequate ventilation.

2.  Clean the area to be used for filling. Dirt in the tank  leads 

to malfunctions.

3.  Shake the container holding the fuel mixture again be-

fore using it for filling.

4.  Take care when opening the cap (10), so that any excess 

pressure can be dissipated.

5.  Pour in the mixture carefully, until it reaches the bottom 

edge of the filler neck.

6.  Close the petrol cap again.
7.  Make sure that the petrol cap is leak-tight.
8.  Clean the petrol cap and the surroundings.
9.  Pay attention to any leaks from the tank or fuel lines.
10.  If necessary, operate the primer pump (23).
11.  Before starting the motor, move to a reasonable distance 

from the area used for filling. 

OPERATION

The tool may not be put into operation before you 

have read these operating instructions, followed 

all the instructions given, and the tool has been 

fully and properly assembled!

•  Only start the hedge trimmer when it has been fully as-

sembled.

•  Support the hedge trimmer during startup and hold it se-

curely. Make sure that the cutter is unobstructed.

Starting the hedge trimmer

1.  Maintain a safe distance from combustible materials.
2.  Ensure you have a firm footing.

BEFORE FIRST USE

The hedge trimmer is supplied without fuel mixture.

Fill up the tool as described under "FUEL AND OIL 

MIXTURE".

FUEL AND OIL MIXTURE

When handling petrol, increased attention is 

called for. Avoid smoking and naked flame.

For best results use regular unleaded petrol mixed 

with 2-stroke air-cooled engine oil on a ratio of 40:1 

(25 mL oil per litre of petrol). The supplied fuel mixing 

bottle can also be used to accurately mix the fuel. 

WARNING: Never use unmixed petrol in your en-

gine. This will cause permanent damage and void 

the manufacturer’s warranty for the product. Never 

use a fuel mixture that has been stored for more 

than 30 days. 

WARNING: 2-stroke lubricant must be premium 

grade oil for 2-stroke air-cooled engines mixed at a 

40:1 ratio. Do not use any 2-stroke oil product with 

a recommended mix ratio of 100:1. If insufficient 

lubrication is the cause of engine damage, it voids 

the manufacturer’s engine warranty.

Mixing

WARNING: Lack of lubrication voids engine war-

ranty. Petrol and oil must be mixed at a 40:1 ratio. 

Petrol Two-stroke engine 

oil (40:1)

Petrol Two-stroke engi-

ne oil (40:1)

1 L

 25 mL

  5 L

 125 mL

2 L

 50 mL

10 L

 250 mL

•  Make sure that you measure the amount of oil precisely, 

as a slight difference in a small quantity of oil can have a 

significant impact on the mixing ratio.

•  Do not alter the mixing ratio, as this will produce more 

residue from combustion, increase fuel consumption, and 

reduce performance, or the motor may be damaged.

Mix the petrol and the oil in a clean container which is ap-

proved and labelled for fuel, and which is equipped with an 

overflow protection device.

1.  First pour in half of the petrol required for the mixture.
2.  Then add the full amount of the oil.
3.  Shake up the mixture.
4.  Then pour in the rest of the petrol.
Fuel can only be kept for a limited period, as it ages. Fuel and 

fuel mixtures which have been stored for too long can cause 

problems when starting the tool. You should therefore only 

mix an amount of fuel which you can use up in a month.
Fuels may only be stored in containers which are approved 

and labelled for this purpose, in a dry and safe place.

Summary of Contents for SPS01-26TRB2

Page 1: ...line product you can rest assured in the knowledge that as well as your 1 year parts and labour guarantee you have the added peace of mind of dedicated helplines and web support 73710968 03 CONTENTS 1...

Page 2: ......

Page 3: ...e your call please have the following information at hand GARDENLINE Petrol Hedge Trimmer 40510 A service engineer will take your call and in most cases will be able to solve your problem over the pho...

Page 4: ...t 8 Stopping the motor 8 Warm start 8 Throttle trigger 8 SETTINGS ON THE HEDGE TRIMMER 8 Adjusting the rear hand grip 8 METHOD OF OPERATION 9 Rules of conduct for using the hedge trimmer 9 WORKING WIT...

Page 5: ...tart and operation The distance between the machine and bystanders must be at least 5 m Watch out for objects being ejected at high speed SYMBOLS ON THE TOOL WARNING INFORMATION SYMBOLS IN THE OPERATI...

Page 6: ...from all liability for any resulting damage The tool may only be adjusted used and maintained by persons who are familiar with how to do so and who are informed of the associated risks Repair work may...

Page 7: ...here is good lighting Do not use the hedge trimmer in the vicinity of combustible liquids or gasses You may not be able to hear potential dangers due to the noise from the motor You should therefore f...

Page 8: ...acturer or by a specialist workshop nominated by the manufacturer Only use original spare parts Using other spare parts or accessories can cause hazards to the user The manufacturer shall not be held...

Page 9: ...sticker 11 Starter handle 20 Air filter cover 3 ON OFF switch 12 Pull starter 21 Start lever choke 4 Rear hand grip 13 Front hand grip 22 Air filter 5 Hand grip lock 14 Hand guard 23 Primer pump 6 Th...

Page 10: ...RE When handling petrol increased attention is called for Avoid smoking and naked flame For best results use regular unleaded petrol mixed with 2 stroke air cooled engine oil on a ratio of 40 1 25 mL...

Page 11: ...th your left hand 2 Slide the lock 5 down 3 Lay the hedge trimmer on the ground in front of you with the cutter facing away from you 4 Place the end of your right foot into the rear hand grip 5 Hold t...

Page 12: ...hedge trimmer with both hands at a safe distance from the body The maximum cutting diameter is dependent upon the type of wood its age and the dampness and hardness of the wood 3 Rotate the hand grip...

Page 13: ...en damage or represent a risk to the user Maintenance Wear gloves in order to avoid injuries In order to ensure long and reliable use of the hedge trim mer perform the following maintenance tasks on a...

Page 14: ...laced before starting work Cleaning or replacing the petrol filter Check the petrol filter 9 as necessary A dirty petrol filter hinders the supply of fuel Open the petrol cap 10 and pull the petrol fi...

Page 15: ...et the idling speed As necessary Tighten the screws on the silencer As necessary Clean or replace the petrol filter As necessary Clean or replace the air filter Every 8 operating hours more often in d...

Page 16: ...or runs but cutter remains stationary Cutter jammed Internal fault Clutch defective Remove object Contact the manufacturer or a recom mended customer service centre Contact the manufacturer or a recom...

Page 17: ...ONMENTAL PROTECTION Should your tool become unserviceable or if you no longer require it do not dispose of it under any circumstances in your normal household waste but rather in an environmen tally f...

Page 18: ......

Page 19: ......

Page 20: ...ase return it to your nearest ALDI store within 60 days from the date of purchase for a full refund or replacement or take advantage of our after sales support by calling the supplier s Customer Servi...

Reviews: