


13
G
12
G
Information
Water jets for
26,5 mm (G 3 /4
) thread
connections
Pond aeration
Filling the filter tank
with zeolith
Applications:
Examples – System Extensions – Product Recommendations
➔
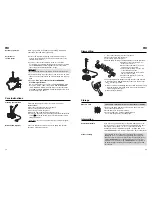
Example for application:
Water jets may be integrated into water features.
Model
Cascade
Water
Foaming
Water
Water-
Cascade
Bell
Jet Spray Fleur-de-Lis
fall
Rotating
Art.
7814 *
7816
7818
7820
7822
7823
No.
WP 700 S
7851
××
××
–
–
××
××
WP 1500 S
7857
××
××
××
–
××
××
* contained in delivery volume
➔
Example for application:
To aerate the pond.
➔
Product :
GARDENA Pond Aerator
Art. No. 7936
Zeolith fulfils the following functions:
.
Filters the water (
➔
protection for the pump).
.
Bonds with excessive nutrients and causes their decomposition
by bacteria (
➔
Ion exchange and the bonding of e.g. nitrate).
.
Helps to keep the pond clean and maintain the biological
balance.
.
Provides stability for the pump
GARDENA Zeolith, 1 l
Art. No. 7914
GARDENA Zeolith, 5 l
Art. No. 7915
Note :
To ensure the zeolith functions correctly, we recommend you
replace or clean it every 6 months (e.g. in salt water).
.
Always unplug the pump first before working on it.
.
Before assembling system extensions first unscrew the pre-
assembled cascade and if necessary also the telescopic tube
of the pump and then screw one of the water jets on again
(
➔
the ball-and-socket joint ensures that the water jet is ver-
tical.)
.
Follow the Safety and Assembly Information attached to the
operating instructions.
Operation
1. Remove the pump from the filter basket and screw the regulator
supplied onto the second opening of the pump up to the limit
stop (
➔
max. delivery capacity on the vertical outlet). Then
replace the pump in the filter basket.
2. Put the pump on a stable base to ensure that the upper edge of
the filter tank is completely immersed in water.
Please note the maximum submersion depth (see “Technical Data”).
Insert both aluminium poles
1
into the holes in the side sections
2
. Place one of the O-rings
3
on each of the swivel pins
4
of the
solar panel
5
then screw both side sections to the solar panel.
Important :
when tightening the screws, ensure that you do not
screw them too tight to ensure that the solar panel can still be
easily adjusted.
Position the solar panel in such a way that it will be exposed
to direct sunlight. No shadow should be cast on it.
The ideal positioning angle is 30° from the vertical.
A
The solar panel must not be positioned near easily flammable
substances.
After adjusting tighten the screws firmly.
.
The solar panel can be permanently installed in an outdoor area.
For this purpose you should attach the appliance to a wall, e.g.
with wooden bolts.
.
For permanent installation of the appliance you should ensure
that it is exposed to maximum solar radiation.
.
The special glazing of the solar panel ensures complete protec-
tion against hailstones and other adverse weather conditions.
Connect the power cable of the pump to the socket of the solar
panel.
The pump will start as soon as enough energy has been
generated from solar radiation in the solar panel.
Installing the pump
Caution : Submersion depth
Assembling the solar panel
Positioning the solar panel
Permanent installation
of the solar panel
Starting the pump
1
2
3
3
4
4


