


EN
9
Cables
If extension cables are used, these must comply with the minimum cross-
sections in the table below:
Voltage
Cable length
Cross section
230 – 240 V / 50 Hz
Up to 20 m
1.5 mm
2
230 – 240 V / 50 Hz
20 – 50 m
2.5 mm
2
DANGER! Electric shock!
With a cut off mains plug, moisture can get into electrical parts via the
mains cable and cause a short circuit.
v
Never cut the mains plug off (e. g. to feed through wall).
v
Don’t use the power cable for plugging off.
v
If the supply cord is damaged, it must be replaced by the manufacturer, its
service agent or similarly qualified persons in order to avoid a hazard.
Mains plug and extension connections must be protected from water splashes.
Ensure that the electrical connections for plugs and sockets are made in areas
safe from flooding.
Protect the mains plug and the mains power cable from heat, oil and sharp
edges.
Observe the mains voltage. The information on the nameplate must be in agree-
ment with the data for the mains power grid.
The pump’s mains plug must be disconnected before anybody enters the swim-
ming pool or touching the surface of the water.
The mains power cable must not be used for fastening or transporting the pump.
For submerging or lifting / securing the pump, please use a fastening rope. Do not
use the power cable to lift the pump.
Please regularly check the connecting line.
Before using, always subject the pump (especially the power cables and the
power connections) to a visual inspection.
A pump which is damaged should not be used. In the event of damage, have the
pump checked by GARDENA Service.
Assembly instructions: Retighten all screws by hand.
Before use after maintenance, make sure that all parts are screwed together.
When using our pumps with a generator, the warnings of the generator manu-
facturer must be observed.
Personal safety
DANGER! Risk of suffocation!
Small parts can be easily swallowed. There is also a risk that the poly-
bag can suffocate toddlers. Keep toddlers away when you assemble the
product.
Please be sure not to use the clear water function to pump dirty water. It can lead
to blockage and overheating of the pump.
Observe the minimum water level in accordance with the characteristics given for
the pump.
Allow the pump to run no longer than 10 minutes against a closed pressure side.
Sand and other abrasive substances cause increased wear and reduce the
pump’s output.
The float switch may only be operated outside the water.
The hose must not be disconnected during operation.
Allow the pump to cool down before troubleshooting.
2. ASSEMBLY
DANGER! Risk of physical injury!
Injury when the product starts accidentally.
v
Disconnect the product from the mains before you assemble
the product.
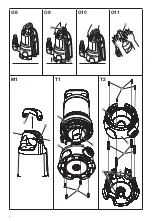
To remove the handle lock [ Fig. A6 ]:
The handle lock
(C)
must be removed before the product is used for the
first time.
1. Pull the attached handle locks
(C)
outwards.
2. Keep them for later securing procedures (e. g. transport or storage).
Connection possibilities of the connection nipple [ Fig. A1 ]:
The hose can be connected via the connection nipple
(4)
with different
hose diameters or the GARDENA Connection System.
Large hose diameter
Cut off nipple at
(a)
[ Fig. A2 ]
GARDENA Connection System
Cut off nipple at
(b)
[ Fig. A3 ]
Small hose diameter
Do not cut off nipple [ Fig. A4 ]
When using the largest hose diameter, the pump has the maximum
delivery capacity.
Pump
Art. 9048
Small hose diameter
Art. GARDENA Hose Clamp
25 mm (1")
Art. 7193
Medium hose diameter
Art. GARDENA Hose Clamp
GARDENA Connection System G 1"
* 32 mm (1 1/4")
Art. 7194
Large hose diameter
Art. GARDENA Hose Clamp
38 mm (1 1/2")
Art. 7195
When using the 38 mm (1 1/2") hose, we recommend the GARDENA Flat
Hose Set Art. 5005 with 10 m hose and hose clamp.
* There is an additional connection nipple
ß
4a
for 1 1/4" hoses is supplied.
To connect the hose via the connection nipple:
1. When using the large diameter hose, cut off the connection nipple
(4)
at
(a)
.
2. Push the hose onto the connection nipple
(4)
.
3. Fix the hose to the connection nipple
(4)
e. g. with a GARDENA Hose
Clamp.
Connect hose via the GARDENA Connection System:
19 mm (3/4") / 15 mm (5/8") and 13 mm (1/2") hoses can be connected
via the GARDENA Connection System.
We do not recommend hose diameters smaller than 25 mm (1"), otherwise
there will be a significant reduction in the output of the delivery rate.
Hose diameter
Pump connection
13 mm (1/2")
GARDENA Pump Connection Set
Art. 1750
15 mm (5/8")
GARDENA Pump Connection Set
Art. 1750
19 mm (3/4")
GARDENA Pump Connection Set
Art. 1752
1. Cut off the connection nipple
(4)
at
(b)
.
2. Connect the hose to the connection nipple
(4)
via the appropriate
GARDENA Connection System.
To assemble the pump connection [ Fig. A5 ]:
DANGER! Risk of physical injury!
Cut injury by the impeller.
v
Operate the pump only with the elbow connector.
The hose can be easily connected and disconnected using the locking
devices
(2)
on the elbow connector
(1)
.
1. Screw the elbow connector
(1)
clockwise into the pump until it stops.
(If the hose is to be installed horizontally, the elbow connector
(1)
can be
screwed out again up to half a turn.)
2. Screw the connection piece
(3)
into the connection nipple
(4)
.
3. Push the connection nipple
(4)
of the hose into the elbow connector
(1)
until it stops and it engages audibly and visibly.
The hose is securely connected to the pump.
3. OPERATION
DANGER! Risk of physical injury!
Injury when the product starts accidentally.
v
Disconnect the product from the mains before you connect,
adjust or transport the product.
To pump water:
If the pump cannot be immersed via the handle, the pump must always
be immersed via a rope
ß
R
[ Fig. O1 ].
Attach the rope
ß
R
by tying it to the handle. The button
(6)
must not
be depressed. Minimum immersion depth during initial operation
see 7. TECHNICAL DATA.
Take care that the pump is located where the inlet openings at the suction
base are not obstructed neither completely nor partly.
Stand the pump on a brick if using in a pond.
If the suction process is close to the minimum water level at start-up,
the suction process may take longer.
1. Immerse the pump.
2. Connect the pump to the mains.
Attention! The pump can start immediately depending on the float
switch setting.


