background image

5

A

B

X  4

X  4

X  4

X  4

C

D

D

A

C

A

A

AA

AA

B

B

AA

C

A

1

1

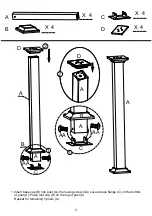
1. Insert base cap (B) into post (A), then using screw (AA) secure base flange (C) on the bottom

    of post (A). Place roof cap (D) on the top of post (A).

    Repeat for remaining 3 posts (A).

A

2

D

2

Summary of Contents for 749241313141

Page 1: ...1 Steel Pergola With Open Roof Date of purchase _____ _____ _____ Product Code D71 M23737 KSN Code 04733844 7 UPC Code 749241313141 ...

Page 2: ...t at least 5 ft during assembly CAUTION Do not leave outside during high winds heavy rains or snow Do not attach gazebo to wood or concrete deck or patio WARRANTY 1 year limited warranty Limited warranty applicable on parts only Warranty extends solely to the original purchaser who must offer the original sales receipt for record EXCLUDED Damages due to vandalism abuse and wrong use of the product...

Page 3: ...3 J J I A D E G H F J J J J J F E I I I I I I A A A C B K ...

Page 4: ...4 16 1 Description Item A B C D E F G H I J K AA BB CC DD Post Base cap Flange base Roof cap Long crossbar Short crossbar Connector 1 Connector 2 Long roof tube Short roof tube Stake Short screw M6 x 15mm Medium screw M6 x 40mm Long screw M6 x 95mm Hex wrench ...

Page 5: ...X 4 X 4 C D D A C A A AA AA B B AA C A 1 1 1 Insert base cap B into post A then using screw AA secure base flange C on the bottom of post A Place roof cap D on the top of post A Repeat for remaining 3 posts A A 2 D 2 ...

Page 6: ... E G E 1 1 1 Slide long crossbar E into connector 1 G halfway then insert another long crossbar E into the other side of connector 1 G then secure them by using 4 short screws AA as figure shown Repeat for the rest 2 long crossbars E ...

Page 7: ...H F F H 1 1 1 Slide short crossbar F into connector 2 H halfway then insert another short crossbar F into the other side of connector 2 H then secure them by using 4 short screws AA as figure shown Repeat for the rest 2 short crossbars F ...

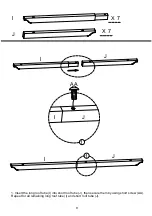
Page 8: ...8 J X 7 X 7 I J AA I J I J 1 1 1 Insert the long roof tube I into short roof tube J then secure them by using short screw AA Repeat for all remaining long roof tube I and short roof tube J I ...

Page 9: ...E E D D D D 1 1 1 1 A A A A CC E D A 1 Place the assembled long crossbar set E over the post A then secure long crossbar set E through roof cap D onto post A by using long screw CC as figure shown Repeat for remaining long crossbar set E CC ...

Page 10: ...e assembled short crossbar set F over the long crossbar set E then secure short crossbar set F through long crossbar set E and roof cap D onto the post A by using long screw CC as shown Repeat for remaining short crossbar set F You need 3 persons for this step ...

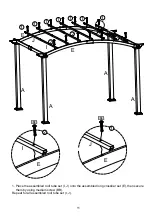
Page 11: ... the assembled roof tube set I J onto the assembled long crossbar set E then secure them by using medium screw BB Repeat for all assembled roof tube set I J E J I E A A A A 1 1 2 2 2 2 1 1 1 1 1 2 BB I E 1 BB J E ...

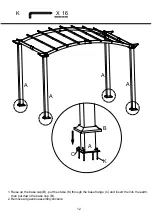
Page 12: ...12 K X 16 A A A A B C A K 1 Raise up the base cap B put the stake K through the base flange C and insert the into the earth then put down the base cap B 2 Remove all gazebo assembly stickers ...

Page 13: ...for maximum protection See our extensive assortment of outdoor living products on line at www sears com and www kmart com Made in Hecho en CHINA Distributed by Sears Roebuck and Co Hoffman Estates IL 60179 sears com For questions or comments about product Email customerservice bondvast com or Call toll free 1 800 961 9838 Please refer to part numbers when reordering ...

Reviews: